Debuted a couple of summers back, we’d already wrote up the details of the Sahmurai SWORD tubeless tire repair kit that slides into your handlebar. But after demoing it last year at Eurobike, I decided to pop a set into my gravel/road bike. Since it has saved two different cyclists riding with me that punctured, but where sealant wasn’t enough of a fix, with the Sahmurai getting us back on the bike quickly
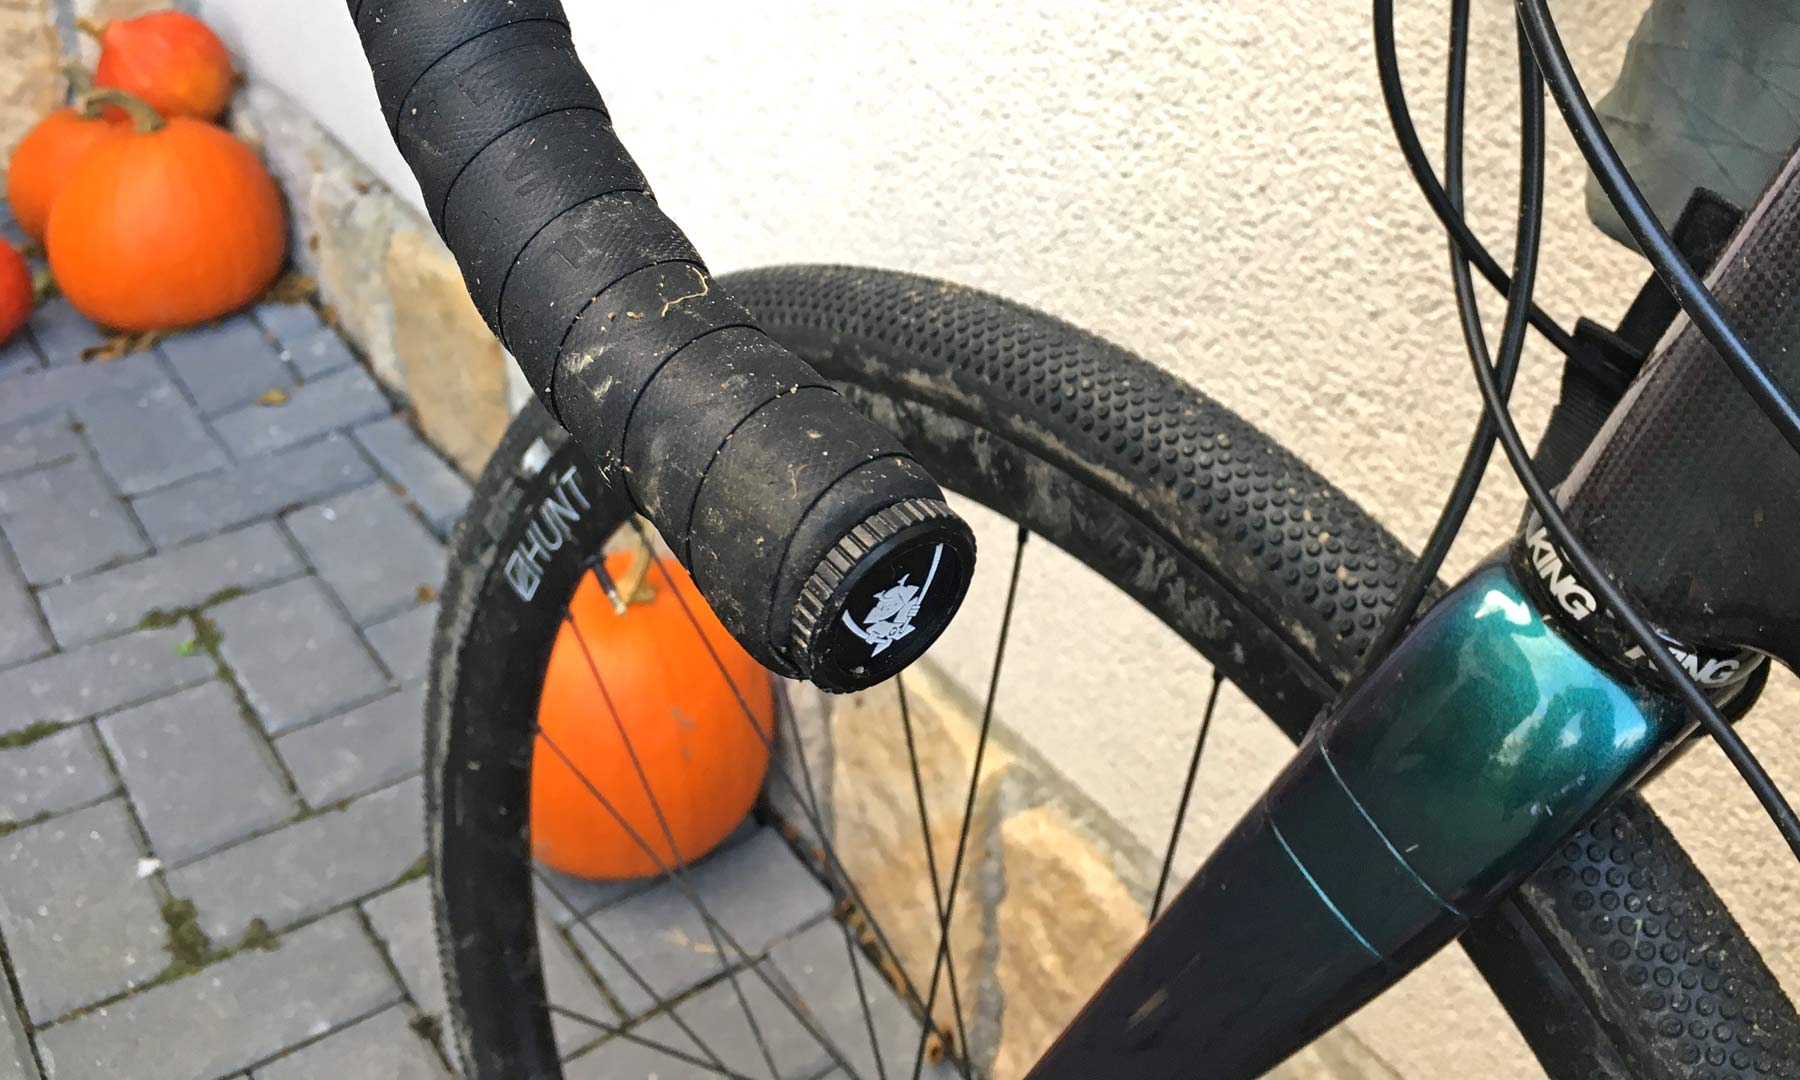
Sahmurai Sword bar end tubeless tire plugs
What do you do when you are running tubeless tires and you get a puncture larger than what the sealant can fix? Normally, that means you have to pop the tire off on the side of the road or trail, maybe boot the tire, and stick a regular tube inside. It also usually means getting covered in whatever sealant you may have inside.
It’s not the end of the world, but it results in losing all of your tubeless benefits – no more self-sealing, care-free lower tire pressures, lower rolling resistance, improved grip, more comfort, and lower rotational weight. But there is a better way…
Enter the tubeless repair tire plug. The concept is certainly nothing new, having been used in auto/moto tubeless tires for generations. Even on the bike, it has been a real option with products available for probably more than a decade. I’ve used a couple of options over the years, but previously with mixed success.
But what the Sahmurai SWORD (that actually is an acronym for Super Wicked Original Repair Device) does differently is that it packs together a well-designed tubeless tire repair kit and sticks it safely into the unused space of your bar end. And the system itself actually works really well, as long as you are careful and know what you are doing.
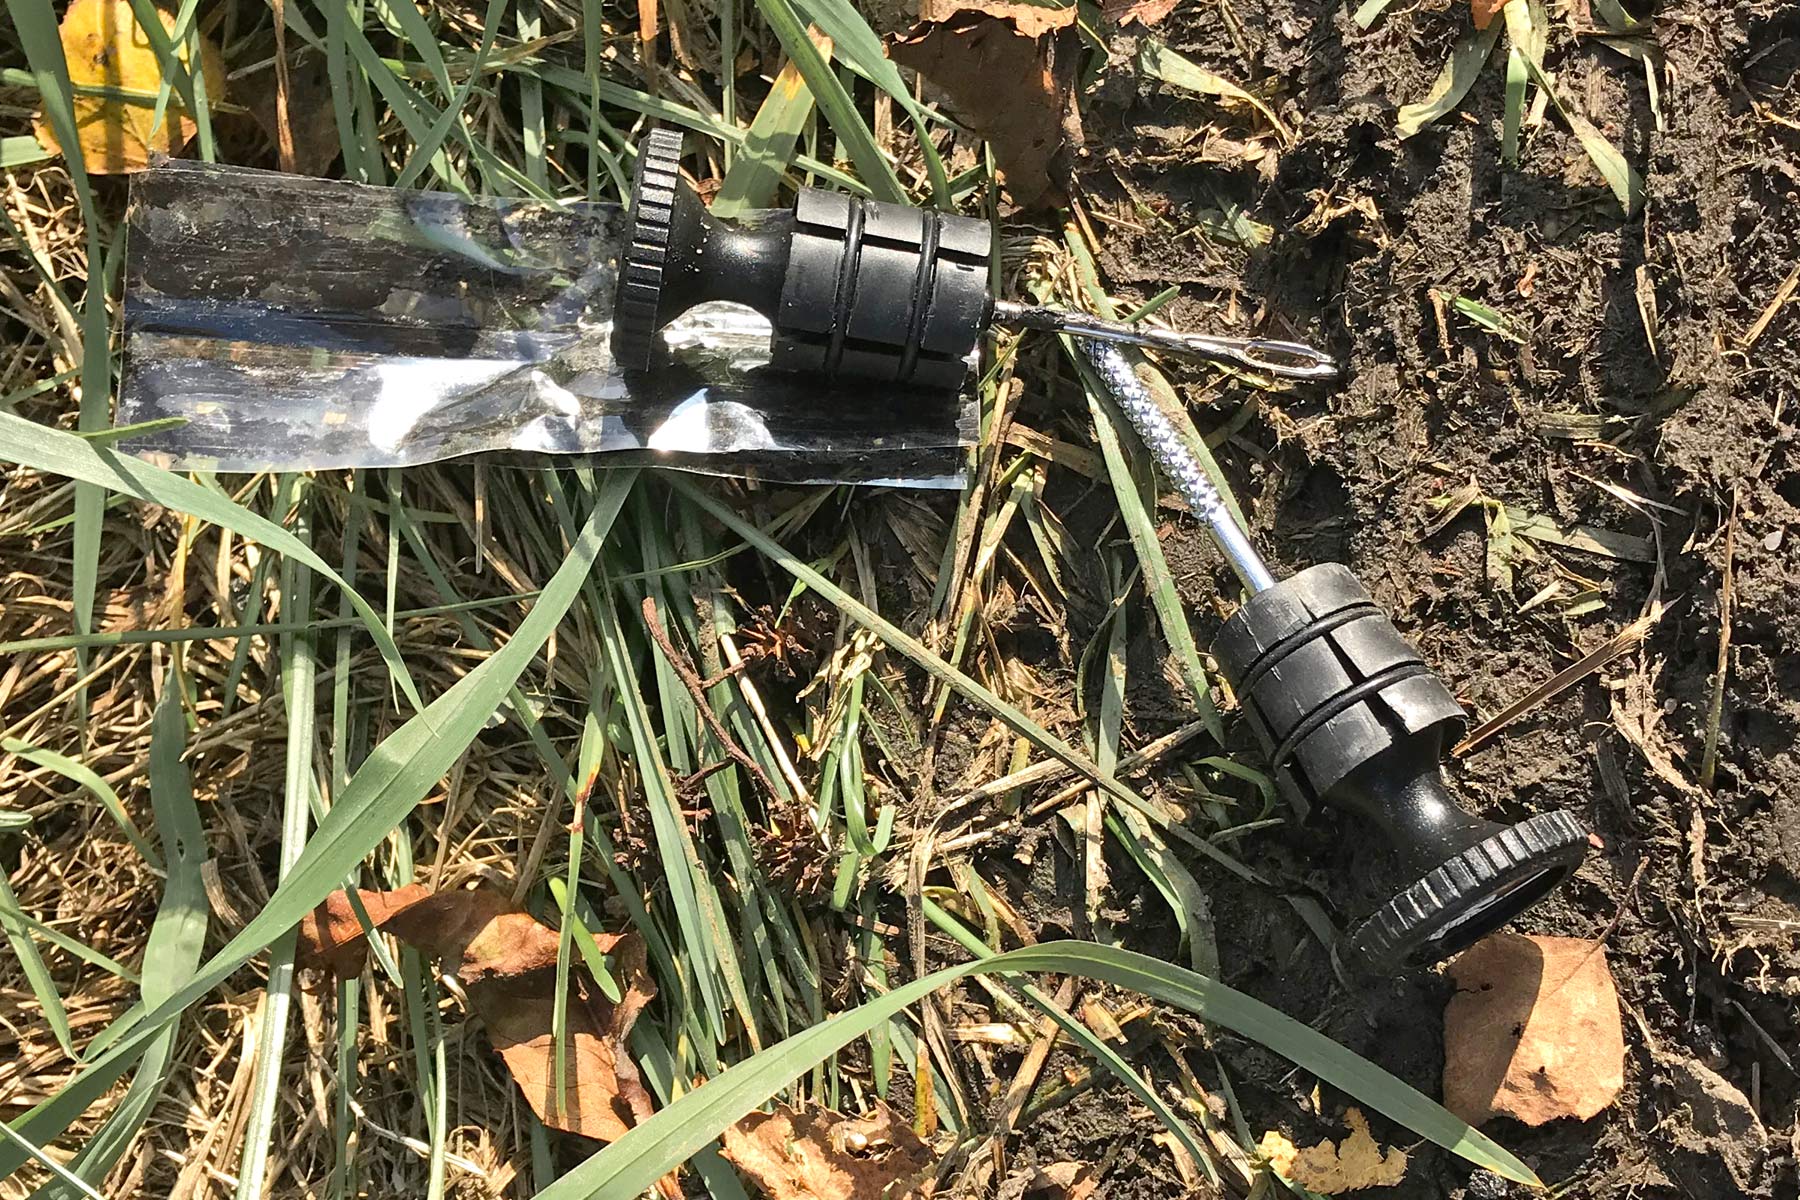
The setup includes three pieces: a set of five sticky tire plugs sandwiched in plastic (left), a plug insertion fork Sword (middle) that goes in one bar end, and the pointy reamer Sword that goes in the other bar end (right). The fork is essentially a big, open-ended needle, and you can slot the plugs in plastic into its tip to store them in the bar too.
How to repair a tubeless tire with the Sahmurai Sword
The first thing to know about a tubeless tire fix kit is to be able to identify the type of puncture it can repair. This is generally well suited to the kind of large puncture you’ll get from a chunk of sharp rock, a piece of glass, or some metal debris like a nail hiding in your path. Smaller punctures will likely automatically get fixed by your tubeless sealant. This is for the next step. Sahmurai recommends that plugs for a hole 3-5mm as that corresponds to the size of their reamer & plugs. But in reality, you can often seal something larger with two plugs pressed together. Both repairs I mentioned fell into the 3-5mm range.
(Step 0 should probably be threading the needle. Read on to see what I mean.)
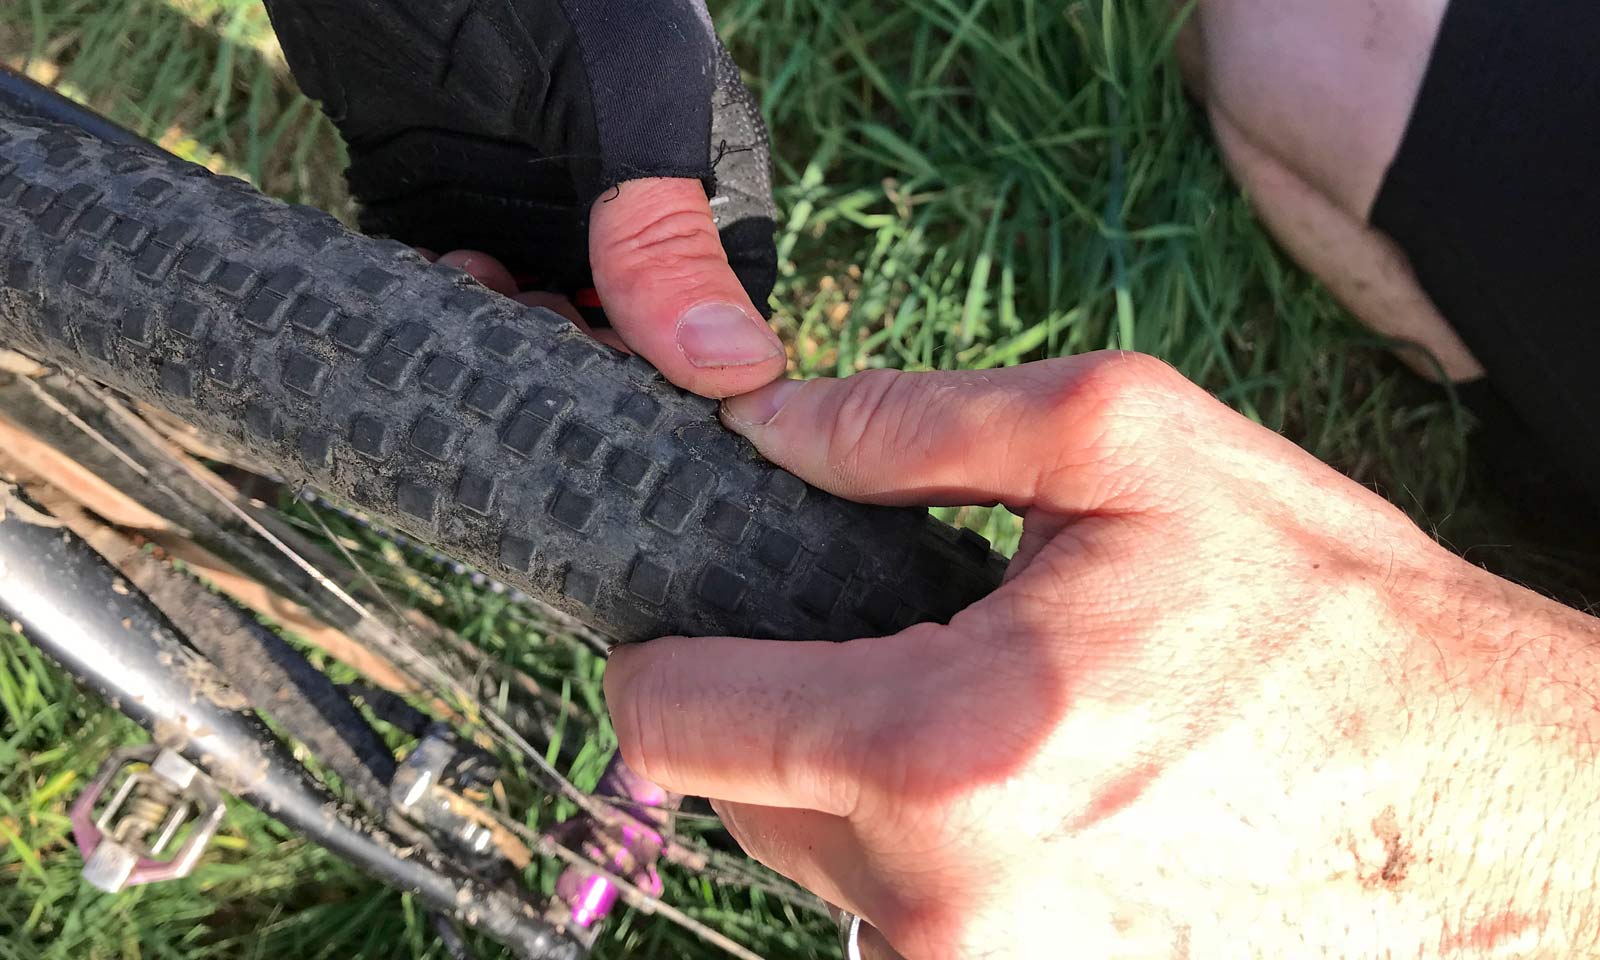
Step 1, pump up your tire to identify the hole and give the tire its shape and structure. Holding a finger over the hole helps keep air inside.
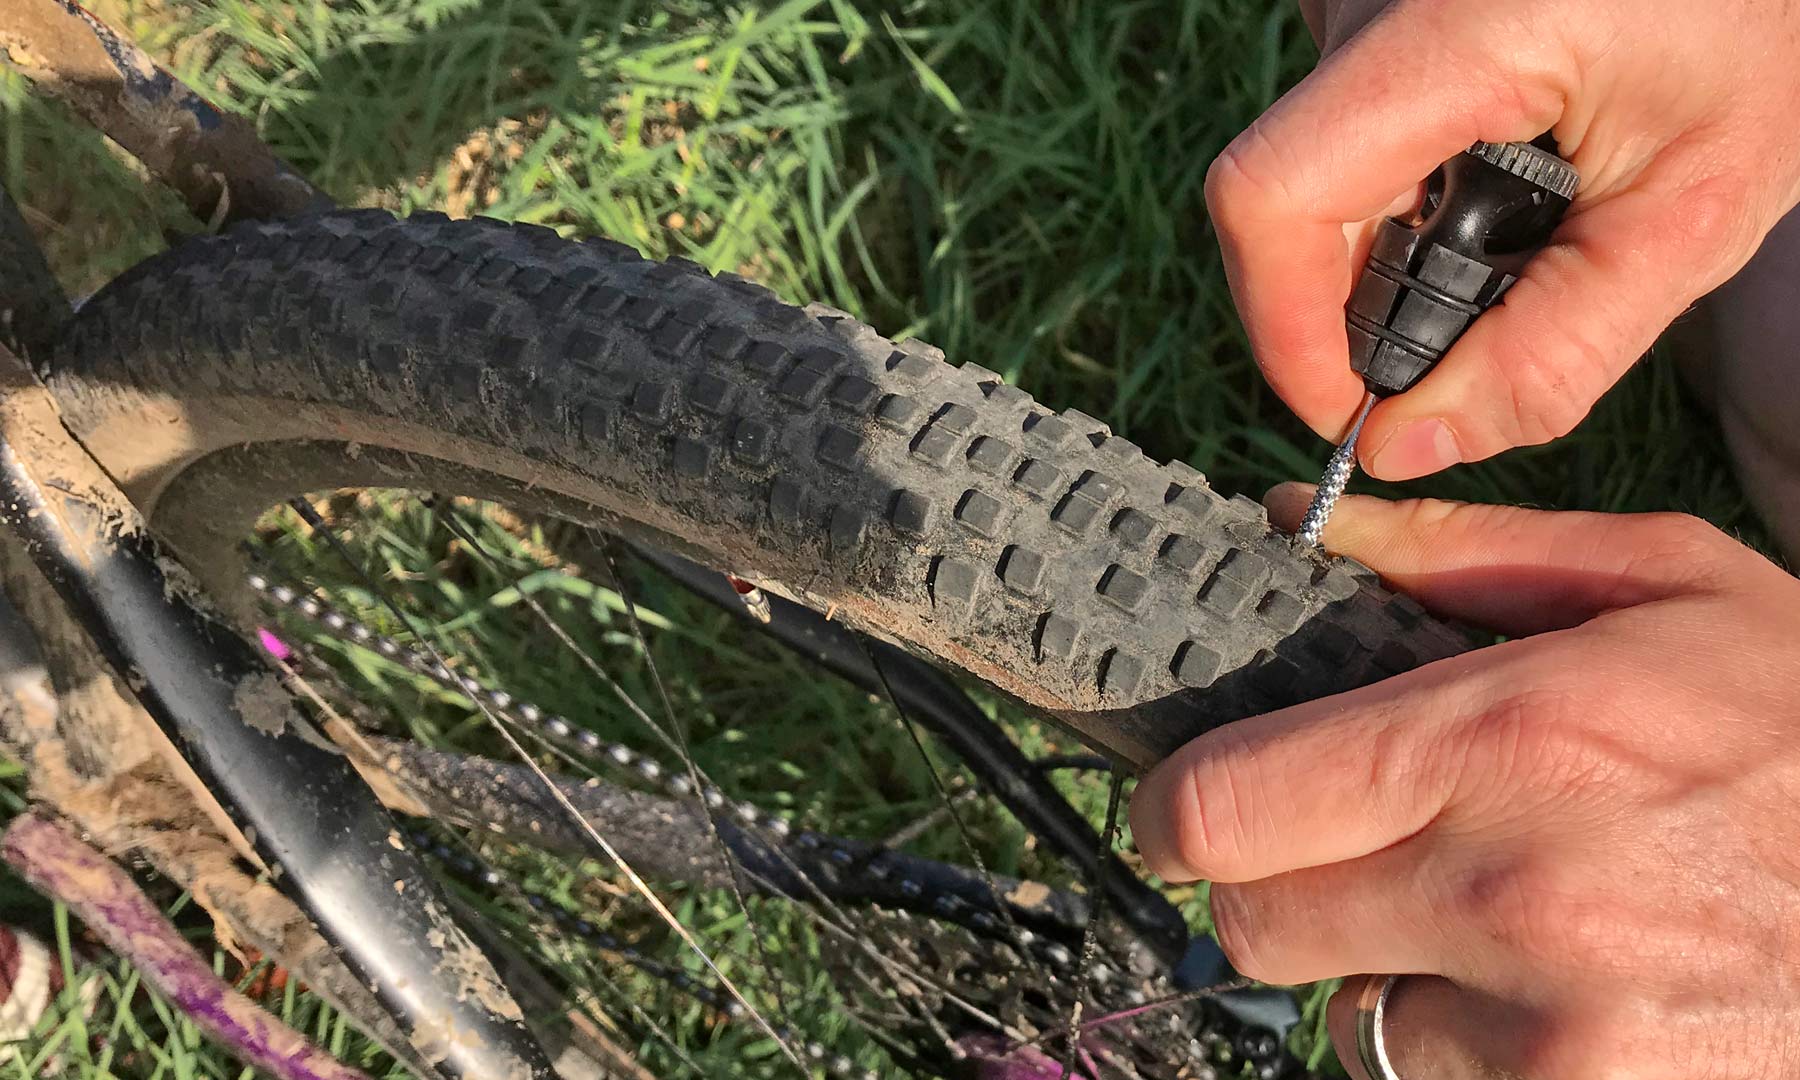
Step 2 is then reaming the hole with the stabby one of the two Swords. The reamer makes the hole a bit bigger to match the diameter of the tire plugs but also makes for a more uniform edge of the hole. The trick here is to push the reamer in at an angle, so you don’t accidentally puncture the rim tape (and kill your tubeless setup again.)
Step 3 is just back to holding the air in again as you get ready to put the plug in.

A single gooey tire plug needs to be pulled out of the plastic and threaded into the insertion fork, much like thread into the eye of a needle. Much like threading a real needle, this can be a chore as the plug is a tight fit.
The trick here is to flatten the end of the plug to pull it through. It also might help before you store this on your bike to cut the end of all of the plugs at an angle to make insertion easier.
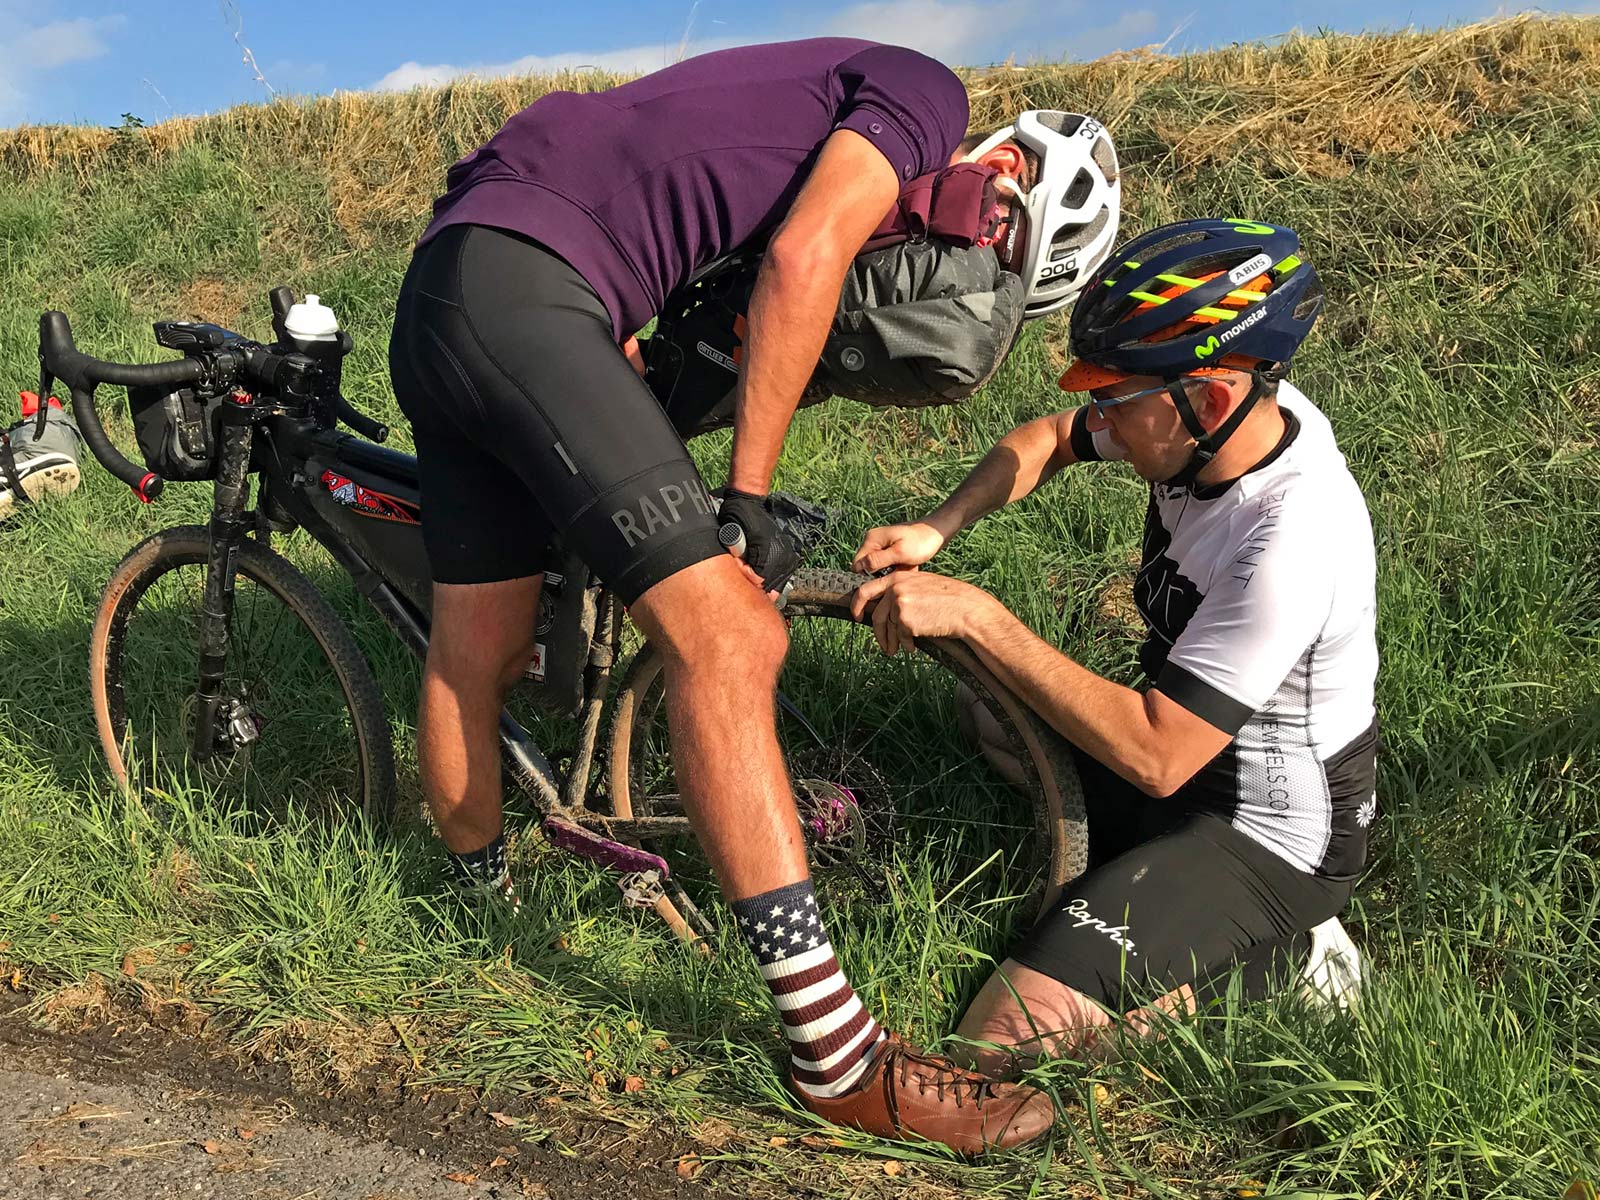
It is also best to thread the fork/needle before you start the reaming. I didn’t in this photo sequence because I wasn’t using my brain. So I worked quickly while a friend held their thumb over the reamed puncture.
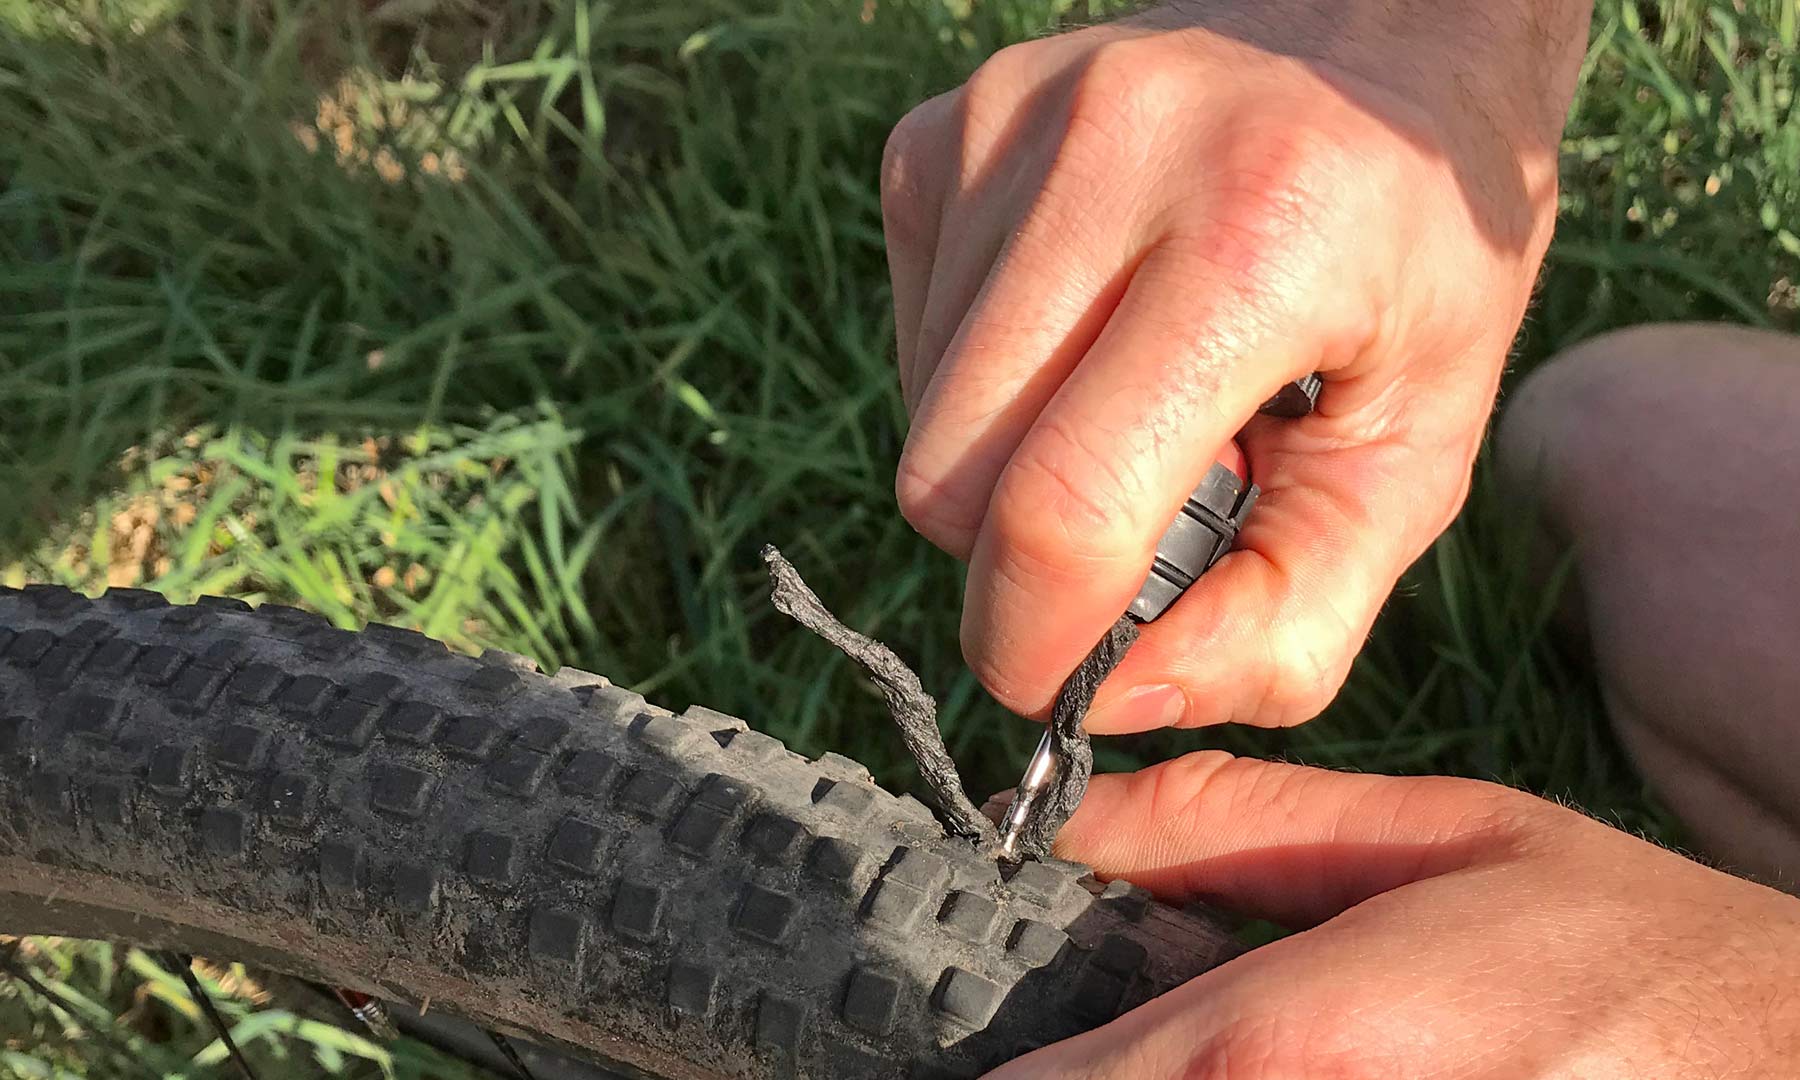
Step 4, carefully press the plug through the reamed hole, again going in at an angle so you don’t push straight down and damage the rim tape. Once inserted, you will need to remove the fork with the plug staying inside.
With the plug pushed sufficiently into the tire (1.5-3cm depending on tire volume), press your fingers down on the plug where it enters the tire to firmly hold the excess section of the plug still sticking out. If you don’t do this, the entire plug will likely try to come back out when you remove the fork.
Step 5, pull out the fork carefully. As you do the plug inside the tire bunches up (doubles up into a loop) and seals to itself, making a larger plug inside that can’t escape from the reamed hole.
Step 6, then trim the excess off (or don’t) and ride away. Sahmurai says it is up to you whether or not to cut away the excess plug. It is a pretty tough material, so unless you have proper scissors it will likely be difficult to do. I trimmed it down to a little over 1cm sticking out, and it did indeed flatten out against the tire. I was a little concerned that it would catch on the road or trail, but also that if I cut it too short it might pop back into the tire.
How well does it last?

3x winner of the Cape Epic Stefan Sahm of Sahmurai (that’s why it is spelled weird, by the way) says that if done properly, the repair should last as long as the tire. I patched this friend’s tubeless WTB Resolute midway through a 4 day, 350km loaded off-road bikepacking tour after the tire got cut by something nasty (notice the missing tread lug above, in addition to the puncture). We reamed & plugged it as a shot in the repair photo sequence, and then put at least another 150km of rough road & trail riding on it before I snapped this wear photo. No further problems, and he’s still riding it today months later.
I also used the same method to patch another friend’s Tufo cyclocross tubular (which uses a butyl inner wall/tube bonded to the casing). The first plug installed into the muddy tire in the middle of the forest was just enough to ride home on, mostly sealed. Cleaned up, and more carefully installed at home, and the plugged tubular still holds air to serve for training duties.
Final Impressions
Using a tubeless tire plug is a bit tricky and requires some attention to detail and the ability to follow directions you need to have learned ahead of time no printed instructions inside your handlebars). It is also something that is easier the second time, even though you need your first attempt to work by virtue of having a flat out on the road or trail. Maybe it’s worth practicing on a worn tire at home before sticking the Sahmurai Swords into your bar?
Speaking of sticking them in the bar, the plastic expander designs of the Swords is a little finicky. You need to be careful with them and then really screw them down tight to make sure they stay put in the bar. I haven’t had one fall out. But before I realized how much torque to apply (lots), one did come loose a bit. In the end, I really appreciate the expander bar plugs. I can be rough on my road/gravel bikes, so I regularly lose standard plugs. These have been secure in my bar for 6 months now (maybe a drop bar plug record for me.)
The thing I like most about the Sahmurai Swords is just that they are always there. No thought needed. Wherever my bike goes, the tubeless repair kit goes unobtrusively with me. I haven’t needed them on my own bike yet, but a couple of my riding buddies are happy that I’ve carried the small $30/35€ and ~22g pair of Sword plugs around on our rides. Now I just need to order a $5 replacement stack of the sticky rubber plugs to restock my bar.
Our last news had been that Sahmurai had sorted out more global distribution, especially looking to the US. Availability in the state took a bit longer than expected. But we have word from Sahmurai directly that their repair kits are in the US now, and will be available direct through Amazon.com by the end of February 2018. So that should make them easy to get ahold, wherever you are.