Home > Feature Stories

Home Workshop Series – Part 1: How To Build A Home Workshop To Match Your Skills

24 Comments
Support us! Bikerumor may earn a small commission from affiliate links in this article. Learn More

Home-Workshop-2

As a cycling enthusiast, once you venture into the realm of owning more than a few bikes, it usually becomes time to work on them yourself. In this series, we are going to cover the idea of building your own home workshop, matched to the mechanical skills or limits that you have. Most of us will have a limit to the work or maintenance that we want to perform ourselves, leaving the more difficult tasks to the professionals that have the right tools. As we move through the series, we will cover all the areas of bike assembly and maintenance, and the tools needed for each task.

Part 1 will be about the primary tool of a home shop, a space to do the work. Working on a dirty bike in the kitchen will probably not win you any favors from your housemates, so it is important first to establish a place to set up shop. Jump in to the story as we discuss space, work benches, and storage…
Workshop-Front

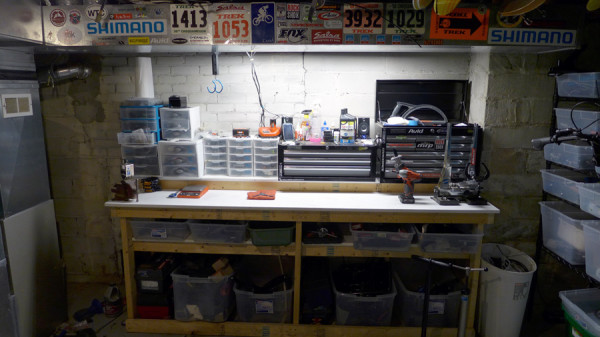
Space is the primary thing you need. Having a space for your bike work is essential to keeping tools and bike parts in order, and keeping the rest of your life free from dirt and grease. Most people will choose a garage or a basement, since those areas are better for getting dirty, and you probably store your bike there already. Since my garage is sub-freezing for half the year, I use my basement for a shop. Cycling is a much more compact hobby than say, assembling a kit airplane, so a lot of space is not needed. About 100 square feet is sufficient, my particular area is 12ft wide by 9 feet deep.
Home-Depot-Wood-Bench

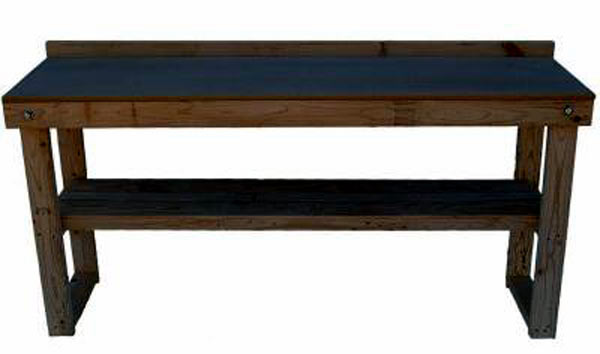
A good workbench is a great place to start. A simple bench made from 2x4s is sufficient for bike work, and reasonably affordable. My bench shown above cost around $100, and is 8 feet long, since most of the material is sold in 8 foot sections. It is built with white melamine coated MDF panels for the surface, and self-tapping Spax screws, and it took about 2 hours to create. If you don’t want to venture into woodworking, there are also kits available at most home improvement stores, such as the one shown above that is available from the Home Depot for $69.97. If your walls and/or landlords allow, screwing the table into the wall studs behind it keeps everything very stable.
Home-Shop

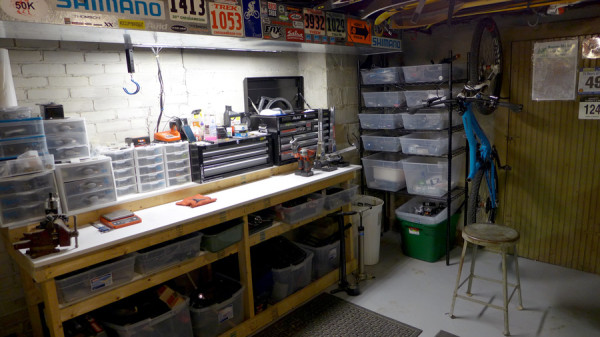
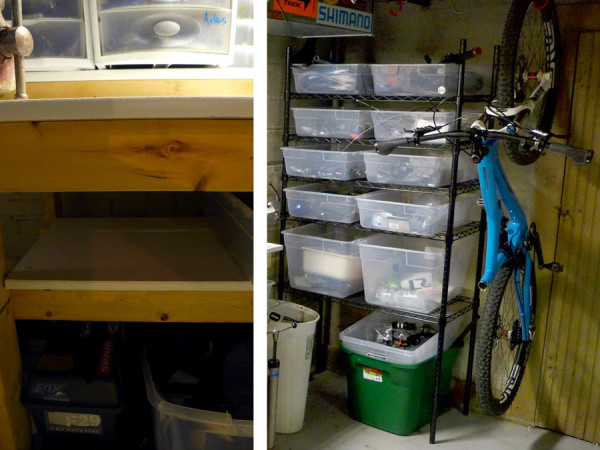
For storage of parts and gear, Sterilite or Rubbermaid containers work really well. I use clear ones so you can see what is inside them easier. Under the workbench it is easy to add a shelf for the containers, and if more space is needed, inexpensive wire shelving is available from most home improvement or big box stores. To store your bikes, simple vinyl covered hooks also available from these stores easily screw into a wall or ceiling to hang your bikes out of the way.

wood-pegboard-bicycle-workshop-example01

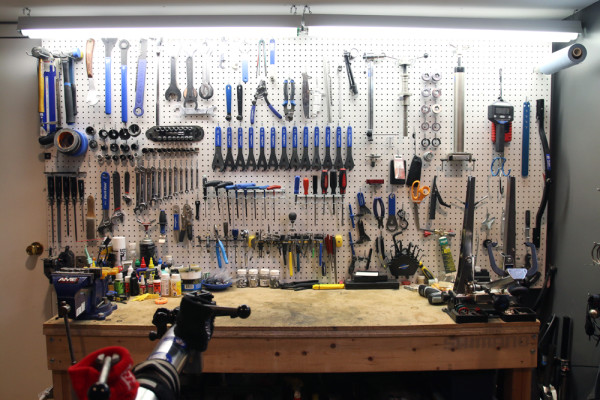
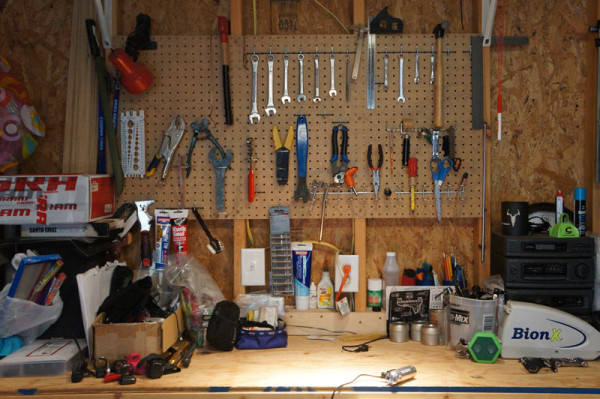
Peg board is the other storage solution and keeps tools ready for action. By placing your most used items in easy reach, you can be way, way more efficient. Tyler’s work spaces use both options, the standard pressed “wood” pegboard that comes in as large as 4′ x 8′ sheets at the hardware store…

galvanized-steel-pegboard-example01

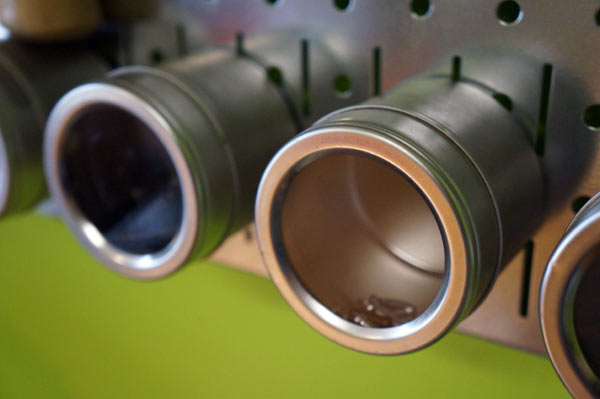
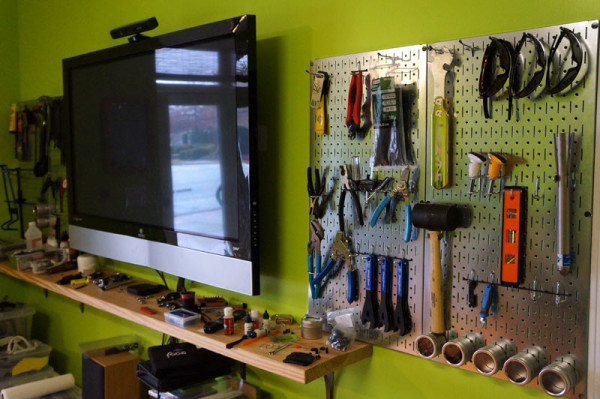
…and the more elegant galvanized steel ones that allow for magnetic storage pods to be used. You’ll find it at Sears occasionally, but your best bet is online with (surprisingly, considering the weight) free shipping.

galvanized-steel-pegboard-example02

Spice rack bins make great containers for small bits like cable ferrules, and the magnetic backs keep them in place.

Bikerumor Workshop set up (2)

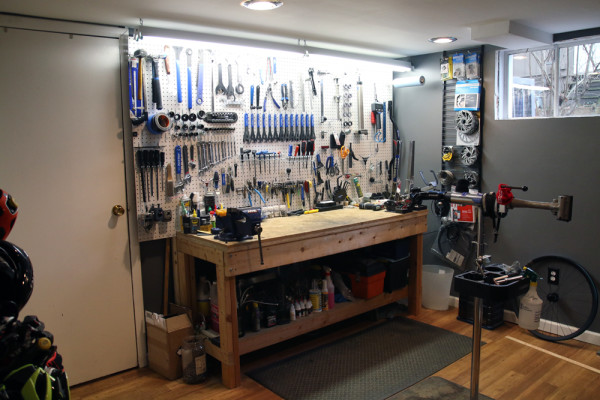
Owing to his years a bike mechanic, Zach’s workspace is on the more advanced end of the spectrum, but still within reach of the average home mechanic. Due to space constraints, pressed peg board was used for the tool rack since it could be easily cut to fit. The workbench is probably overbuilt with two  layers of 1/2″ ply and a third layer of 1/2″ MDF for a work top, but at this point it has survived two houses and one move.

Bikerumor Workshop set up (1)

Ample light is very important especially when working with small parts. One or two inexpensive fluorescent light fixtures from the local hardware store will do the trick. Zach runs two 4′ fixtures side by side, plugged into a powerstrip on the side his work bench. That provides extra outlets should you need them for powertools, charging Di2 bikes, etc. and also provides a single on/off switch for both lights.
Home-Depot-anti-fatigue-mat

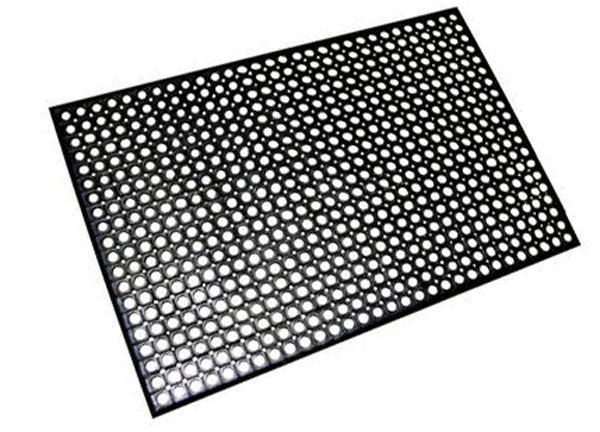
Finally, make sure working in the space is comfortable. If you have a concrete floor like most garages and basements, industrial anti-fatigue mats are also available from most home improvement stores, make it easier to stand for a while, insulate your feet from the cold floor, and prevent that dropped bolt from rolling off into Narnia. If you don’t want all the holes, interlocking gym floor mats can be found at Target, Wal-Mart, Sears and sporting goods stores and make a great option if you happen to have wood floors you don’t want ruined by any grease or oil drippings.

Have a good opinion on setting up a workshop space? Want to share your space with Bikerumor readers? We will be continuing to mold this series based on what others are doing as well, so send your feedback to tim@bikerumor.com.

Check back for Part 2 where we will dive into basic tools for basic repairs.

If you haven’t seen them already, make to check out all of the other installments from our Home Workshop Series!
Part 2: Lighting, Tool Storage and Work Stands

Part 3: Basic Tools & Kits To Start Working On Your Bike

Subscribe
Notify of
guest

This site uses Akismet to reduce spam. Learn how your comment data is processed.

24 Comments
Oldest
Newest Most Voted
Inline Feedbacks
View all comments
Ploutre
Ploutre
10 years ago

Perfect moment for releasing such article ! Just moved into a new house, with a big garage, and now has come the time to setup my workshop 🙂

Ryan
Ryan
10 years ago

Looking forward to (hopefully) a wide range of bike stand options, ideas, and solutions.

Slow Joe Crow
Slow Joe Crow
10 years ago

Don’t forget to install some good lights so you can see what you are doing. I have a 4′ fluorescent light over my bench in the garage and I still need to break out the portable work light for some jobs.

SketchyD
SketchyD
10 years ago

Looks like I’m not the only guy to have both a Fat Tire 40 and CAMBA blue sign in my shop…

David
David
10 years ago

I used the IKEA Trofast children’s storage units to create a work bench in my basement bike room. The ones that look like a small set of stairs work great. I got two, and set them up with the steps facing each other, and then put a 8′ x 2′ work top across the span. The work top [recycled from another project] is a sheet of 3/4″ 4′ x 8′ plywood cut lengthwise and glued together to make a 1-1/2″ thick top that is very strong and won’t sag as it spans the storage units.

One of the nicest things about the Trofast series is the plastic bins that can be slid into place. They come in different sizes and colours, so you can chuck all your chainrings in one bin, derailleurs in another, etc. I keep my tools in a rolling tool chest instead of on the wall, as I really don’t like pegboard [not sure why]. Small parts [i.e. chainring bolts, headset spacers etc.] are kept in a small parts organizer bolted to the wall. Truing stand is attached to the bench with a C-clamp for easy removal. I need to create an organizer for spokes – PVC pipe?

+1 on the lights. I’ve only got 4 potlights in the work area, and it is not enough.

Billbowlrider
Billbowlrider
10 years ago

Here we go with another cool series ala the suspension set up! Looking forward to storage ideas/advice for spare wheels and tires.

Porter
Porter
10 years ago

Ahhh, so this article is why you cleaned your shop up. LOL!

groghunter
groghunter
10 years ago

It helps to live by yourself 😀 My kitchen has had a shop stand in it for the last 10 years.

JAMES
JAMES
10 years ago

+1 also on lots of light.. I also never seem to have enough peg board.

BestRidesDC
10 years ago

Good stuff – I’ve been putting together something similar for my site. Slow Joe Crawl is right, light is critical. Love the big screen; I’m adding new of those to mine as well; perfect when you reference the ever growing list of how to videos on the web. Right now I have an iPad stand that hangs from one of my shelves that serves that purpose, but with the ability to stream from an iPhone to an apple TV having that set-up wold be great. Looking forward to more installments…

roy
roy
10 years ago

Whats up with riders and pegboard? Tools are meant to go in a toolbox, not on pegboard!

James
James
10 years ago

@ Roy : opening toolbox drawers all the time is for kids. I am at the point where magnetic strips on the wall is the fastest way to go. Done with pegboard hooks always coming out when pulling tools off the wall!

ABW
ABW
10 years ago

@roy – I agree, but it’s about finding the system that works for you. My problem with pegboard is the pegs are always falling out of the board and behind the bench. Grab a wrench and then spend 5 minutes on the ground finding the stupid hook. I’m sure there are pegboard systems that have addressed this, and maybe that will get talked about, but as an admitted cheap bastard, I used what I inherited.

ABW
ABW
10 years ago

Also, to address the root cause, and stipulating I have no data to support this other than personal experience as a mechanic in a bunch of shops, I’m betting it has to do with tool ownership. Most bike mechanics don’t own their own tools (yes, good mechanics do, but as a percentage of all the people who earn a paycheck by wrenching on bikes, good mechanics are the minority). Pegboards make it easy to see if all the tools are put away at the end of the day, which helps with shrinkage.

Kevin K
Kevin K
10 years ago

What about the TV? That has to have a couch and beer fridge to go with it.

Osteo
Osteo
10 years ago

Lookig forward to more of this series, some good points aleady. Few years ago I built my bench and made it 4″ higher than a standard counter height. My buddy disagreed and said it was too high, but he is 5’9″ and I’m 6′. Standing bent over a normal counter looking down gives me a headache, custom for me!

Also got a sheet of stainless steel cut an bent for the top, 2 -4′ pieces and siliconed the seam, way cheaper than one 8′ piece.

Most of the benches have Vice’s, I’d spend the extra $ if I had it and get one that also rotates/swivels if I was doing it again.

Derek
Derek
10 years ago

I’ve got a corner of my den set up with three bikes, a wire shelf converted into a workbench (with a toolbox), and a dual-tap kegerator. My wife graciously allowed these things into our home, and I use a Park folding race stand that goes in the closet when I’m not using it. Most important is the skills – if you want to learn how to wrench bikes, I highly recommend Appalachian Bicycle Institute (appalachianbicycleinstitute.com) in Asheville, NC.

gringo
gringo
10 years ago

One not so small detail that often goes overlooked in the name of saving space: make sure that your bench is deep enough that you have clearance for a complete wheel to go into your vice if it needs hub work. The benches in this post look pretty pinner! Good luck using that vice for hub work.

Dirtyonethirty
Dirtyonethirty
10 years ago

1 As others have mentioned good lighting is huge, especially when you drop stuff. I put a led light strip under my bench, like ground effects. And clamp style lamps are cheap and effective.

2 a deep work bench is necessary.

3 Instead of pegboard or whatever, plywood with nails is the cheapest most customizable solution. Need a hook, pound a nail. Need to switch things up, pull the nail out.

4 Having a vice is a big deal.

5 Lets not forget a sweet stereo is essential.

bsimon
bsimon
10 years ago

Ditto on the tall bench. Floor space in my shop is a premium & I also have non-bike tools & projects to consider. So I have a bench mounted bike stand (Park) rather than a floor standing model. Some tools are in drawers, but most of the bike stuff is on pegboard; it’s much easier to find & put away than having stuff in different drawers. On the pegboard, the thick ‘heavy duty’ hooks stay in the holes; the thinner/lighter ones fall out frequently.

Osteo
Osteo
10 years ago

I can concur with the thought of a deeper bench so a wheel can sit on it. I’m on a 29’er and the balance act of having the wheel on the bench only to have part of it off and then I tap it by accident and it falls off the bench completely is a bit of a pain! It is just the waste in wood making it greater than 24″ deep unless you can find a use for those left over strips… maybe shelving!

rob cole
rob cole
10 years ago

I’d avoid using a pegboard. I’m a professional bike mechanic, and have built or rebuilt many bike workshops for retail stores in London, England. I’ve used many different backboard systems, and have found my preferred option is very simple, and cost effective

Once you have built your bench, mount a good solid backing to the bench, preferably bolt the bench and the back board to the wall behind, if possible.

I’d then install 3/4″ or 1″ plywood sheet to this backing, and paint it a suitable matt paint colour. I hang my tools using a selection of fittings including woodscrews and nails. I will cut some of these to length using bolt croppers, or dress the end with a file if cutting short with the bolt croppers. Once the tool layout is decided, I use a white marker pen or black sharpie to outline the tools to create a “shadow board”. If you decide to change the layoutl, or the paint gets dirty after a season, strip all the tools and fittings, paint it over an start again.

Here are recent examples of my latest fitout:

http://ep1.pinkbike.org/p4pb11509081/p4pb11509081.jpg

http://ep1.pinkbike.org/p4pb11509079/p4pb11509079.jpg

http://ep1.pinkbike.org/p4pb11509084/p4pb11509084.jpg

Rich
Rich
10 years ago

Put a 4×8 sheet of 1/2 pink foam board behind peg board. Hooks stay put. No spiders behind pegboard. Can screw straight through pegboard and foam board into stud.

Gillis
Gillis
10 years ago

-Plywood tool board, use screws. (someone above said nails, but after a while those can come loose. And screws are easier to manipulate)
-Bench vice, ideally with different jaws for a multitude of tasks.
-Power strip. fix it to a leg or under the lip of the work surface. With nearby shelf it can be a good place to store and charge batteries.
-Small garbage can or . Also good for placing under bike when cleaning, it catches the excess drips and/or dirt/grime, which minimizes clean up afterward.
-I put in a bottom shelf just off the floor with a 2×4 kick-board underneath. It keeps stuff off the ground in case of spills or flooding (for basement dwellers) and stops that tiny screw from rolling to the back-wall into that unseen crevice never to be found again.

Subscribe Now

Sign up to receive BikeRumor content direct to your inbox.