Lately, we’ve seen a lot more attention paid to the size of a fork or shock’s air chamber, so it’s time to dive a little deeper and explain why that matters, and how it benefits you.
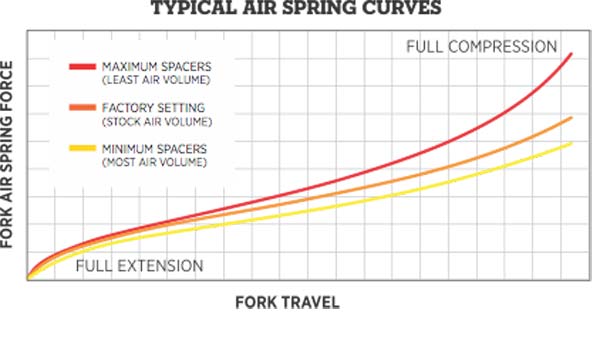
When air springs first started to replace coil springs, the challenge was (and still is) to make it feel as supple and linear as a coil. We’re inching closer and closer to matching the suppleness, but nowadays many suspension manufacturers are actually taking advantage of an air spring’s natural ramp to provide more control at the end of the stroke. Since air molecules can pack together only so tightly, it gets harder to compress them as you move farther into your travel. So, by the time you reach the last third of your travel, it usually starts ramping up. Which can prevent a harsh bottom out (that’s a good thing), but it means some riders may not actually be using all available travel (that’s a bad thing).
In the rear, frame manufacturers can use leverage ratio and linkage design to overcome (or work with) the shock’s ramp rate to help use all available travel and tune the end stroke performance. Up front, forks don’t have that luxury, so it’s up to clever damping and the size of the air chamber. For this article, we’ll focus on fork air volume, and how to make it work for you…

Because a standard telescoping suspension fork will always have a 1:1 leverage ratio, you really have to tune the air volume, along with using compression and rebound knobs, to control the entire travel range. Where compression and rebound settings can have dramatic effects, in most cases forks are designed to operate best when set wide open, especially compression. We’ll dive deeper into those settings in another post. Here, we’ll focus on how changing air volume lets any size rider take full advantage of the fork’s damping tech while minimizing compromises.
Think of it like tires: If your fork has a small air chamber, it’s like a road bike tire that needs higher pressure because it’s supporting all of your weight with a small volume of air. It also takes a lot more effort to compress it, so it’s much harder to bottom out.
But a big chamber is like a mountain bike tire. It has more air to support the rider, so it can use a lower pressure and will have a more supple ride. They’re softer and more malleable, which is good for soaking up bumps, but can bottom out more easily. The trick is getting size and pressure just right for you…

…and the application:
“The two main things we focus on when designing our air springs are application and travel. If you have a little XC bike, you want very firm, efficient suspension,” says Fox marketing manager Mark Jordan. “But with a downhill bike, you want it to gobble up bumps.”
Conveniently, that’s what you end up with simply due to chassis size dictating available air volume. Smaller stanchion diameters and shorter chambers mean less volume in XC forks, which end up needing higher air pressure and having a more pronounced ramp. And it makes sense because with XC forks, you have less travel to work with, so a smaller chamber will remain sensitive at the beginning of the stroke (small bump compliance), but ramp faster to prevent bottom out. As the forks grow larger and longer, the necessary pressure drops, as does the curve at the end of the stroke, providing a softer suspension better able to take on the big hits.
GUIDE TO SETTING YOUR FORK’S AIR VOLUME

Fine tuning your air volume is a balancing act between supple small bump performance and ending stroke support to avoid a harsh bottom out. Fortunately, most modern forks have a user-adjustable air volume either with spacers or oil, so it’s just a matter of knowing how to use them.
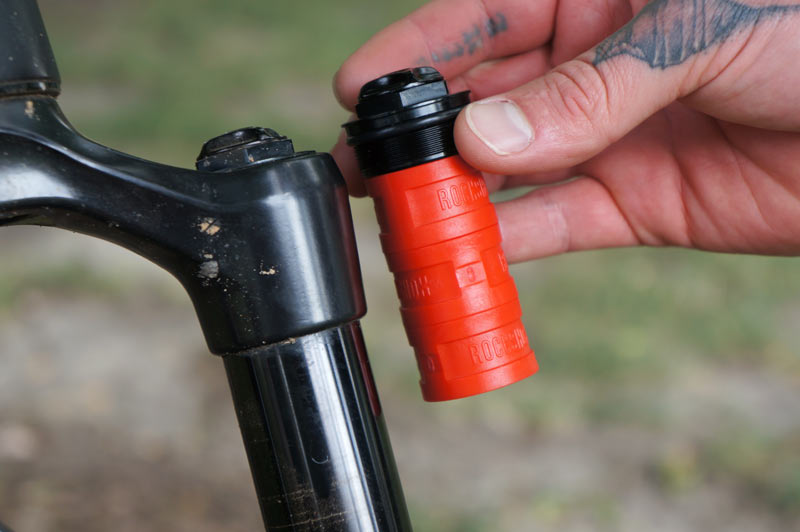
“(Our forks) are all tunable with the air volume spacers that we provide by adjusting the air volume in the positive chamber,” Jordan says. “Adding a spacer will decrease the air volume, so the air spring will build more pressure at bottom out. This is good for riders that are bottoming prematurely or need more bottom out support. And vice versa, removing a spacer will allow the fork to achieve full travel easier.”
Perhaps counterintuitively, that means heavier riders might use more volume spacers than lighter riders. Why? Because that will help keep the beginning of the stroke supple while protecting against bottoming out.
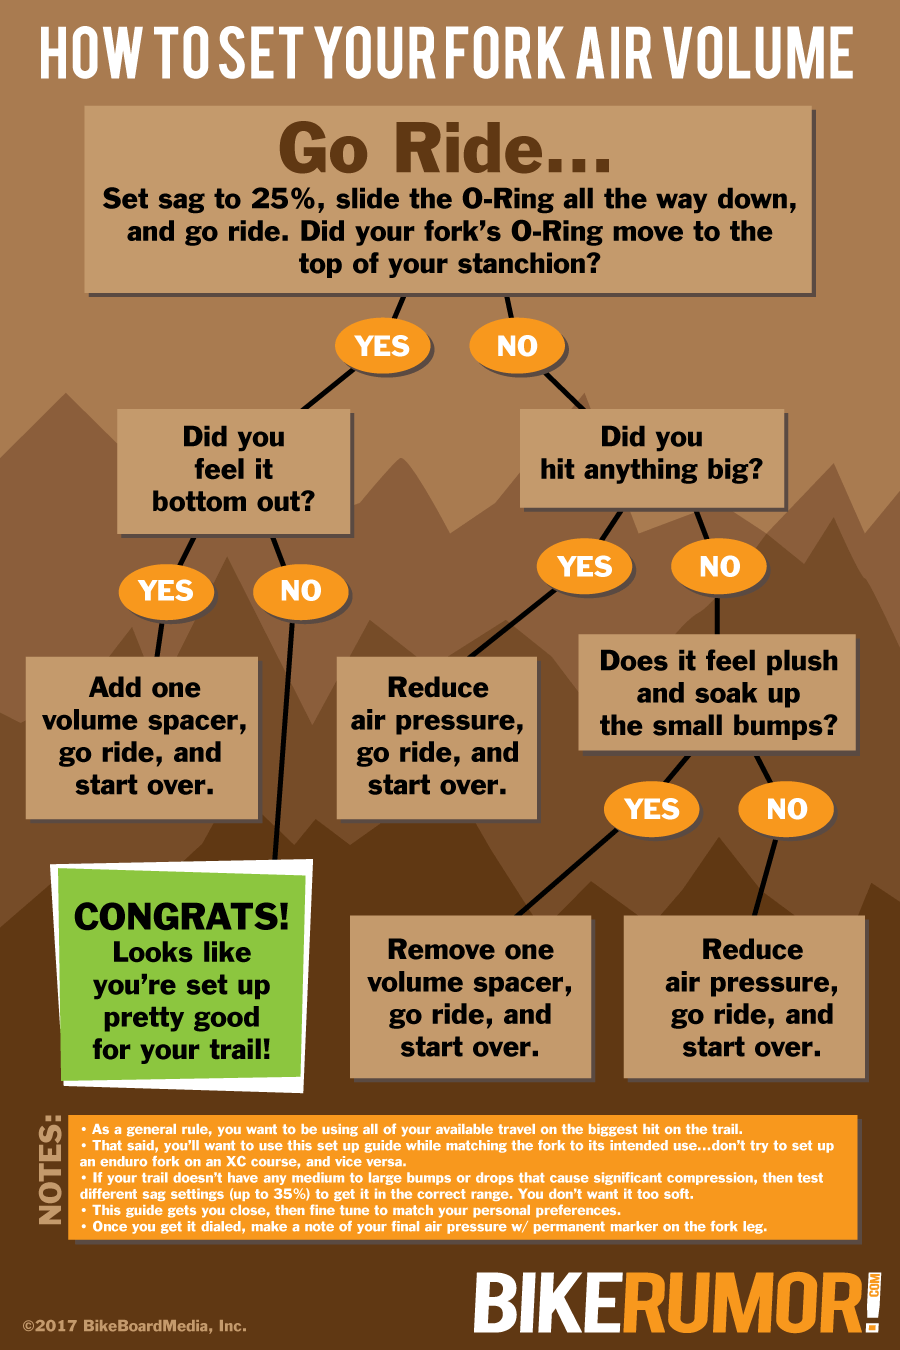
To find the right balance that works for your riding style, weight, and trail conditions, set your sag to about 25% of travel, then go ride your usual trail. Are you knocking that O-ring all the way to the top on your normal loop? If so, are you feeling the fork bottom out? If you don’t feel it bottom out but are using all of your travel, you’re probably set up close to perfect. From there, it’s just fine tuning to get the feel you want. Use the flow chart above to get your fork set up and starting take full advantage of the available travel.
Jordan adds: “A big part of it, too, is balancing that with the rear end of the bike.”
The fun never ends. Stay tuned…this is the first in a new weekly series that explores one small suspension tech, tuning or product topic each week. Got a question you want answered? Email us. Want your brand or product featured? We can do that, too.
