Home > Bike Types > Gravel Bikes

World’s Funnest Bike 2017 – Part 4: The drivetrain, featuring SRAM Red eTap & Speedplay SYZR

sram red tap wiles shifting ride review
34 Comments
Support us! Bikerumor may earn a small commission from affiliate links in this article. Learn More

For Part 4 of the 2017 World’s Funnest Bike project, we explore my drivetrain choices. Namely, SRAM RED eTap, a Wheels Manufacturing threaded PFBB30 bottom bracket, and Speedplay’s long awaited SYZR pedals. As with the cockpit, there are mostly pros to this build, with a few concerns – one of which I can do something about, the other is simply what it is, and any solution ends up being a worse compromise.

I chose these parts because, well, it’s SRAM Red eTap, and who wouldn’t want to run that? It shifts amazing, controls are ultra intuitive, and installation couldn’t be easier…for the shifting, anyway. Hydraulic brakes run internally are never fun, but the Rodeo Labs Trail Donkey frame made it painless. They still have to be bled, though. The Wheels Mfg. bottom bracket was chosen because I’ve found that one-piece or threaded-to-become-one-piece bottom brackets solve a lot of pressfit BB problems by aligning the bearings and all but eliminating creaking. This particular model was used because it’s been sitting here for a while just waiting for a bike to go on, and this seemed like the right one. And because they make killer stuff. The Speedplay SYZR pedals were the gamble…

SRAM RED ETAP ACTUAL WEIGHTS & INSTALL NOTES

sram red tap actual weights

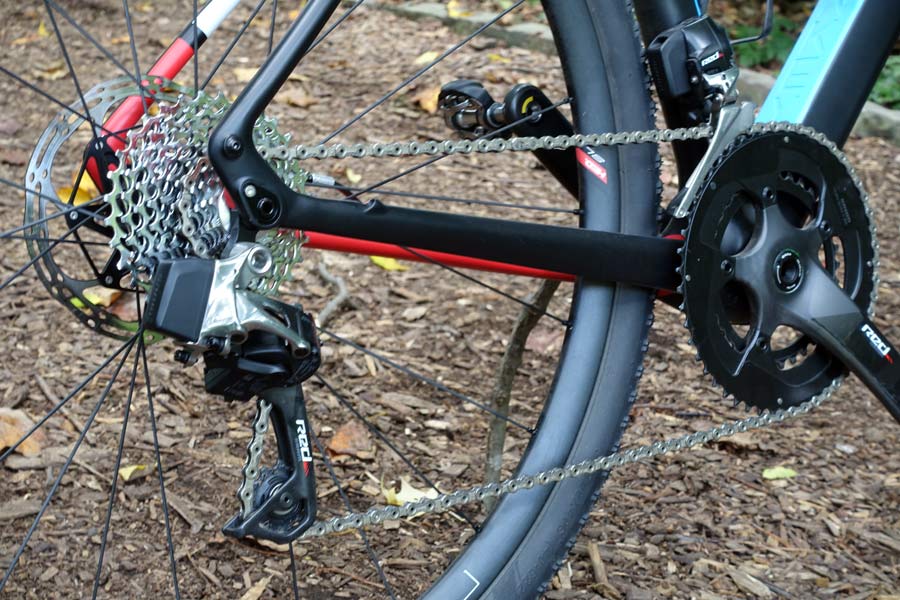
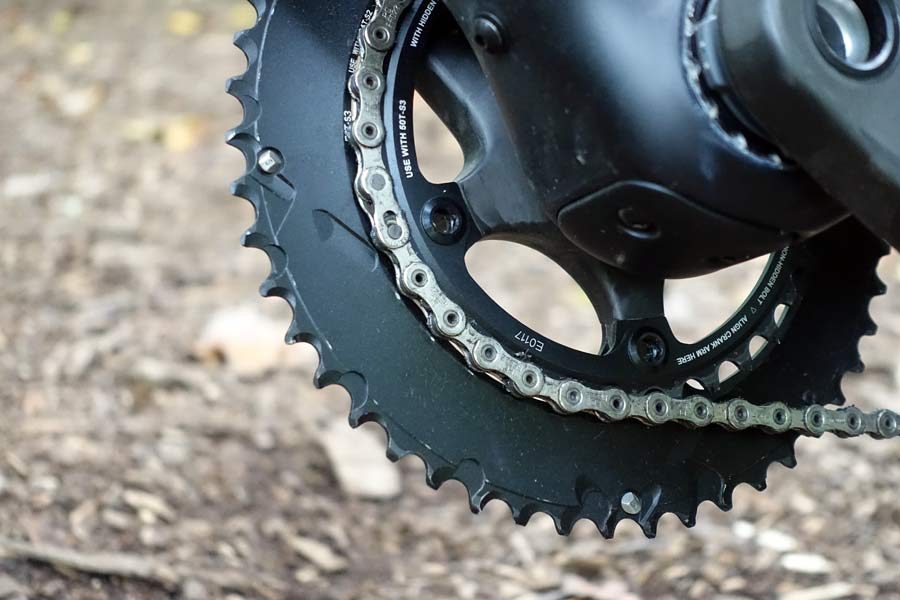
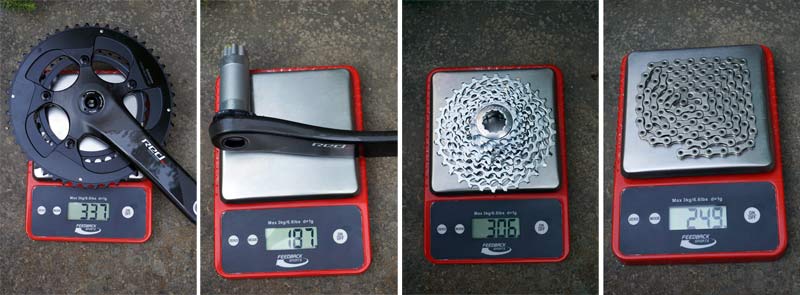
I’m testing the BB30 175mm crank arms with a 50/34 chainring combo and the widest range cassette they offer for eTap (for now, anyway). Actual weights for the crankset with rings is a combined 524g, the 11-32 cassette is 306g and chain without any links removed is 249g (I removed a couple during installation). Why this gearing combo? Because it’s a gravel bike, so I wanted low end on the grunty climbs and trails, and high end on the roads getting to those sections.

sram red tap actual weights

Levers with batteries installed come in at 235g each, but note that there’s no brake fluid in them yet, which will add a few grams once the system is installed and the master cylinder is filled. Rear derailleur is 242g, front is 159g and Blips are 12g without mounting rings. Those are plastic and add a couple more grams.

sram red tap actual weights

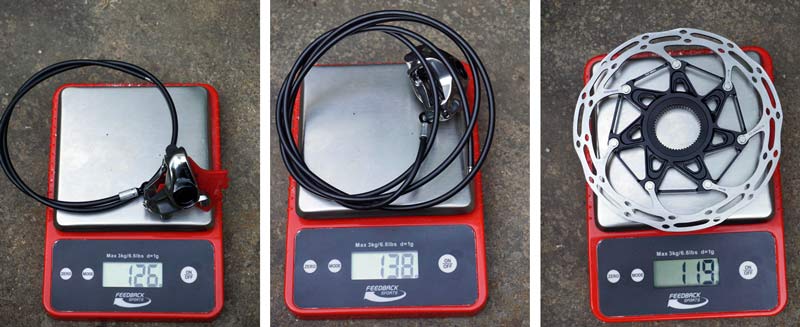
The front brake with uncut hose is actually 118g – it’s weighed here with the wedge installed because I couldn’t get it out for the photo. I ended up sticking the system in my freezer for 30 minutes to reduce fluid volume enough that it would release the wedge, which is weighed separately below to validate actual weights. Rear brake hose, also uncut, is 20g more at 138g. I ended up cutting a little off both during installation. The 160mm 2-piece rotors both weighed in at 119g, so I’m only showing one here.

sram red tap actual weights

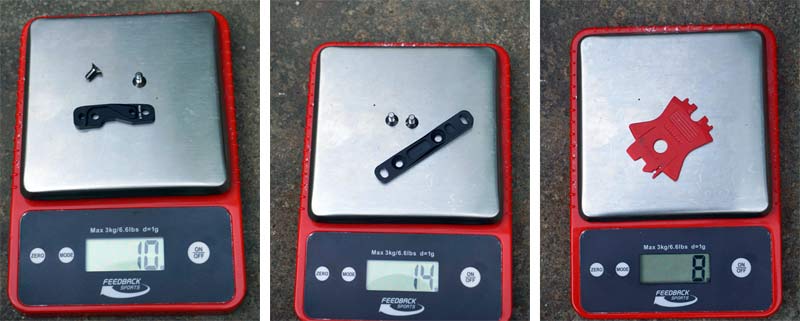
These are the flat mount brake calipers, so they require adapters to adjust them to either 140mm or 160mm rotors (the frame is flat mount, so these aren’t conversion adapters, they’re just rotor size adapters). They add another 24g total.

Altogether, the system is 2,480g, give or take a few grams. Installation of the cranks, derailleurs and shifters couldn’t be easier. We covered the button and setup details in our launch coverage, and SRAM has detailed videos online. The YAW setup of the front derailleur is still required, but it’s much easier than with the cable system. Basically, you’re just lining up guides with the chain and chainring teeth. SRAM sent along their pro bleed kit, and I have a high quality hose cutter. If you’re planning on installing this yourself, consider both of those things essential. Once again, SRAM’s online support videos walk you through the bleed process, so just set up the laptop next to your bike stand and set aside an hour or so. I got the front brakes working great on the first bleed, and the rear required letting a little fluid out after capping it off…I think I just pushed the plunger a little too hard on the last step, which put the fluid pressure just a bit too high and left them with no modulation. Redoing the last couple steps and letting off a little solved the problem.

SRAM RED ETAP RIDE REVIEW

sram red tap wiles shifting ride review

The big question is, how does this system work for gravel bikes without a clutch derailleur? Pretty darn good, I’d say. I’ve been riding this bike on access trails, jumping curbs, and hammering my local root-infested cyclocross training loops. No dropped chain yet, and there’s no chain catcher or other preventative measures installed. Most of my time on these surfaces are in the small chainring, too, so there’s more slack in the system, and still no drops.

sram red tap install notes and ride review

sram red tap install notes and ride review

Shifting is flawless. I mentioned in my original first impressions piece that it’s not as quick as Di2 or EPS, but only fractionally so, and quick enough for spirited riding (just ask the pros in Le Tour). Even with the larger gap between ring sizes, front shifting is so good that you’ll actually want to use it frequently. That’s the beauty of electronic shifting, it’s flawless regardless of conditions and terrain.

sram red tap hrd hydraulic disc brakes ride review

sram red tap install notes and ride review

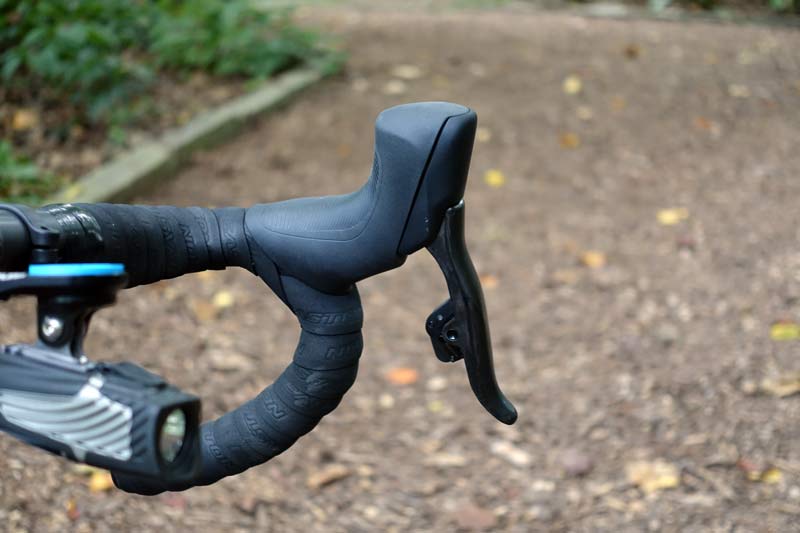
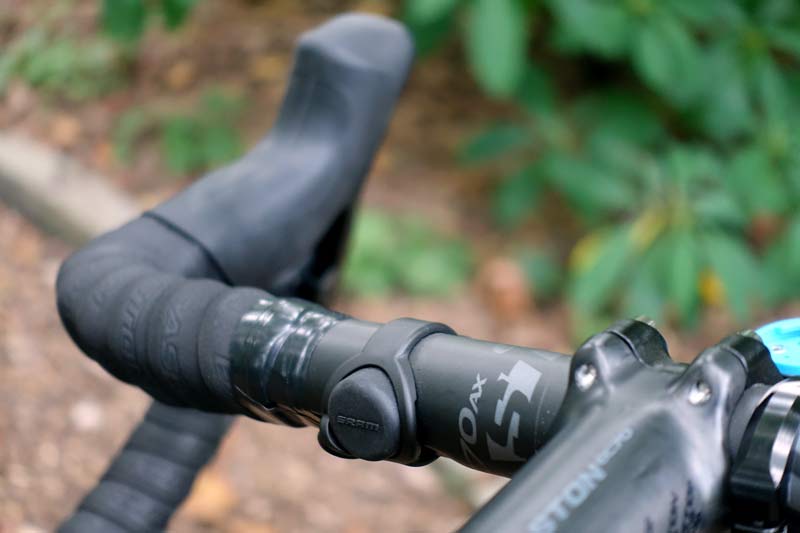
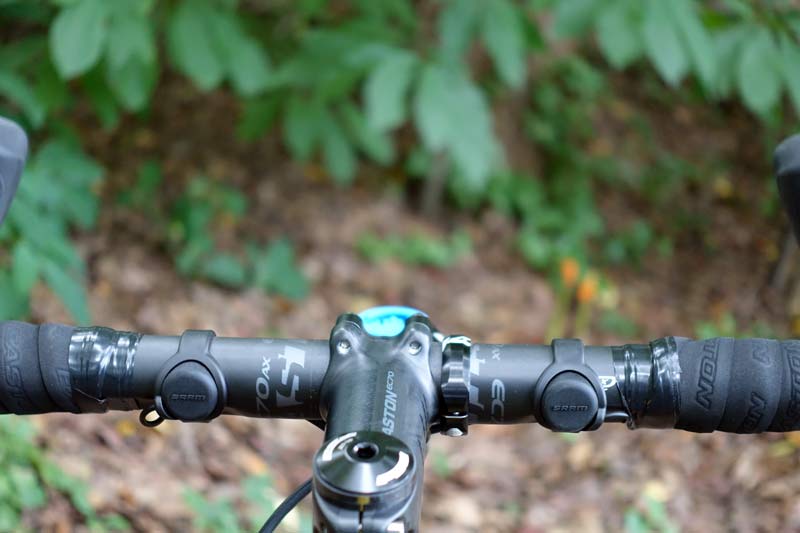
So the question becomes, why choose eTap over Di2 or EPS? Installation ease aside, it’s incredibly intuitive. Left clicker moves the chain to the left, right to the right, and both shifts the front. Takes only a couple minutes to get used to, and then it’s like second nature. Add in the ability to put the Blips remote shifters anywhere you want, and it’s a system that both works around your riding style and complements it at the same time.

sram red tap install notes and ride review

I intentionally left just a bit of extra wire poking out from the bar tape so I had room to adjust the Blips. I’m likely going to rotate them up a few degrees, putting them in a more ergonomic spot for my thumbs to hit while riding on the flats. Once you know where you want them, you can even wrap them under the tape for a stealthier install.

sram red tap wiles shifting ride review

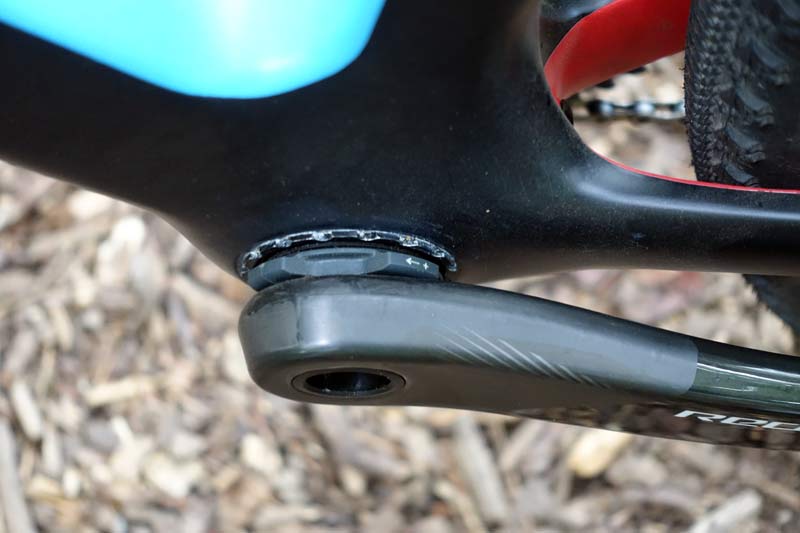
The Wheels Mfg. bottom bracket’s flange is very thin, which requires a delicate install to avoid scratching the frame. It also kinda sorta requires their own tool if you want the best results easily. Their wrench is thin, which mates perfectly with the thin flange. But, for SRAM installs, I recommend this particular model because deeper flanges or ones with much of a recess leading to the bearings can interfere with SRAM’s preload adjustment bezel and give you headaches.

sram red tap hrd hydraulic disc brakes ride review

sram red tap install notes and ride review

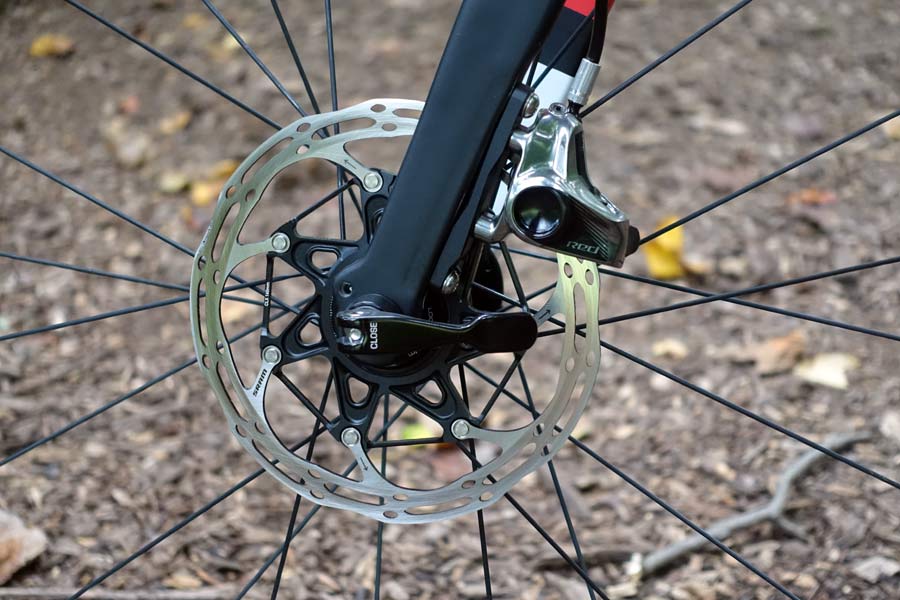
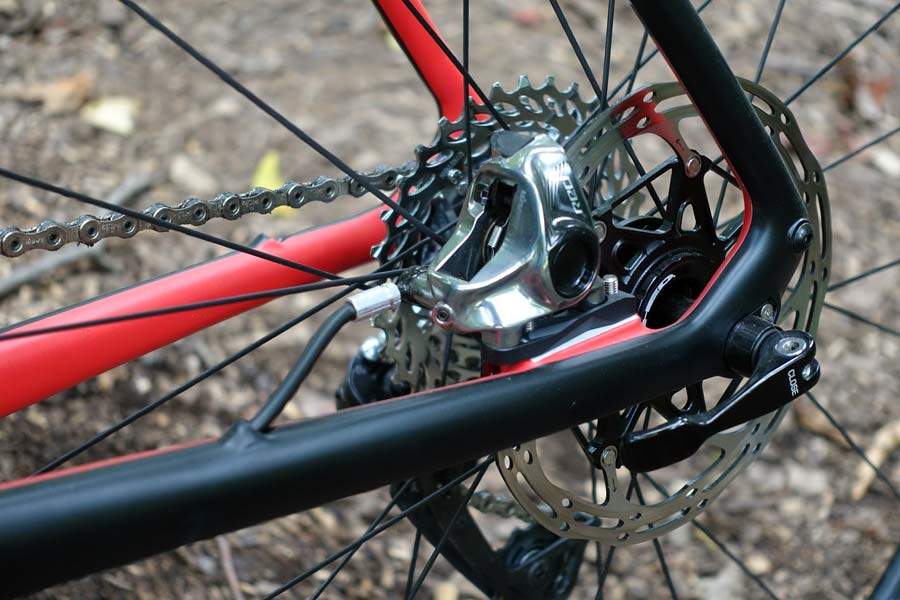
I called in the SRAM Centerline rotors for Centerlock because that’s how HED makes their hubs. HED’s hubs come with the lock rings. Installation of the calipers is easy, getting them lined up is mostly easy. The one downside to flat mount brakes is that you’re mounting the rear caliper to the adapter, then the adapter is bolted to the frame from the underside. depending on the frame, this can take a little extra time to get it aligned properly. The rear brake hose exit port on the frame is very close to the caliper, which creates a tight bend that also puts load on the caliper, adding to the “fun” of getting it aligned with the rotor. I’d prefer if the hose port were moved about an 3cm forward on the chainstay.

Braking performance is exactly as awesome as you’d expect from hydraulic disc brakes.

the sram red etap front derailleur battery limits tire clearance on wide tires

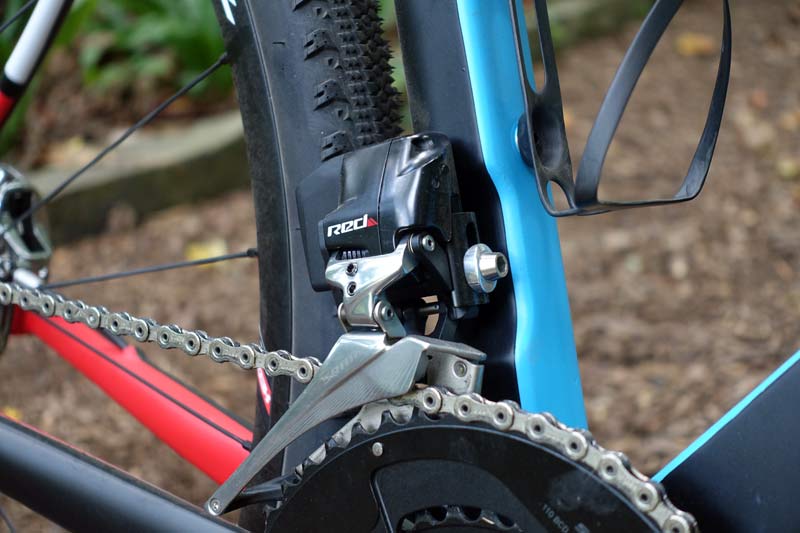
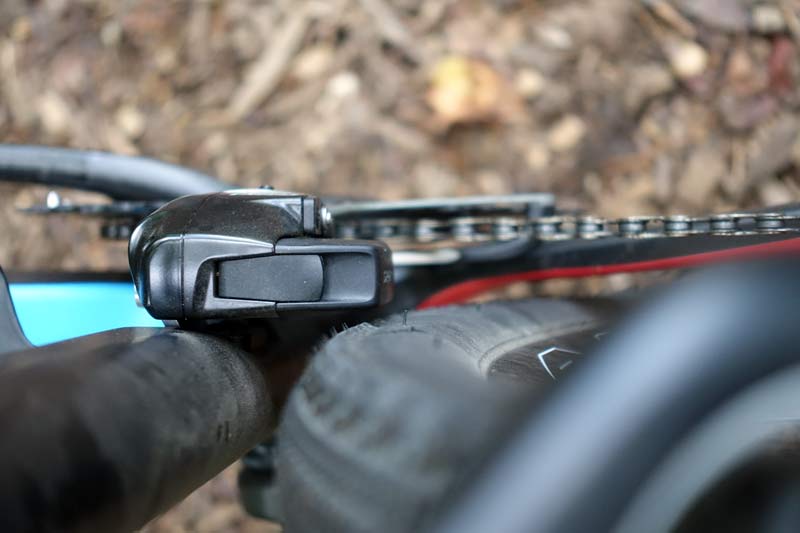
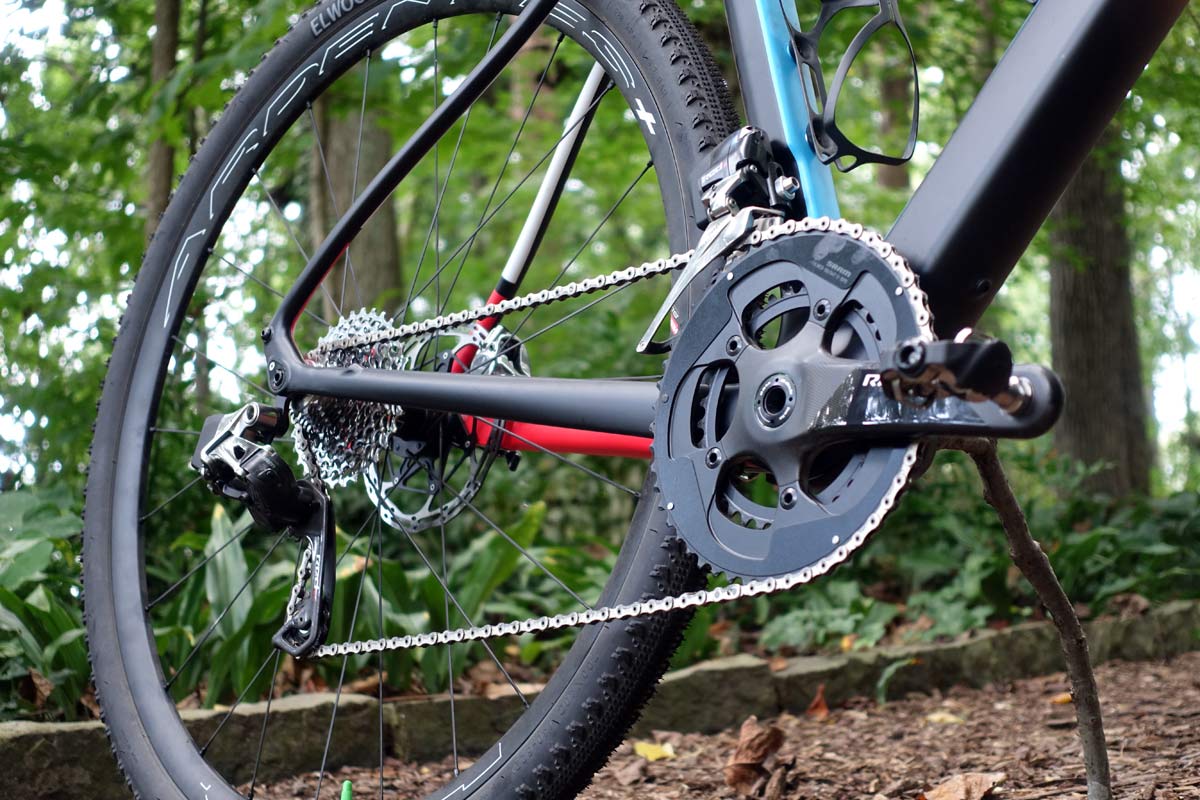
Here’s where we get to the first concern: SRAM’s eTap front derailleur battery sits perilously close to the tire on gravel bike setups. With the Terrene Elwood 700×40 measuring out at 44mm wide here, there’s only a few millimeters between the tire and the battery. SRAM is well aware of this issue, and it’s likely they’re addressing it in future products. The battery doesn’t move during shifts, and there’s plenty of clearance around the cage, so I don’t anticipate problems, but I also can’t put wider tires on this bike. If you’re planning a similar build, limit it to 40mm (claimed) tires and check clearance before you ride.

SPEEDPLAY SYZR “MOUNTAIN BIKE” PEDALS

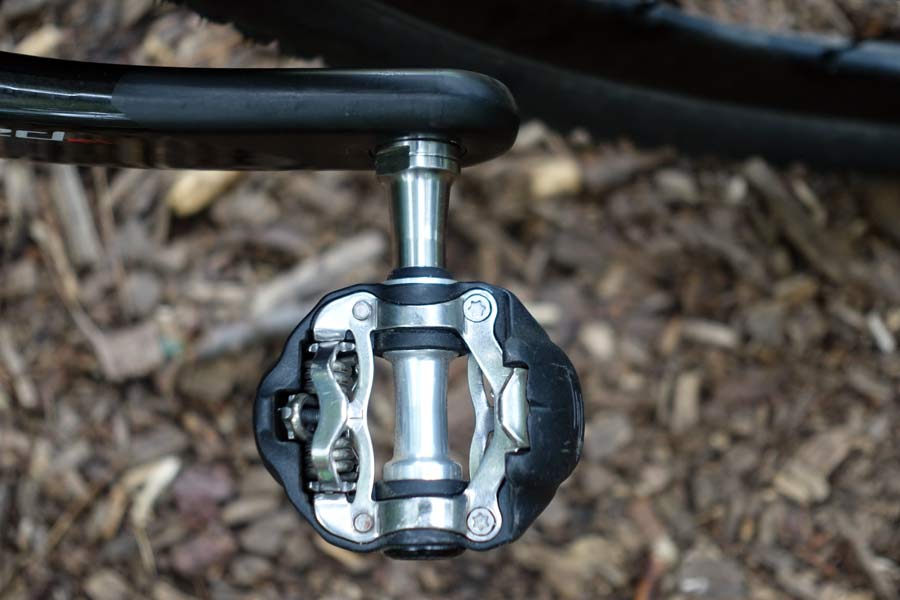
speedplay syzr mountain bike pedal review as used for gravel bikes

OK, we’re going long form here. Back in January, I sat down with Speedplay’s founder, Richard Bryne, and discussed the SYZR pedals. He says people wanted more stability in an off-road pedal, to feel more like a road pedal. In the process of figuring out how to do that, he looked at Shimano’s MTB pedals, which are more or less the standard against all others are judged. What he found was that the SPD design was leaving efficiency on the table because they relied on resting the rubber treads on the body of the pedal. That meant there were soft points that were supposed to provide stability.

His solution was to eliminate the reliance on the tread to provide stability. Instead, the sides of the cleat are raised slightly and match up with raised sections on the pedal’s body, putting metal on metal. To ensure full, consistent contact, the shape of the “claws” on the pedal that grab onto the cleat’s are angled to provide downward force, pulling the two together. This also helps accommodate wear, and even though they’re designed with very high tolerances, it also makes up for any manufacturing variations.
speedplay syzr mountain bike pedal review as used for gravel bikes
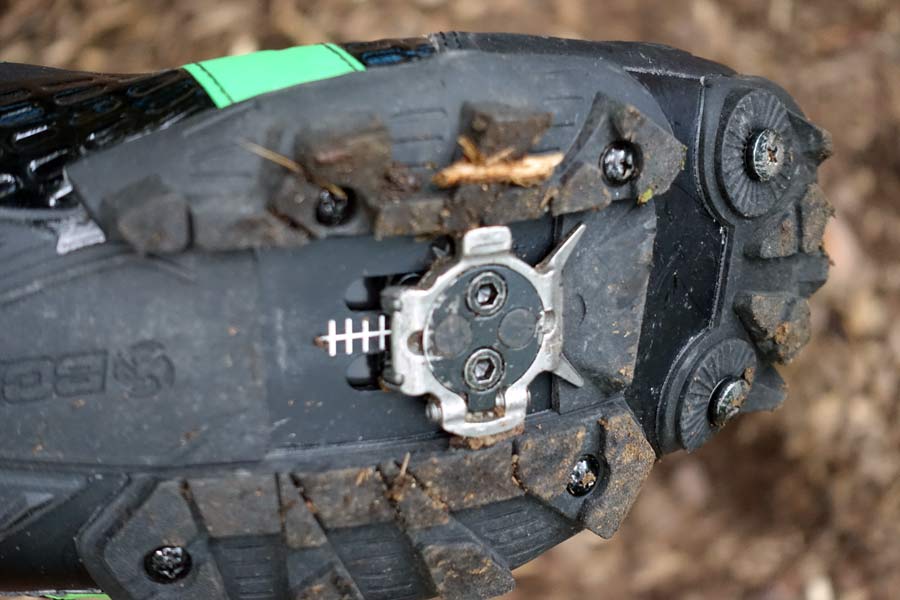
A funnel guide helps guide the cleat into the pedal.

Lastly, he wanted to improve the biomechanics, offering a similar float as they do on the Zero road pedals. This is accomplished by using a “floating” cleat similar to what’s on their road pedals where the cleats rotate on the mount, and two screws let you adjust the amount of float.

They also offer five different spindle lengths and a shim system to adjust the height of the pedal on the pedal itself rather than putting shims under the cleat (on the shoe), allowing for riders and fitters to accommodate leg length discrepancies.

speedplay syzr mountain bike pedal review as used for gravel bikes

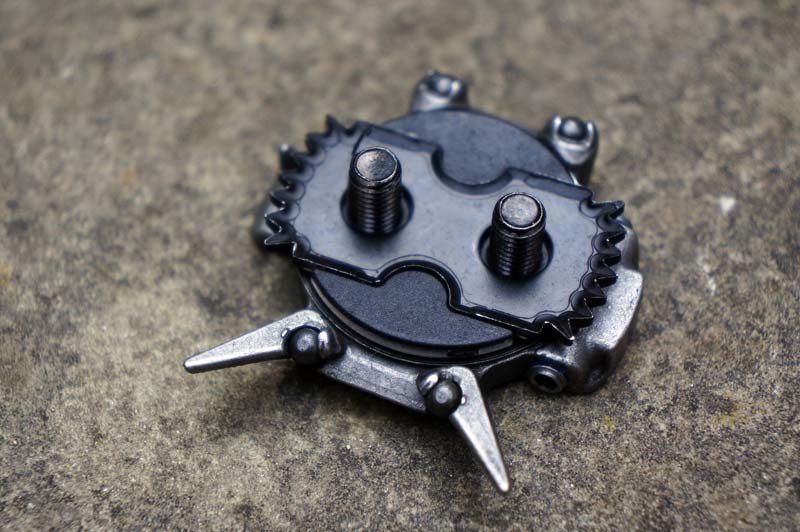
With the extremely high tolerance and fit, they found that it had some issues releasing in foul conditions. Solving this is what delayed the launch the most. Different metals don’t play nicely together, sometimes sticking or trying to cold weld to each other. Eventually, he developed small ceramic rollers on each corner of the cleat that helped things slide more freely and release even when they got dirty.

The pedals themselves have needle bearings inboard with two seals (lip and o-ring) and a cartridge bearing on the outboard side with a grease injection port. Stainless steel spindles and titanium spindles are made in California, as are some of the metal parts of the body. They also offer a more affordable chromoly spindle option.

speedplay syzr pedals actual weight

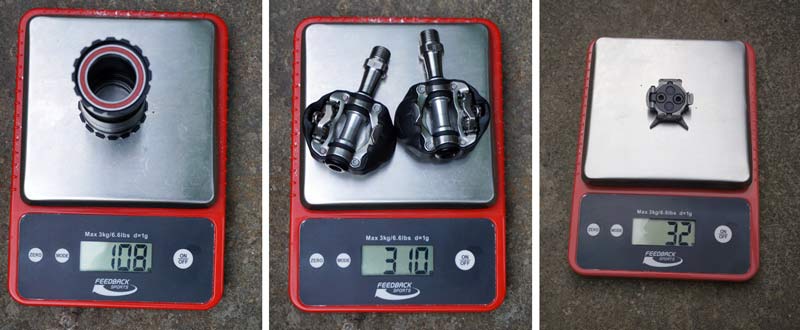
The pedals weigh in at 310g with the stainless spindles in normal length. Cleats are 32g each, so total weight to put them on your bike and shoes is 374g. That Wheels Mfg. BB is 108g.

So, how do they perform? This is where I’m still on the fence. Richard very strongly recommended trying these out on the road first, which seemed odd for a “mountain bike” pedal. Gravel is my compromise, and he seemed relieved at that prospect. My first impressions are that they release far too easily. The recommended way around this is NOT to increase spring tension on the release mechanism, but rather to open up the outward float angle a little. I’ve done both, actually, but looking at my shoes, I’m thinking the cleats may not be rotating as designed because they’re tightly packed in between the treads on Bont’s Riot mountain bike shoes. So, I’m going to file down the tread to give the cleats breathing room, open up the angle a bit more and see what happens. As is, they don’t inspire confidence, which makes it hard to really rip the bike hard or jump stuff for fear of coming out. And I wouldn’t use them for mountain biking or cyclocross. That said, I’ve ridden hard and fast over rooty trails and NOT come out of them unintentionally, but I still don’t feel locked in the way I’m used to. I’ll report back in a future roundup review on this project bike.

Check out Part 1 for the frameset, Part 2 for the wheels and tires, and Part 3 for the cockpit. Stay tuned for Part 5, where I discuss the small bits that add to the bike’s character.
SaveSave

Subscribe
Notify of
guest

This site uses Akismet to reduce spam. Learn how your comment data is processed.

34 Comments
Oldest
Newest Most Voted
Inline Feedbacks
View all comments
Tom in MN
Tom in MN
7 years ago

A 50 chainring on a gravel (or touring) bike just makes the front shift an awkward huge jump and gives you much larger gears than is ever needed. See

https://wickwerks.com/products/cyclocross-42-34-110-bcd/

For a nice solution to this. I’m running a 42-34 using a 42 ring with no ramps and it shifts fine, so this set must shift really nicely.

David
David
7 years ago
Reply to  Tom in MN

if I’m going to run a 42 big ring in the front, I’ll only run a 42 run and go 1x. 50/34 is a great gravel gear for those that are man enough to run it. I ran it at Southern Cross a couple of years ago.

SAWTOOTH
SAWTOOTH
7 years ago
Reply to  David

You’re so manly. You must ride at least a 55t on a road bike.

50t is large for a gravel bike and most people I see that “Stay in the big ring, like a man” also spend most of their time cross chaining into the largest cogs on their cassette.

TK
TK
7 years ago
Reply to  SAWTOOTH

He rides a 56t on the road and so do I.

Dinger
Dinger
7 years ago
Reply to  Tom in MN

That assumes that a gravel bike is only ever used on slower gravel surfaces. Most gravel bikes are getting used for lots of different kinds’ of rides, often changing to faster tires. That’s one of the main reasons so many people are buying bikes in the category.

A neat option (I think) are some of the newer 48/32 and 46/30 cranks that FSA is doing (Specialized is using them heavily). Still enough top-end for higher speeds, and the lower end for climbing on slower surfaces, without resorting to wide range cassettes with uncomfortably large jumps between gears.

Heffe
Heffe
7 years ago

You could try the newish HT Leopard pedals; they’ll lock you in.

Keir Stiegler
Keir Stiegler
7 years ago

Just to add my Syzr experience – yes, they release with less force than comparable Shimano pedals WHEN you are twisting your foot at all. Obviously, pulling straight up does nothing to release since that’s the point of clipless pedals. I’ve used my Syzr for fast group road rides as well cross and mountain bike races and the only instances of accidental release occurred when I was using more “body English” than normal, trying to steer with my feet rather than the bike. For me, it doesn’t happen anywhere often enough that I would give up the tunable float that is so lacking in other MTB pedals. The only thing I would want more in a pedal/cleat is side-to-side adjustability like Shimano cleats have. Otherwise, I’m a happy customer.

satanas
satanas
7 years ago

What pedals was the writer using before? If SPDs, maybe having float just feels odd, and requires acclimatisation; I cannot tolerate SPD due to the lack of float, so people’s mileage may vary.

FWIW, I’ve been using Speedplay Frogs for seversl years but am going to try the Syzr as I need the leg length compensation; I’ve not had any unwanted releases with the Frogs except when the cleats were totally knackered and needed replacing. Frogs are super quick and easy to get in and out of, light, and the free float is great (for me), but leg length compensation via shimming the cleat causes problems as the cleat tends to distort. They don’t like wet, gritty slurry much either…

Rod Diaz
Rod Diaz
7 years ago
Reply to  satanas

Been using the Syzr for a couple of seasons now, including a full CX one (8 races).

There are a few issues with fine tuning them, first is placement and interference: if your sole has a soft tread, they’ll dig in with low installation screw tension and not float at all (issue with a Lake shoe, not with a cheaper SIDI sole). They also need a fair amount of room between the lugs.I had to cut cut op a bit of a SIDI and Lake shoe.

With regard to unclipping – the only issue I found Vs. my previous pedals (Crankbros) is that they release much more easily if your toes are pointing down. Maybe that’s what the other comments regarding body english refer to.

Curiously, I had no issues with them in muddy races – at least no more than other pedals. They don’t like freezing conditions, though – they will pack with snow and ice like Shimano’s do. They are great for long rides off road; for CX it’s more of a toss up because of issues unclipping if you’re pointing your toes down and slightly harder engagement (not the tension, finding the spot) than Crankbros. But I still like them because they don’t have the confounding issues with the gates opening on hard efforts (like trying for the holeshot) and wondering about that mushy feel. They are totally solid underfoot.

Alistair Spence
Alistair Spence
7 years ago
Reply to  satanas

I have been very happy with my experience of Syzr pedals. Full disclosure, I’ve been using them for 5 months or so, on the road only. No off road experience with these.

I had to spend a some time with a carbide bit in a die grinder in order to grind a relief in the cleat “well” of my shoe (Giro Terraduro’s) so that the cleat could turn freely. Once that was done, they’ve been performing great.

I’ve been running them at almost minimum tension for a clip out that it easy on the knees. Compared to SPD’s, which in my experience have more “stiction” than “float” I consider the Syzr solution to be vastly superior.

I’ve yet to encounter a situation where I pulled out of the pedal when I wasn’t intending it to release.

Interesting to read your take on these pedals. Thanks.

Penn Teller
Penn Teller
7 years ago

I don’t quite follow. Tyler writes:

“The big question is, how does this system work for gravel bikes without a clutch derailleur? Pretty darn good, I’d say. No dropped chain yet, and there’s no chain catcher or other preventative measures installed. Most of my time on these surfaces are in the small chainring, too, so there’s more slack in the system, and still no drops.”

Huh? A properly adjusted front derailleur makes a pretty good chain guide, so I’m not surprised that the author hasn’t dropped the chain. That paragraph would make sense for a 1X setup with no front derailleur, but I don’t quite follow why he’s so impressed with zero chain drops on a bike with a front derailleur.

When SRAM introduced their clutched Type 2 rear derailleurs in 2012, they advertised reduced bounce and chain slap, not reduced chain drops. In 25 years of riding mountain bikes with front and (clutchless) rear derailleurs, I don’t recall ever dropping the chain unless I crashed or I blew a shift with an out-of-adjustment front derailleur. Am I missing something?

Penn Teller
Penn Teller
7 years ago
Reply to  Tyler Benedict

Thanks for explaining your thought process. I was thrown by your point about not dropping the chain even over rough ground. I’ve never dropped a chain on a double or triple due to rough ground. I *have* dropped a chain to the inside when shifting from the big to small chainring. I’d argue that any derailleur that drops a chain when shifting is misadjusted by definition.

But it’s hard to adjust a front derailleur perfectly, and sometimes a bike that shifts fine on the workstand will drop the chain to the inside 0.1% of the time in the heat of battle. A chain catcher allows you to adjust your derailleur to shift to the little ring authoritatively without risking a dropped chain.

K-Edge made its first chain catcher for Kristin Armstrong’s road bike, not for CX or mountain bikes. Andy Schleck dropped his chain in the Tour and lost the yellow jersey on the Port de Balès, a not-especially-bumpy climb. So I still don’t quite see the connection to bumpy ground, and I can’t say I’ve ever had bumpy ground cause the chain skip in the front, either. But I appreciate your explanation.

Dinger
Dinger
7 years ago
Reply to  Penn Teller

Your experience is remarkable. Derailling off of the front with a non-clutch R/D is pretty common. It cost Marianne Vos the CX world championship this year, for example. I see front chain drops on the road frequently, good riders even have a technique for “riding” it back onto the chain ring. Lastly, the common mistake of cross chaining (small/small) is a major contributor to chain-suck, and has destroyed it’s fair share of carbon frames.

Clutch road R/D’s can’t arrive soon enough.

David Walker
David Walker
7 years ago

I had the Syzr as well. My experience is that the prematurely released off road way more than SPD’s and I also had more trouble getting them aligned and engaged in a hurry. I eventually went back to SPD’s because of this. Even though I like the float. I also had initial problems with the float being really hard to turn. I noticed that the “claws” were dragging against the sole of the shoe. I put in one of the spacers that they supply and the problem went away. I guess that the curvature on my shoe soles was different than that of the claws.

ColinL
ColinL
7 years ago

If you can push 50×11 on flat ground with a 700×40 high volume tire, you probably should go pro. The drivetrain should have been 1×12.

Penn Teller
Penn Teller
7 years ago
Reply to  ColinL

I totally agree. There are some Cat IVs in my club who won’t use a compact crank because they “need the 53×11 for sprints.”

I don’t think they understand that the pros who turn a 53×11 are literally sprinting 30-40% (10-13 mph) faster than them. I also think they’re missing the fact that I’m outsprinting them (no great feat) even though my top gear is a 50×12.

ColinL
ColinL
7 years ago
Reply to  Penn Teller

This is a gravel bike. I mean, Ted King won the DK200 last year on 46×10 with a 650×42 tire. Somehow it was enough for a former Grand Tour domestique.

CaptainDon
CaptainDon
7 years ago

Great write up! I love the Syzr pedals – waaaaay better than the old Frogs. Hah! Really enjoying these funnest bike write ups. Keep it coming! Though… I think someone needs a refresher on how to tape bars, or at least, how to finish it off properly! Cheers!

riley martin
riley martin
7 years ago

the syzr! the greatest pedal that never was. speedplay. just stop. focus your time, money, and effort on your road pedals. your syzr’s have been a work in progress for YEARS…..i can appreciate the effort given your pedigree…….other pedals have come and STAYED….the syzr just keeps coming an going…..anyway. its just a bike with pedals. ride it however you’d like….
pedal damn it!

BigCottonwoodKid
BigCottonwoodKid
7 years ago

Frogs forever! I’ve ridden the same pair for 23 years. If it’s not broke….

drew
drew
7 years ago

Been on Speedplay since mid nineties. Bought syzrs and followed install to the letter. Popped out repeatedly. Checked install. Read more on them. Tried again. Popped out over and over. Shelfed them. Gambled and lost.

Alistair Spence
Alistair Spence
7 years ago
Reply to  drew

If you’re interested in selling them let me know.

Yup
Yup
7 years ago

Don’t the HRD brake calipers have a banjo fitting that you can use to rotate the brake hose to better line up with the frame entry point? Just crack the T25 bolt just enough so you can rotate the banjo fitting, rotate hose to desired position, then re-tighten. No re-bleed required and no more wonky bend in your rear brake hose.

Tyler Loewens
7 years ago

Weird – I had the opposite problem with the SYZR pedals. Mine were very secure all the time. My problem was if they got wet or muddy, you either couldn’t get out of them fast enough (fell over comically slow on a fat bike at the beach) or couldn’t get back in to the m as they were too muddy.

kt
kt
7 years ago

Eh, you lost me at Speedplay.

Definitely appreciate the unbiased review, but I’m not willing to file the tread of my shoes down for better contact.

Hexsense
Hexsense
7 years ago

There is a reason most pedals put the locking spring in the back.
Speedplay Syzr negate that and put spring in the front. what happen is when you toe down and push weight on them, you are effectively pushing open the spring and that lead to easy disengagement you mentioned in the article. This can also happen easier/harder depend on the gradient you are riding on (up hill or down hill).

The conventional way of spring in the back may suffer the same thing if you can managed to heel down as deep as you can toe down (i can’t) while push down large force. But it’s just not happening for normal human’s anatomy.

EMFC
EMFC
7 years ago

No need to be critical of the build, it will do as intended and looks like a fun bike. IMO I think you have succeeded in reaching your goal.

Matt
Matt
7 years ago

Time and Look MTB pedals are all spring on the front too…I think it’s a poor compromise.

Taber Newton
7 years ago

For the love of god, learn how to properly finish off wrapping a bar…

Paul
Paul
7 years ago

Yeah, just loosen the bolt on the banjo fitting a tiny bit and you can rotate the fitting to avoid the cable bend. Weird that so many bike shops don’t understand this either, I’ve seen so many bikes (including some we’ve bought) built up with terrible cable bends due to this little oversight.

Tyler Durden
Tyler Durden
7 years ago

I hate to be pedantic (actually I don’t), but that finishing tape on the handlebars is in dire need of help.

Toine
Toine
7 years ago

Not as good as Shimano’s drivetrains. End of story

Subscribe Now

Sign up to receive BikeRumor content direct to your inbox.