Home > Bike Types > Gravel Bikes

Review: Redshift ShockStop may just change your mind about suspension seatposts

16 Comments
Support us! Bikerumor may earn a small commission from affiliate links in this article. Learn More

Dropper posts might get all the attention these days, but there’s another form of seat post trickery that’s been around for ages. That of course, is the suspension seat post. One of the many ways riders have tried to increase the comfort of their rides, the suspension seat post is experiencing a bit of a renaissance with companies like Redshift Sports offering a new spin on an old idea. But the question remains – is the sleek design of the Redshift ShockStop Suspension Seatpost worth the cash? Yes, probably.

Redshift ShockStop suspension seat post travel

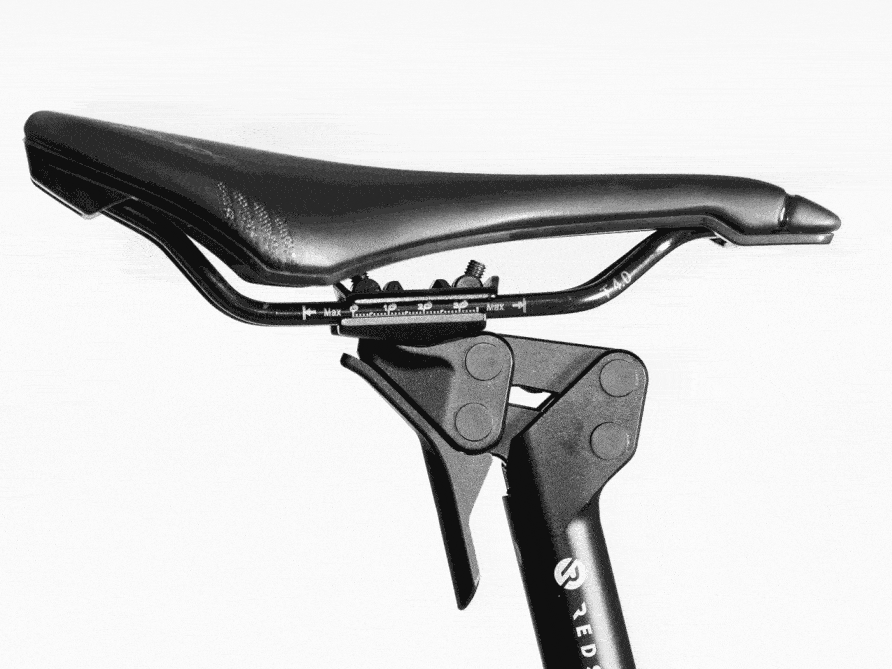
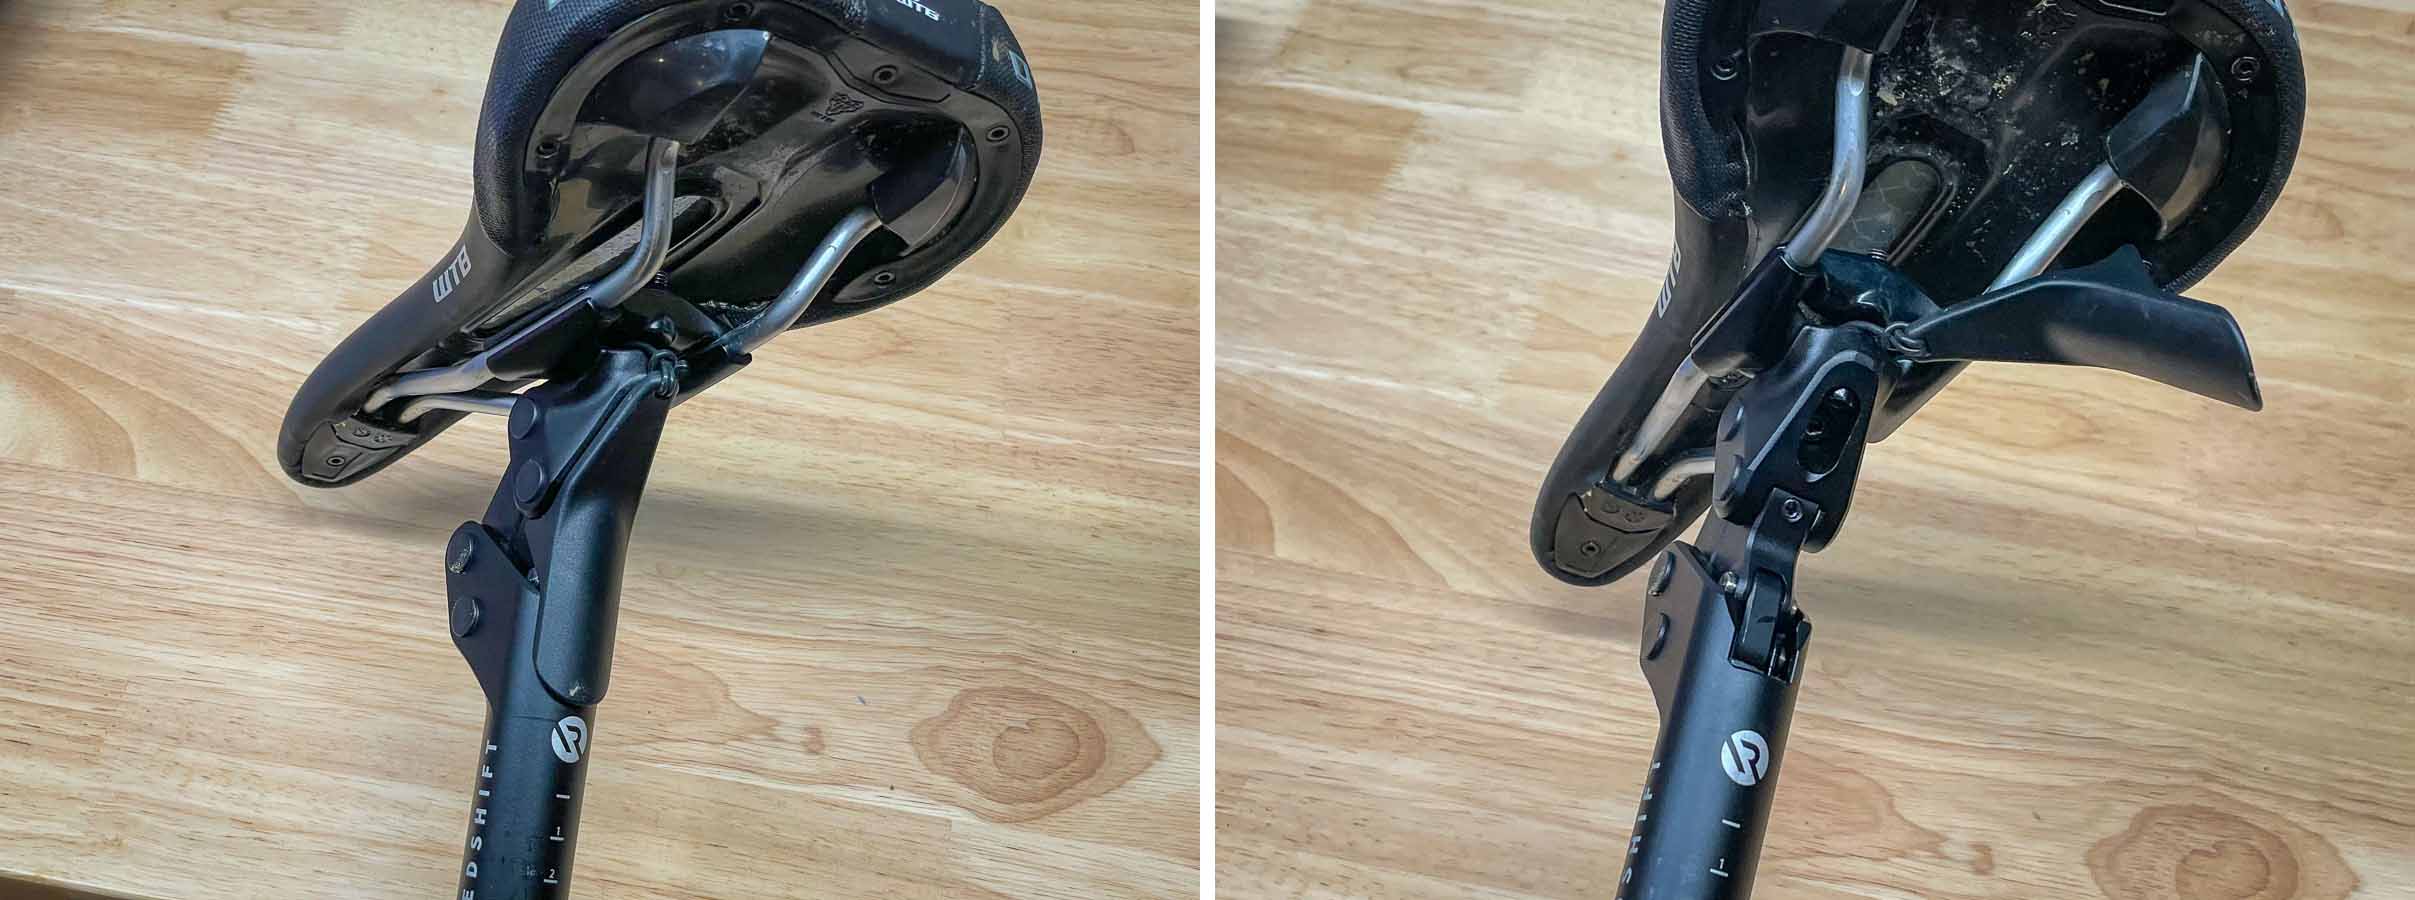
Built with a unique linkage based suspension, the ShockStop Seatpost offers 35mm of suspension travel controlled through the spring inside the seat post. Redshift mentions that they wanted to create a post with travel that was less progressive than those using elastomers which is why they went the coil spring route. Elastomers can work well for shorter travel designs, but they tend to ramp up quickly making it difficult to use the full travel of the post.

Due to the linkage geometry, the suspension remains impressively responsive while also keeping the saddle flat through the full range of travel. The travel does have a slight rearward ‘axle path’, with the offset starting at 7mm and growing to 12mm at 25% travel. Like other suspension, when properly set up, the ShockStop will have a bit of sag. Redshift recommends starting with about 6mm or 20% from the top of the travel range when sitting on the bike in a neutral position. Because of this, you’ll want to set your saddle position a bit higher, and farther forward than you usually would. Redshift recommends starting with your saddle height 6mm higher than usual, with saddle position 6mm farther forward.

Internals

Internal parts of Redshift ShockStop suspension seat post

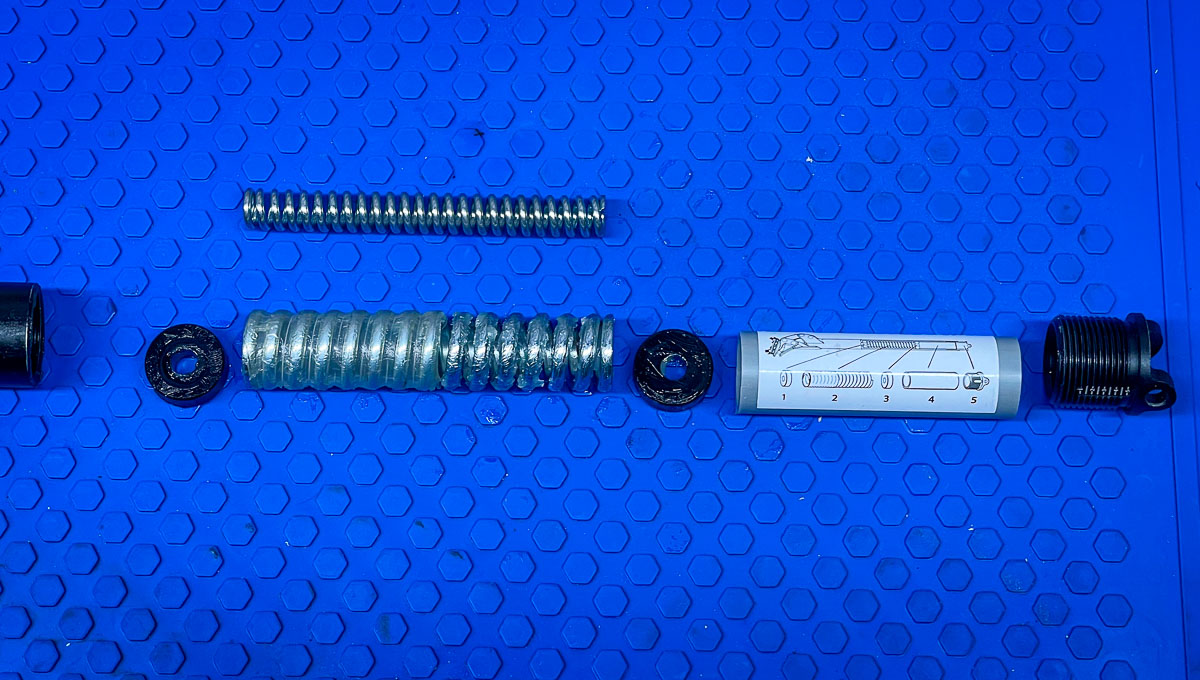
Inside the ShockStop seat post, things are fairly simple. Under the Preload adjustment plug, there’s a Spring Spacer, then a Spring Endcap, followed by the Main Spring, and then another Spring End Cap. If you want more support than the main spring offers, you can add the included Inner Spring which rides inside the Main Spring for a stiffer setting.

Kudos to Redshift for not only including a very detailed instruction manual with the seat post, but also placing a diagram with the component order on the Spring Spacer itself. No excuses for messing things up here! Note that the heat shrink on the Main Spring is meant to face the top of the seat post – it’s pictured that way on the diagram, so again, no excuses.

Correct setup is critical

Redshift ShockStop suspension seat post preload cap Redshift ShockStop suspension seat post di2 compatibility

With the post fully assembled, preload adjustments can be made very simply. Just place a 4mm hex wrench inside the holes on the Preload Adjustment Plug and turn clockwise to add more preload, counter clockwise to remove it. The plug is labeled from 1 to 5, with 5 being the firmest setting which should only be used with both springs.

Also, the Preload Adjustment Plug and the internals are hollow for a reason. This allows you to run a Shimano Di2 internal battery with the installation kit from Redshift. The “kit” is simply two o-rings which fit around the battery and hold it in place, and is priced accordingly at $2.99.

Redshift ShockStop suspension seat post tuning chart

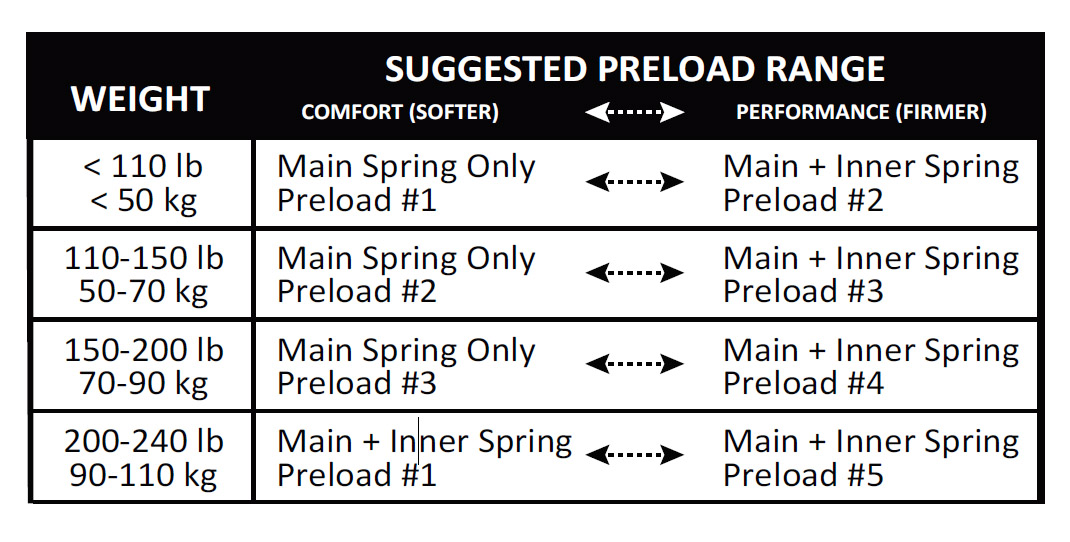
It’s also worth pointing out that Redshift has updated their suggested preload range since the first ShockStop seat posts went out (including the one in this review). I found that their original suggestions were far too soft for my liking, which made me happy to see that their revised chart above includes both a comfort and performance recommendation which are quite different.

At 150lbs, initially I went with their recommendation of the Main Spring only with preload at #3. This was way too soft in my opinion, especially for more spirited riding. The next step was to increase the preload with just the Main Spring. Eventually, I cranked it up to 4 which is the maximum recommended preload setting with just the main spring. It was better, but I found that it resulted in a ride that was still a little too active, and it was more prone to ‘topping out’ with a thud in certain situations.

Finally, I added the Inner Spring and ran a preload setting of 2/3. This was much more to my liking. The suspension was quite a bit firmer, but still incredibly smooth throughout the travel and resulted in a saddle that seemed to ‘float’ within the travel range. It also seemed to cut down on any top out issues for the most part.

The aha moment came while I was riding the last setup and powering through a very rough section of trail. My concerns about feeling changes in saddle height were replaced by thoughts focused on how much smoother the back of the bike felt compared to the front. On a completely rigid gravel bike, the sensation from the saddle made it seem like it was coming from a completely different bike. In my testing, it’s led me to believe that it definitely allows for better power transfer through rough terrain while seated, and may even offer a noticeable improvement on climbing traction. That last bit is still debatable, but I was blown away by how much traction I was able to maintain in scary slick conditions on a super steep section of trail with the wrong tires. I thought for sure that I’d be walking, but I made it almost all the way to the top, which is difficult to do on a dry day.

What about heavier riders? My current set up still has quite a bit of preload you can dial in (which stiffens the feel of the post without reducing the travel). But heavier riders may still find that they should be running a stiffer spring. For those riders, Redshift is working on a new stiffer spring option that will include both the main and inner spring with springs made from a material that is 25% stiffer. This option will likely be available for sale from Redshift in the new year.

Redshift ShockStop suspension seat post on gravel bike

So this thing is awesome, and you should definitely buy one. Right? Well, as good as it is, there are some drawbacks…

Redshift ShockStop suspension seat post sizing chart

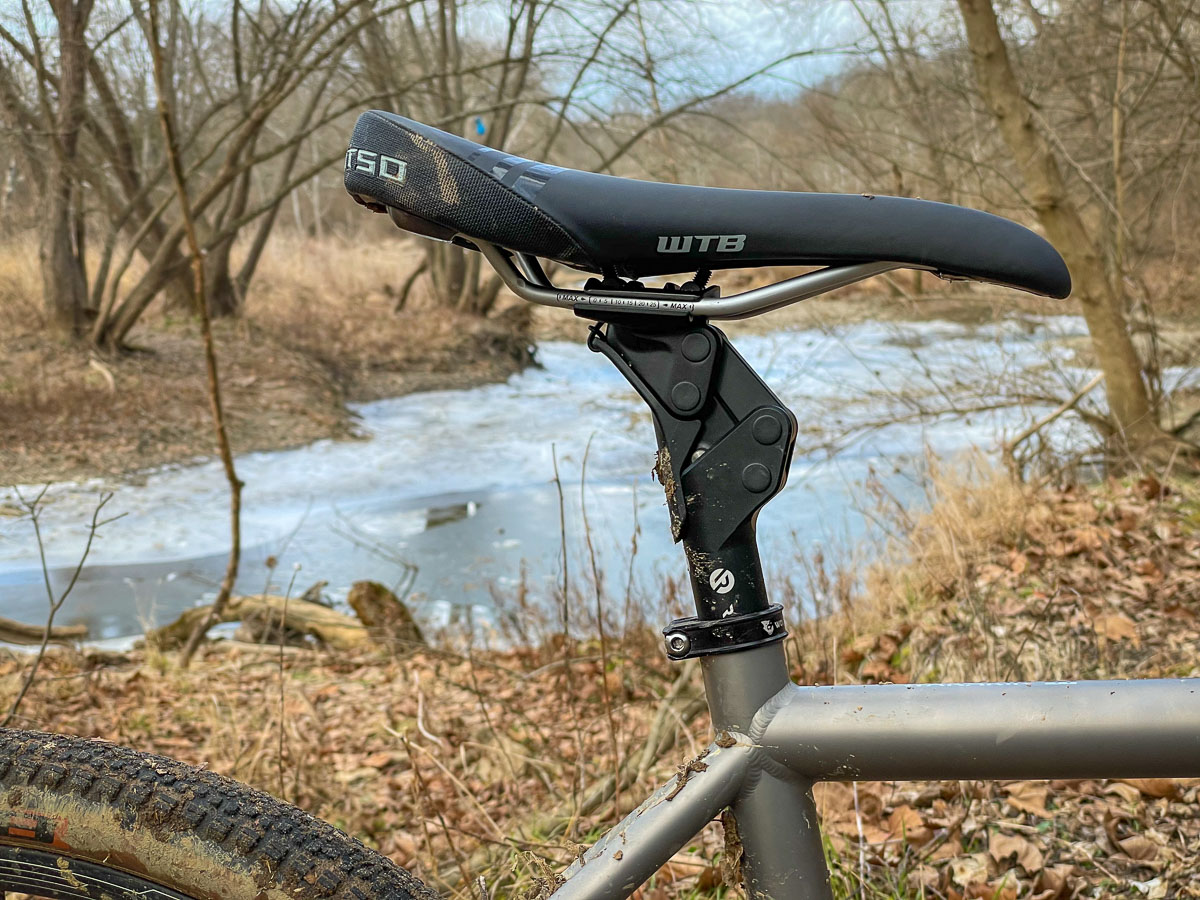
The design of the linkage, while enabling buttery smooth travel, does take up real estate on the post. Redshift managed to package the ShockStop Seatpost into an impressively sleek package that doesn’t look out of place on a modern bike, but you do have to have at least 90mm of exposed seat post to the saddle rails to run the post. This includes extra distance as the magnetic ‘fender’ moves down with the saddle as the post moves through the travel (though the fender can be removed if needed).

What about seatpost mounted lights?

How to mount light on Redshift ShockStop suspension seat post

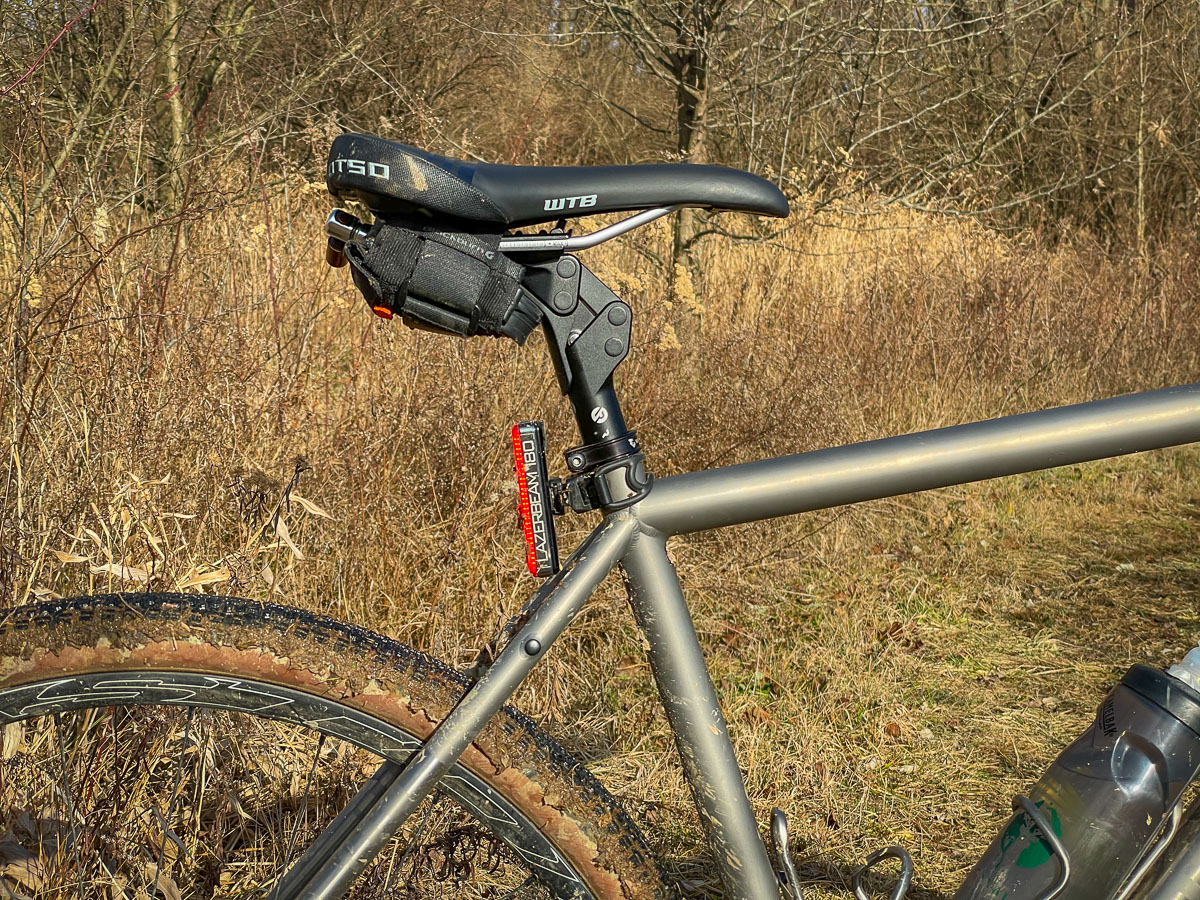
It was the movement of that fender that got me on my first ride with the post. Not because I didn’t have enough room for the post – but because I didn’t have enough room for a light. I had mounted a light to where I thought it would clear the fender, but the first big bump knocked the light right off the post.

Fortunately, the Axiom Lazerbeam 180 not only has a rubber band that is long enough to fit around the seat tube of the Otso Warakin Ti, it also has an articulating clamp and a tall, skinny design that allows me to position it so it’s still visible to traffic. More reasons it was worth of an Editor’s Choice award.

Another solution? You can remove the Fender entirely. Redshift points out that all of the pivots are sealed and mostly maintenance free – they even state that you should not add any grease or lubrication to the pivot bushings.

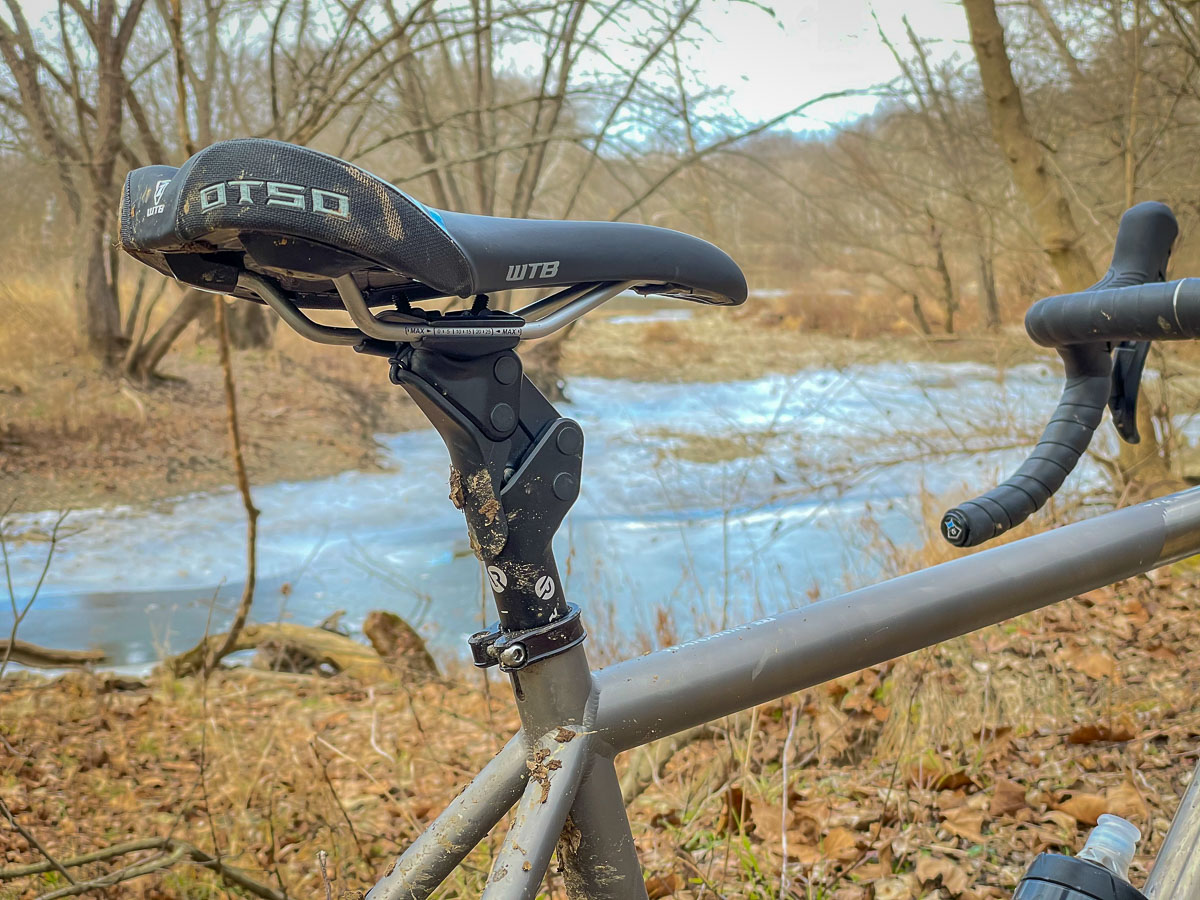
In really muddy terrain, the Fender works very well to keep mud out of the works. So it’s probably best to run the Fender unless clearance issues prevent you from doing so.

Can I use a saddle bag?

Redshift ShockStop suspension seat post with saddle bag

Saddle bags are fine to use with the ShockStop Seatpost, as they move with the seat post and fender.

Select your (multi) tool wisely

saddle clamp bolts for Redshift ShockStop suspension seat post

Redshift ShockStop suspension seat post fender

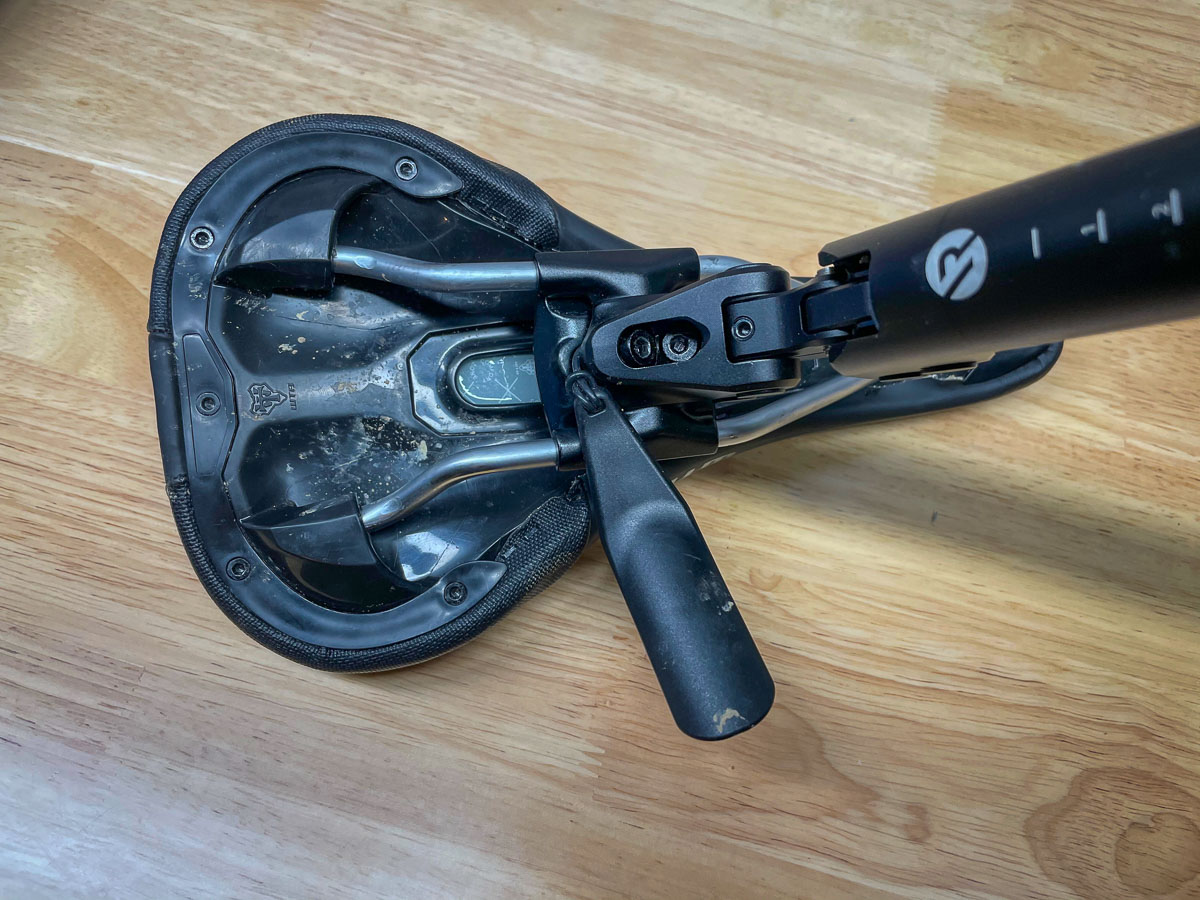
Underneath that magnetically attached fender are the two bolts for saddle adjustment. The post design puts constraints on where these bolts can be located. As a result they are very close together inside a recessed pocket in the post. Unfortunately, their arrangement makes it nearly impossible to use certain multi-tools to adjust saddle position or tighten the bolts in the field.

Because of this, a ball end 4mm hex wrench seems like the best tool for the job to quickly install a saddle. And it’s a good idea to carry one with you on your first few rides to make any saddle changes. But once you’ve gotten your position dialed in, you can probably leave it at home.

Weight & Pricing

actual weight of Redshift ShockStop suspension seat post

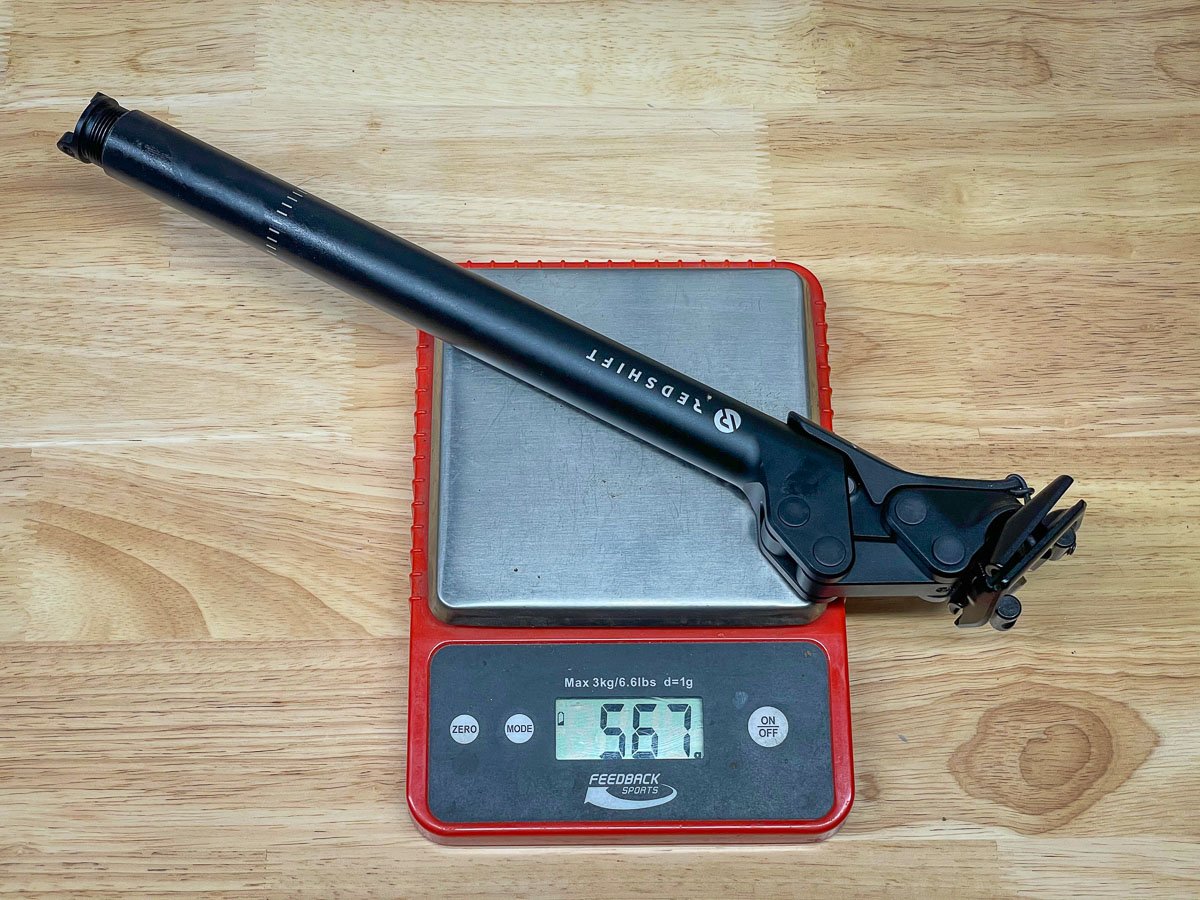
Then of course, there’s the weight. At 567g with both springs installed, this post isn’t exactly light. But then again, it’s not far off many dropper posts either.

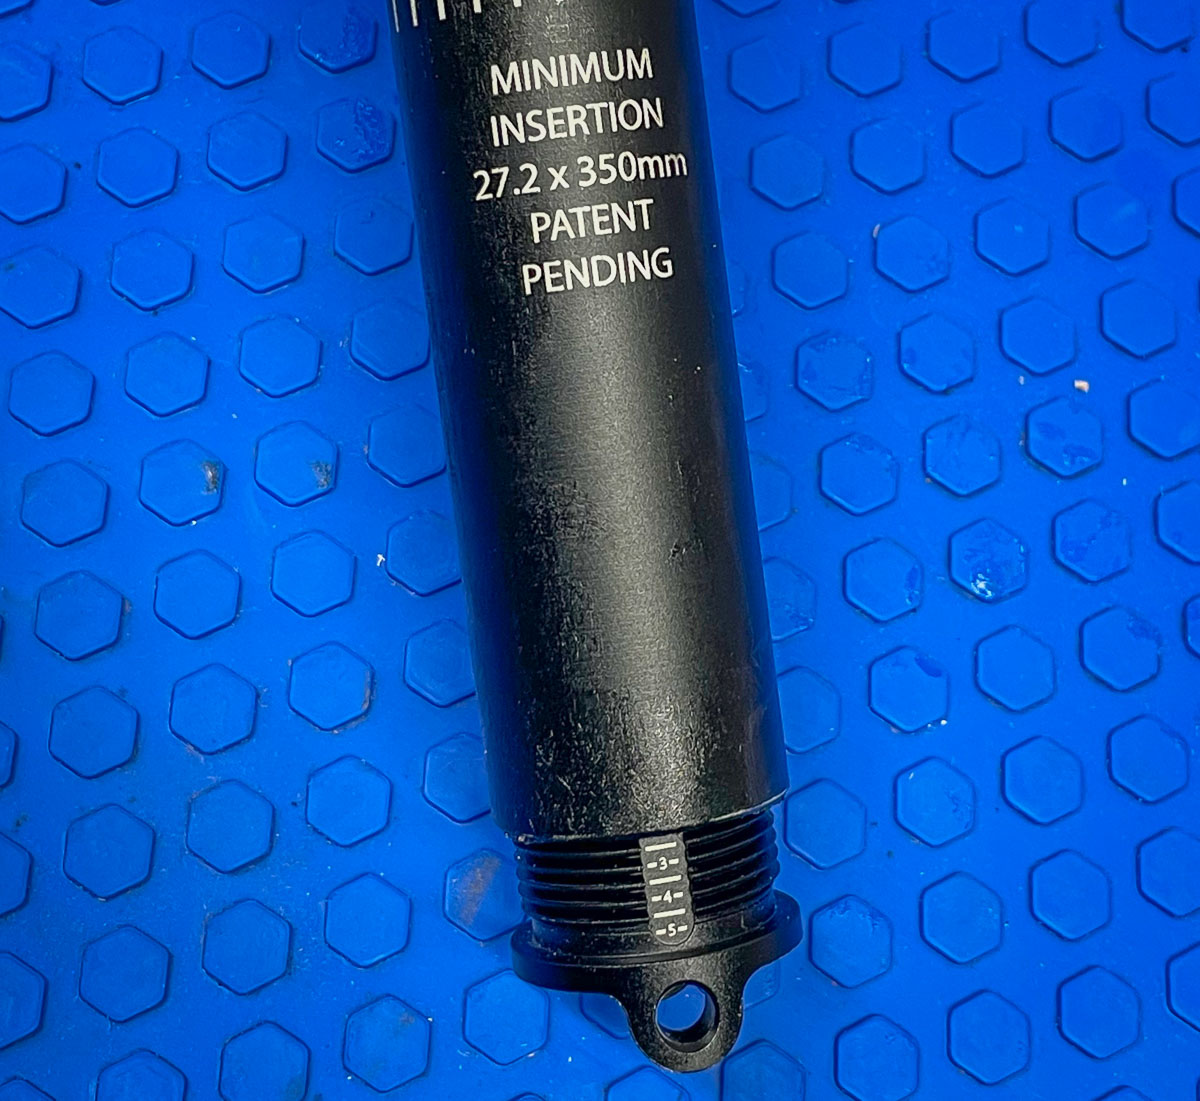
The ShockStop Suspension Seatpost is listed at $229.99. Only available in 27.2mm diameter and with a 350mm length, Redshift does offer seat post shims for $7.99 that will allow it to fit nearly any frame. If you want the front of the bike to match the feel of the rear, you can also buy the seatpost as part of their ShockStop System which includes their ShockStop Stem. The combo pack is priced at $379.98.

There’s also an option for their just-released ShockStop Stem Pro, which uses additional machining plus titanium hardware to drop the weight of the original by 15% (240g for 100mm Pro stem). The Pro stems can be added to the ShockStop System package for an additional $64, and they’ll ship in February.

Otso Warakin Ti with Redshift ShockStop suspension seat post
From a distance, the ShockStop doesn’t look too out of place.

Verdict

Honestly, I’ve never really been a fan of suspension seat posts. I’m not sure the ShockStop changes that, but it’s come closer than any other post before it. I would say that I’m very sensitive to small changes in saddle height, which makes it hard to get used to a seat post where that is constantly changing.

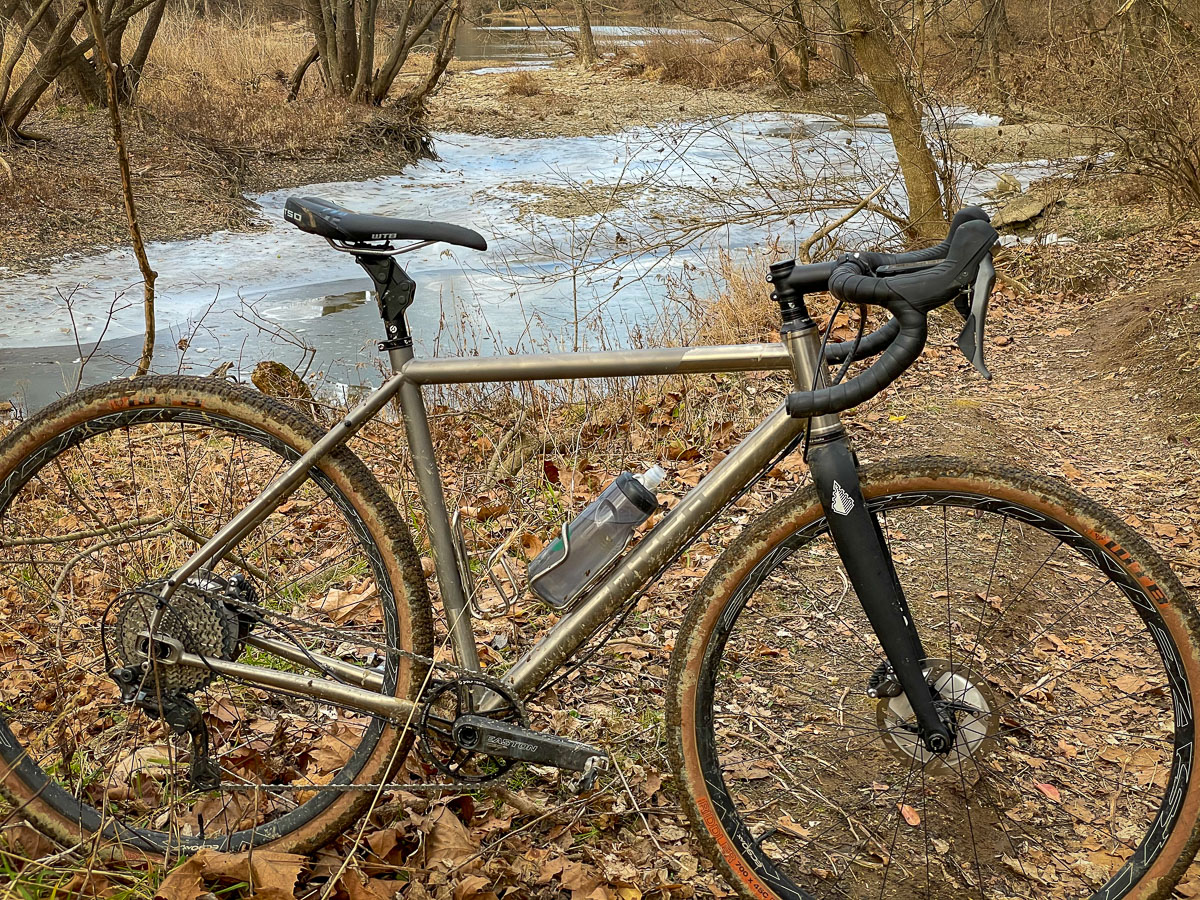
However, when driving the bike through rough terrain, the ShockStop is a thing of beauty, and works exactly as promised. It allows you to stay seated while putting down power, and may make it easier to maintain traction. Overall, it seems like an incredibly easy and effective way to add a high degree of comfort to any bike, whether that’s a gravel bike, MTB, or even road or e-bike. But there is still some pedaling induced movement that is noticeable on pavement, which may be a turn off for some. I would guess that most riders would get used to this feeling eventually, but that’s up to the individual.

Rather than a bouncy shock absorber with a saddle mounted on top, the ShockStop really feels like you’ve added working suspension to your bike. Realistically, if you’re in the market for a suspension seat post, you really can’t go wrong with the ShockStop. I would say it’s category leading, and almost convinced a long-time suspension seat post skeptic to keep it on their bike for good.

redshiftsports.com

Subscribe
Notify of
guest

This site uses Akismet to reduce spam. Learn how your comment data is processed.

16 Comments
Oldest
Newest Most Voted
Inline Feedbacks
View all comments
GH
GH
3 years ago

The seat post reminds me quite a bit of a beefed up Tamer post.

Aaron
Aaron
3 years ago

My current gravel seatpost is 180g, and cost about $35 over a decade ago, so I’ll just stick with that. The problems this post address seem like they could be better addressed with a properly fitting saddle and larger volume tires with less air pressure.

Tandem Adventurers
3 years ago
Reply to  Aaron

We very recently installed a Post Moderne Venzo seatpost for the stoker cockpit on one of our tandems. It’s very similar to the RedShift in design, construction, and function and not too far off in weight, but less than 1/3 the cost.
We published a “first impressions” video on YouTube at https://youtu.be/A8oqHHC1jaM. It’s not really a full review since we don’t have a lot of time on the seatpost as of yet.

NC
NC
3 years ago

I’ve got 3 Kinekt BodyFloat seat posts that I’ve picked up over the years. Would like to see a head to head comparison of the two, especially since they approach the spring mechanism in different ways. At least with the Kinekt post, I can get it in whatever diameter I need instead of using shims. Looking at the tech specs, every single model of the Kinekt post is lighter than this one.

NC
NC
3 years ago
Reply to  nooner

Thanks! Based on that article, it looks like I made the best choice for my needs.

KGR
KGR
3 years ago

I absolutely love my ShockStop stem. I ride a rigid hardtail and was sick and tired of my wrists taking a hell of a beating, particularly when the sun glare in my face makes it easy to hit sharp bumps by surprise. I got to the point where I thought I may have to ditch the rigid fork for a proper suspension. The ShockStop stem changed all that – my wrists were happy and I’ve never thought about putting a suspension fork on that bike again. The best part is that I literally never think about it and it just takes the harsh edge off hits, nothing more. It really honors the rigid front end while being kinder to your body.

With high expectations from the stem, I bought the ShockStop seatpost. The experience was not the same. At 214 lbs, I should have been easily within the proper weight range. What I wanted from the seatpost was exactly the same thing I had from the stem: I don’t want it to move around. I don’t want plush. Just take the edge off of bigger hits and otherwise be invisible. Unfortunately, I couldn’t achieve that with the seatpost. It would dip too easily while just riding along and it was very distracting when it happened. I used all the springs, maxed out the preload, and even cheated a little bit with a tiny spacer to try to squeeze a little more preload out of it. Nothing got me to where I wanted to be. The guys at Redshift were super understanding and let me return the seatpost with no hassle at all.

If you’re close to the upper limit and want the post to stay still until you take a bigger hit, then maybe this isn’t the right post or just wait for the heavier spring to come out. If you’re nowhere near the upper limit of the weight scale or don’t mind movement during normal riding, then party on.

Stephen Ahnert
Stephen Ahnert
3 years ago
Reply to  KGR

@KGR – Stephen from Redshift here. Glad you’re enjoying the stem, and sorry the stock spring setup on the seatpost didn’t work out for you. We developed the stiffer spring material specifically based on feedback from riders like you. We’ve got them in-stock in our warehouse, just not listed on our website yet, so if you’re interested in trying out the seatpost again with the stiffer setup, shoot us an email at support@redshiftsports.com and we’ll get you sorted. Our usual 90 day free return period would apply, so if the stiffer setup still doesn’t work for you, no worries. Thanks again for your support – hope you have a happy new year!

made
made
3 years ago

while i get the stem suspension, the seatpost suspension never made sense to me. when the terrain requires it im not seated anyway so it provides neither comfort or traction. i feel like a good saddle and flex seat post provide the minimum for the light terrain seated situation.

of course and again for the stem it makes sense to me and that looks nice

Jason Berry
Jason Berry
3 years ago

I used to laugh at people with suspension seatposts. Like a couple of commenters here, I felt it was an issue of proper seat adjustment and tire pressure. As a KOM-chasing, overly competitive maniac that frequently destroys equipment, I felt I was NOT the use case for these items.
Then a friend gave me a Thudbuster 3G LT, so I popped it on my gravel bike for a year and found it amazing. Although it was too bouncy on the road, it was life-changing on the rough gravel (and I ride technical, fast, and bumpy). Surprisingly, I could easily ride twice the distance with no neck or back fatigue and it eliminated hesitation on downhills that I had no business being on. So I kept my cushy gravel bike off road and my stiff road bikes where they belonged (mostly ).
Then I built up a new gravel beast and thought, hey, why not upgrade the seatpost as well. I retired the Thudbuster and sprung for a Redshift (pun intended). I’ve been on it for a month now and there are no downsides. I’m 175# and this post is perfect. I run it slightly soft and it keeps me planted through the big hits and eliminates most of the medium chatter. Small stuttery garbage is gone. The return rate is immediate and so I’ve had no issues taking this bike on the concrete. Yesterday, on a whim, I took this bike on a group road ride and was in the front the whole time. I’ve experienced no penalty for running the Redshift post on the road!
I put this seatpost in the same class as Rene Herse tires. Not cheap, but worth three times the price in terms of performance. Helps to transform my gravel bike into a true all-rounder. I’m in love.

Mike V.
Mike V.
3 years ago

I’ve had both the Redshift stem and seatpost on my Santa Cruz Stigmata for almost a year now. Don’t know if I’d want to do a long road ride with the seatpost, but on gravel it’s magic. Matched up with the stem, I can ride rough gravel roads all day in comfort and with a level of control and traction that’s unmatched on other gravel bikes I’ve owned and ridden (including the Stigmata before I swapped out the seatpost and stem). I have wondered a little about climbing efficiency and whether I’m giving up a some power to the seatpost on long (2-20 miles), steeper (6-22%) climbs. My times up some regular routes are a bit slower than with my old Trek Checkpoint (which has a much less active suspension system built into the frame), but that could be due to my level of fitness this year too. On the other hand, my times on the descents are definitely faster, and I attribute that to the confidence from suspension. I’m also finding I’m enjoying my rides much more since installing both.

NC
NC
3 years ago

If you want to compete with Kinekt, you need to release larger post diameters, which will also give you more ability to tweak the springs. I hate using shims, so I wouldn’t even consider this post for anything but a 27.2 bike. If you had a 31.6mm post with springs to support a 235lb rider, I’d probably buy one to test it out. I’ve also bought the PNW Coast dropper with suspension feature, and found it to be unsuitable, swapped that bike (30.9) back to a Kinekt. A big part of their market are people like me, long time cyclists dealing with age/injuries and the weight gain that comes with them, at a point in my life where I can afford to try new things that might keep me on the bike for both longer periods of time and later into my years.

Jiri
Jiri
3 years ago

I was early adopter of it at kickstarter. It is great. I would buy it again and it is the best review I think.
If you ride mostly road, don’t buy it, it is a bit annoying on the road.
If your rides are mostly offroad, go for it.
But one note. Recommended setup was too soft. I have 74kg and I use setup for 90+ (inner + outer spring). Yes, it is not too soft for offroad, but you can pedal on the road without beeing upset of swinging.

Melea
Melea
2 years ago

not impressed with this company- I bought both the stem and seatpost after giving them my specs and, at 5″3 the seatpost will not work! and cannot be cut down!. they expect me to pay $90 return post to get a refund.I was prepared to wait mid year when they release their smaller seatpost, after selling me something that clearly wouldn’t work- (and also a wrong shim size, blaming my mechanic for the error, wrong, hes one of the best in Sydney australia at Omnefiets) but not now. I have to sell my brand new never used Seatpost on eBay at a loss. This company sucks. such high expectations, and anticipation paying a premium for this kit- only leading to disappointment. If you are under 5″5 forget about the Seatpost. It wont work for you.

Adrienne Blumer
4 months ago

I recently had the opportunity to try out the Redshift ShockStop suspension seatpost, and I must say, it truly exceeded my expectations. As someone who was initially skeptical about the benefits of suspension seatposts, this product has changed my perspective entirely.

Subscribe Now

Sign up to receive BikeRumor content direct to your inbox.

Subscribe Now

Sign up to receive BikeRumor content direct to your inbox.