Last time, we talked about Anti-Squat, which is a frame’s rear suspension design’s resistance to compression under acceleration and pedaling forces. This week, we talk about Anti-Rise. While it sounds like a simple inverse, it’s actually quite different as it has little to do with pedaling force, and much more to do with braking forces and the subsequent shift of your weight.
For this installment, we have answers from Chris Currie (President, Speedgoat Designs and the guy behind the new Jamis 3VO suspension), Christophe R. Benoit (MTB Engineer, Cycles Devinci), Tim Krueger (Managing Partner, Esker Cycles), Tyler Cloward (Director of Product Development, Fezzari) and George Parry (Engineering Manager, Niner Bikes), (Tim Krueger, ) and (
BIKERUMOR: In simple terms, what is “Anti-Rise”?
BENOIT: When braking, the force created by the decelerating mass of the rider causes the rear end to ‘rise’. The Anti-Rise is the propensity of a suspension to stay active under braking conditions by counteracting this brake jack using appropriate pivot placement. It’s simple geometry.
KRUEGER: Well, it could mean a few things in this context, but in the bicycle world, it generally refers to the concept of designing a suspension not to extend under braking forces. So, that would be the trait of a suspension system that resists suspension extension under mass (meaning “weight”) transfer during braking.
Currie: These days, mostly a marketing term. First, understand that it’s relative. “Anti-rise” isn’t a feature found on only some bikes. Whether you’re seeing the term “anti-rise” or “anti-dive” (opposite way of measuring the same basic thing), all suspension systems with rear brakes have it. One bike will have more “anti-rise” than another, but if your wheel goes up and down when you hit stuff and you have a rear brake, you’re in on the party. It’s usually better to set aside the vague terms and instead think about how your bike behaves. There are three kinds of bikes in the world when it comes to squeezing your rear brake lever: ones that compress their rear suspension or “dive,” ones that firm up their rear suspension or “rise,” and ones that ignore the brake and let the suspension work the same whether the brake is being applied or not.
BIKERUMOR: If you had to explain it more technically, is there anything you need to add to that description to help people understand the concept better? (as in, if a bike has “50%” anti-rise, what does that number mean?)
CURRIE: First, visualize this: when you accelerate (pedal) or decelerate (hit the rear brake), you’re a giant bag of meat and water sloshing backward or forward, so it’s up to the pivot locations and link dimensions of your suspension system to deal with that mass. “Anti-rise” behavior (braking) and “anti-squat” behavior (pedaling) are both calculated relative to a “center of gravity,” or basically where that giant bag of meat and water that is you happens to be at any given moment.
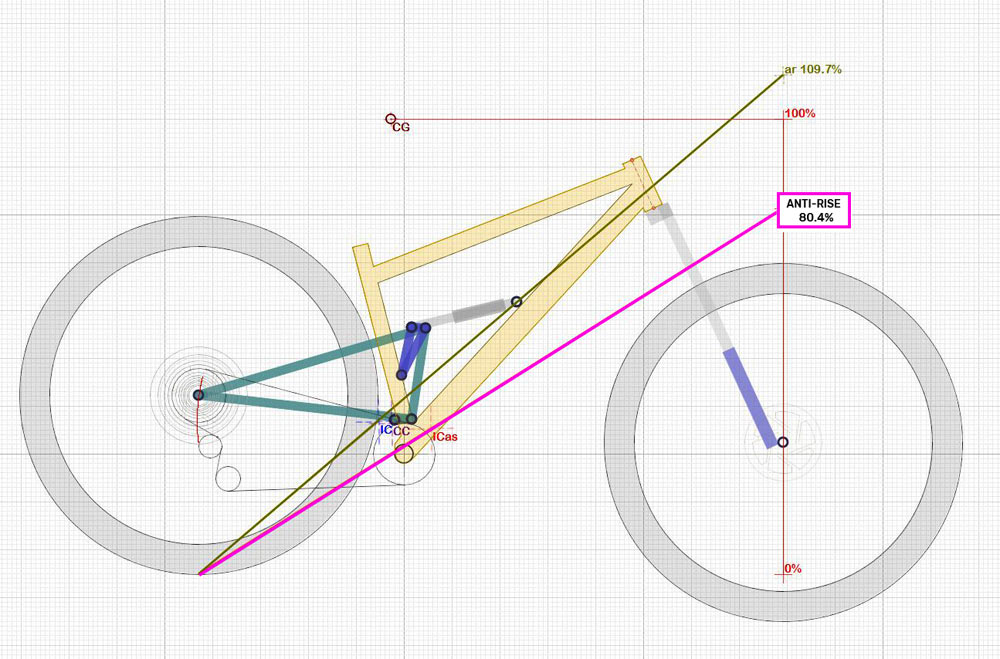
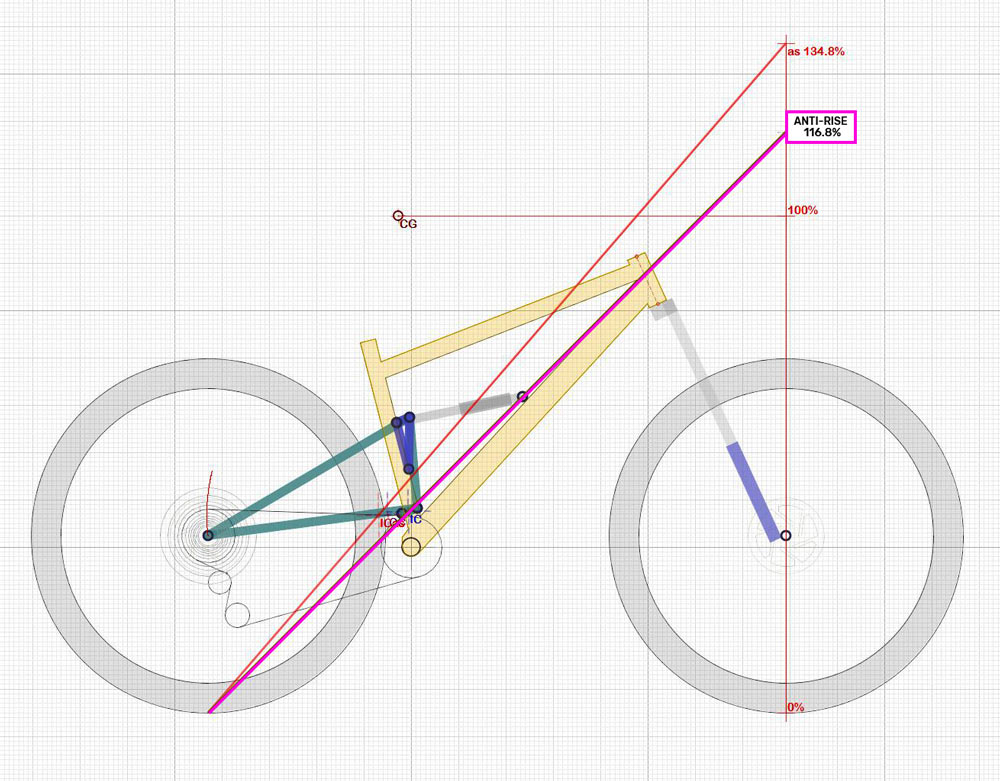
Drawings go a long way to help with this, so I put together a hypothetical bike using Linkage, a program used by a lot of designers for calculations. On a bicycle the vertical height of that “center of gravity” is very important. Check it out as the line labeled “CG” on the screen captures. The center of gravity or “CG” can be viewed as a horizontal line many bike nerds believe lives 600-800mm above your bottom bracket center. This is not a true fixed point (because people come in different shapes and sizes, and they move around). Really bitchin’ suspension systems like 3VO account for this.
To start working out anti-rise, first draw a horizontal line straight through that center of gravity point, then draw a vertical line straight up from your front axle. Next, we need to draw some lines through our pivots to find the “instant center,” or the point at which those lines intersect. Those are the bright purple lines shown in the close-up detail images (below), and the actual instant center is shown in bright green.
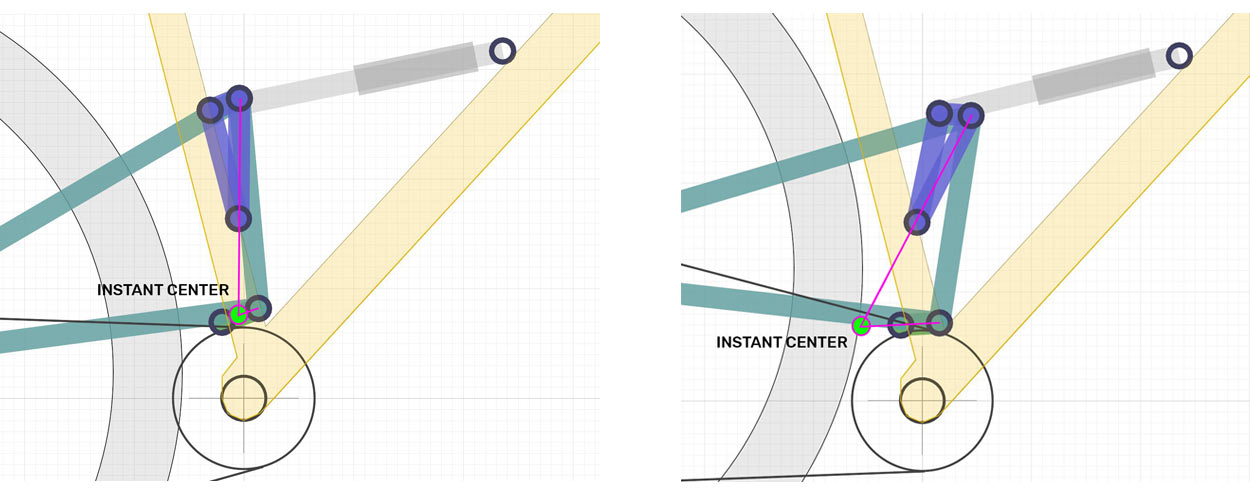
To find anti-rise, start at the point our rear tire contacts the ground and draw a line up through that “instant center” and keep on drawing. Where that angled line crosses the vertical line up from your front axle will be either above or below your center of gravity line. Dead center on that line would be 100% anti-rise. The hypothetical example bike shown has an anti-rise of 116.8% at full extension (no rider on it), and an anti-rise of 80.4% at full compression. For this example, the bike sits right around 100% anti-rise through most of it’s travel. Clear? Of course not. Back to some marketing? I designed my 3VO system to hover right around that 100% zone so it can ignore the rear brake–not dive and not rise–while still absorbing impacts the same way it does when the brake isn’t on.
PARRY: When the rider is braking the center of gravity shifts forward (inertial force) causing the fork to compress and the rear suspension to extend. This will happen even if the rider shifts his weight back on the bike. More than 100% anti-rise implies that, under rear braking only, the suspension will compress. Conversely, less than 100% anti-rise implies that, under rear braking only, the suspension will extend.
CLOWARD: When the brakes are applied on a bike, depending on the design of the suspension, it will pull up on the rear wheel and compress the rear suspension. The higher the anti-rise number the more the rear suspension will compress. 50% anti-rise is pretty low and braking will have a smaller effect on the suspension and the suspension will remain active. At 100% the suspension will compress under braking. At 150% the suspension will compress even more and can cause a lockout feel while braking over bumps.
BIKERUMOR: What’s the benefit of Anti-Rise to the rider?
BENOIT: The main goal of Anti-Rise is to keep an active suspension under braking.
KRUEGER: Well, we talk about it a bit differently today. We used to call it anti-rise as the braking forces wanted to extend the rear suspension. Then, as people began to understand it a bit more, and design ways to counteract, we started calling it “brake stiffening” a bit more in that the suspension wasnt so much extending any more, but stiffening up under braking. Basically, the difference between extension and stiffening wasnt much, really those are the same forces, just with stiffening being less of an impact on the frame than extension. Now, we generally talk about “brake isolation”, basically trying as much as possible to remove the forces of braking from have any effect whatsoever on the suspension. So, coming back full circle, “brake isolation” could also be described as 100% anti-rise mathematically.
I believe the term anti-rise is still used in the CAD program Linkage – which is probably why it is coming up here, but suspension engineers are not actually using Linkage, so that term is not really used a lot in kinematics discussions anymore. An interesting note here, while 100% anti-rise would mathematically make sense to isolate brake forces, that’s not actually what feels best in the real world. And what that number is, and what the curves look like is what a lot of companies try to protect and/or keep secret. A well designed bike in this area will feel “muted” under hard braking, and not really have any reaction to the application of the brakes, especially in regards to suspension performance.

BIKERUMOR: Is there a downside?
KRUEGER: In this case, not really. Again, in a perfect world, we would have 100% anti-rise (or perfect brake isolation) at every given point in the travel (or, the magic number that actually feels best to riders), but thats not truly possible. So, we look at how the bike is going to be used, and dial in those optimal points for the best traits. Again, like anti-squat, some of those specific traits, curves or points are protected and patented.
BENOIT: Suspension kinematics are a mix of many factors including Anti-Squat, Axle Path, Leverage Ratio, and Frame Design (Clearance, shock placement, geo, and frame stiffness). Tuning each of these aspects has an effect on the others. Therefore, we need to balance all these variable to reach our desired suspension performances. The split pivot platform allows us to reach the optimal tune since the brake is mounted on a link that is independent from wheel movement, thus separating the braking forces from the acceleration forces.
BIKERUMOR: How much Anti-Rise do you want?
CURRIE: Just the right amount. Seriously, this is kind of the secret sauce – especially since anti-rise is affected by rear axle position. It changes as your suspension compresses. Personally, I think it’s best to have that change be minimal, so behavior under braking is consistent throughout the full range of rear wheel travel. That’s what I did with 3VO.
BENOIT: Keep the Anti-Rise in a zone that prevents the suspension from stiffening under braking. It’s hard to give a specific value since anti-rise is measured along the travel and changes depending on the bike’s intended use.
KRUEGER: The real numbers and curves are secret – but in ride experience terms – you want enough to prevent suspension stiffening or extension under braking, but not so much as to create a lot of suspension compression under braking.
BIKERUMOR: How do you design Anti-Rise into a frame?
PARRY: Similar to anti-squat, anti-rise is determined by the position of the suspension pivots. As with anti-squat, anti-rise is just one of several variables that must be considered for a balance suspension design.
KRUEGER: This is where the real fun begins, when we talk about how to counter braking forces in a frame AND acceleration forces. There are a lot of people out there now who say with single chainrings, multi-link bikes are useless and we can all go single-pivot. The truth is that the theoretical points in space that we use for designing anti-squat and anti-rise are different. It is possible to make a single pivot behave extremely well for one of the two traits with proper pivot placement, but it is impossible to make it behave well for both traits, as that would require two seperate pivot placements, one for acceleration, one for braking. This is where mutli-link bikes come in.
Any multi-link bike can be designed to have a varying “instant center”, or the particular point in space the theoretical pivot is, at a given point in the travel. These instant centers are important to both anti-squat and anti-rise, and some multi-link designs are more “tuneable” than other designs. So, any suspension design that has the wheel mounted to a swingarm, with a link on either side of the swingarm attached to the frame uses the idea of the “instant center” These are designs such as FSR, DW-Link, Switch Infinity, Orion or VPP. Single pivot bikes don’t do this, as they have a “real center”, i.e., the pivot is the actual center, all the time. Any bike where the wheel is attached to a swingarm, and the other end of that swingarm is directly attached to the main frame is a single pivot, even if the execution appears like a multi-link. Those are what are typically referred to as “faux-bar”. In faux-bar or single pivot executions, you can typically dial in the behaviour for one of these two traits, but not both.
CURRIE: Very carefully and usually while other people are asleep.
The fun never ends. Stay tuned for a new post each week that explores one small suspension tech, tuning or product topic. Check out past posts here. Got a question you want answered? Email us. Want your brand or product featured? We can do that too.
