In a nutshell, TrainerRoad is an online cycling training software that works by pulling all of the data from the peripherals on your bike and body to adjust the workout to improve results. It also has the magical ability of making indoor trainer sessions less miserable thanks to the real-time feedback displayed on screen, helping you stay on target and actually get the desired work from your workout.
What sets TrainerRoad apart is that it syncs with your Bluetooth and ANT+ speed, cadence, power and heart rate sensors and uses their data to graph your effort overtop the prescribed training plan. And there are a ton of plans and individual workouts available, with more being added quite frequently…or you can create your own. Even more impressive is that if you have a “smart” trainer like the Wahoo KICKR, it’ll adjust the resistance automatically to keep your output synced with the workout.
But, the whole thing works just fine with a basic trainer, too. Looking for a new training partner this winter? TrainerRoad could be it…
Setup is easy enough. Download the app and sign up for the service ($10/month or $99/year), then fill in your basic biometrics (height, weight, gender, etc.).
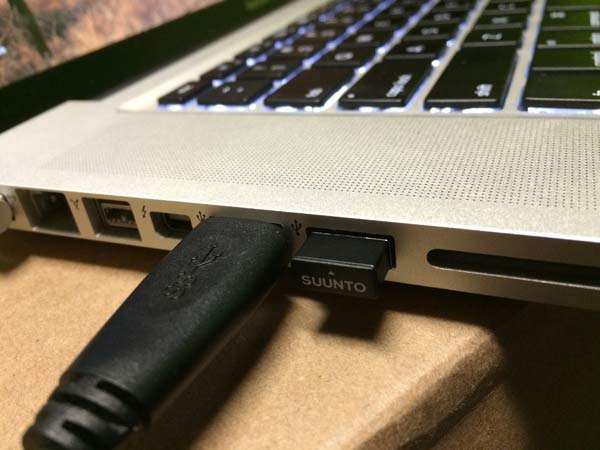
If you’re running a 2011 or newer MacBook Air or 2012 and newer MacBook Pro, it should have Bluetooth 4.0. You can check this under About This Mac. Once a device is paired, it’ll remember it for next time. Occasionally a software update to TR may require repairing, but it took me all of two seconds. For ANT+ peripherals, which is what most of their customers are using, you’ll need a USB dongle. The Suunto Movestick is recommended, but any should do.
For PC’s and Windows, ANT+ is the preferred system. With Windows 8, Bluetooth support is increasing, but if you need a BT4.0 dongle, they recommend specific USB dongles on their website.
They’ve also ported the entire thing to an iOS app, letting you take the entire desktop experience to an iPad or iPhone, which makes the whole system far more mobile. Think specific warmup workouts for pre-race.
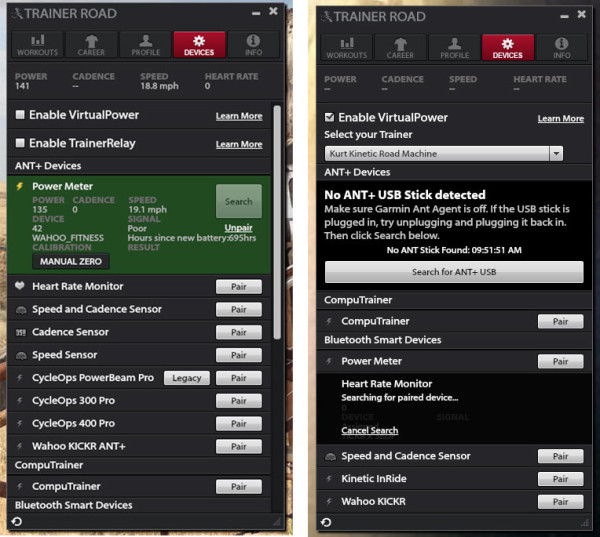
The pics above show the options for pairing both ANT+ and Bluetooth devices as well as selecting your standard trainer. Selecting your trainer enables Virtual Power, which uses profiles for most popular trainers combined with your speed sensor to know approximately how much power you’re putting out.
The Suunto Movestick Mini required no plugins or additional setup on my Macbook Pro – just plug and play.
The catch is that most ANT+ speed and cadence sensors have a very small range, so plan on putting your computer right next to your trainer. For me, this meant off to the side since I was mirroring the monitor to an Apple TV. Once my computer was close enough, it picked the Sigma ANT+ speed and cadence sensors (which are separate units for Sigma’s computer) after a few seconds of searching. When pairing by Bluetooth, it found my Wahoo KICKR trainer in a couple seconds from about 10 feet away. Regardless of which sensors and devices you’re pairing it with, you’ll need to get them moving so they start broadcasting a signal…which is as simple as starting to pedal the bike for a few seconds. I have not tried pairing to an iPhone or iPad yet.
Once everything is linked up, you’ll want to pick your workout. If you don’t already know your FTP (Functional Threshold Power), that would be a good place to start since TrainerRoad uses your FTP as a baseline for output recommendations within each workout.
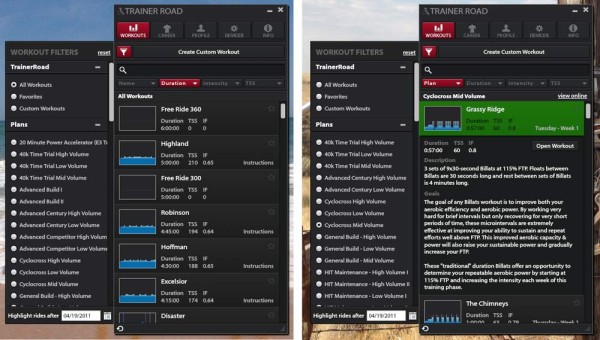
Select the “Workout” tab from the top and you’ll see all the options show up on the right. There are “Plans” that combine a series of workouts based on specific seasonal or event goals like cyclocross prep or hill climbs, or just pick any of the workouts on their own. You can sort by name, intensity and duration, and some of them get pretty long and pretty hard.
I did find one quirk when searching for Sufferfest videos. Under the Sufferfest category, not all videos were appearing, but just searching the name “sufferfest” found them all. So, try doing a search to speed up specific requests.
Once a workout is selected (See “Grassy Ridge” on the right image), an output profile and description appears, with most describing what sort of skill (power, endurance, speed, etc.) the workout is aimed at improving.
Once you hit start, it’ll stay paused until it detects movement from the sensors, and it’ll even auto-pause if the sensors stop moving, which is a pretty handy feature set if, say, UPS comes to the door or nature calls.
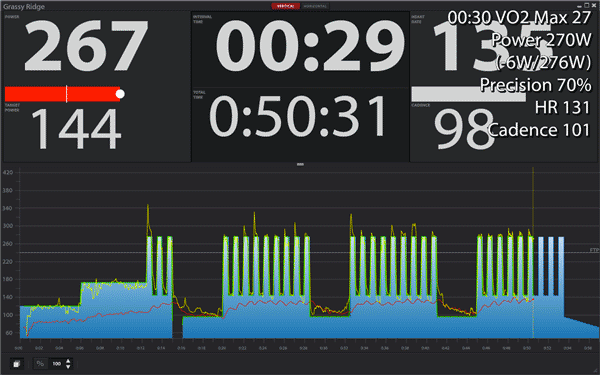
During the workout, you’ll see progress moving along the map in three lines: Green is time elapsed, Yellow is your actual power output and Red is your heart rate. The pic at the very top of the post shows the normal flow, and your goal is to keep the yellow line as close as possible to the blue outline. The top pic also shows the mini report you get after each interval session, showing how accurately you followed the interval, your power output during the interval and more.
Audio cues help alert you to changes in the workout so you remember to look at the screen.
The two images directly above show what happens when you adjust the intensity mid-workout. Default is 100%, which is based on your FTP. On the left, I brought the intensity down to 78% and the blue lines dropped accordingly. Notice that the green lines remained where they were since they’re marking actual output. On the right I bumped it to 139% and the blue lines jumped accordingly.
That adjustability is good when you’re feeling up or down on a given day, but ultimately you want to have your FTP pretty much in line with reality if you want to get faster. They recommend retesting FTP every four to six weeks.
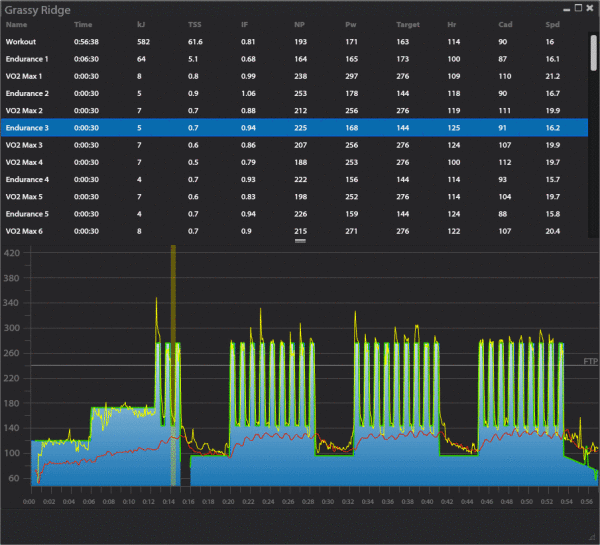
Once you finish the workout, it’ll send the complete data to their cloud and you’ll get a graph like this on their website. Click on a specific interval at the top (“Endurance 3” highlighted here) and it’ll highlight that section on the graph, too.
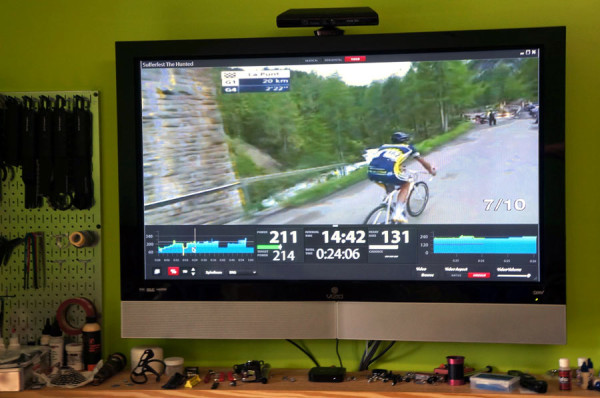
Another great feature is the ability to overlay workout videos. I used Sufferfest, and there are power profiles matched exactly to each of their videos, so you know what you’re supposed to do and when. Shown above, the TrainerRoad dashboard docks to the bottom of the screen and puts the video up top, so you have all the same information. Setting this up is beyond easy…just drag the video file onto the workout window and select the option to expand to fill the screen.
Besides Sufferfest, they have power profiles for Graeme Street’s Cyclo-Core, 3LC, Endurance Films, Spinervals, Ride Fit, Real Rides and Epic Rides. You need to buy the videos, but then you can just drag the video into the workout window and it syncs them automatically. I did have the video fail to show up one time, but simply restarting my computer fixed the issue and haven’t had any problems since. It’s worth noting that Sufferfest’s streaming subscription option won’t work with this, you need to own the video file on your computer.
If I’m getting on the trainer, I’m pretty much always putting a Sufferfest video on the big screen to make it bearable. But, with TrainerRoad, I’ve found that just having an organized workout with something prompting me visually to put in the effort and rewarding my dopamine system with little accuracy counts and squiggly lines has added new enjoyment to it…even without Sufferfest running on the background. For anyone spending more than a day a week on the trainer, I’d recommend it if only to minimize the boredom, but also because the training plans seem very well thought out and the hard numbers quantify your improvements as race season approaches.
WHAT’S INCLUDED & HOW IT STARTED
It’s a subscription service with automatic recurring billing. If your sub expires, it’ll just log you out until you sign back up. Other than the third party videos, it’s an all-inclusive system – all of their training plans are included with the subscription.
For stock workouts, they are continually developing new workout plans for everything from road races to Ironman triathlons. They’re developed in house by Chad Timmerman, an Elite Level USAC coach.
The company was started by software engineer Nate Pearson who was taking classes from Timmerman in college. But at $20 per class on a student budget, Pearson started thinking he could build something himself.
He partnered with Reid Weber, a triathlete, to build TrainerRoad. Once the system was created, they approached Timmerman to develop plans for it. It launched publicly almost three years ago, and now they have seven full time employees and four part timers. Most of them have been working on building the product’s capabilities and supporting their customers, and they’re proud of their customer service record.
TECHNICAL NOTES
For the more geek inclined, here are some specific setup notes I discussed with them:
Power Smoothing – smooths the data output, helping keep your power readouts less spiky. They recommend 3 seconds.
KICKR setup – do a spin down calibration. Leave it in ERG mode, which is a drop down option in the pairing window. Once you’re in a workout, it’ll change the Kickr’s setting if it needs to be (like on the power tests). For most of the workouts, it’s dictating the power resistance of the trainer based on your FTP, so you don’t want mess with it.
Other Options include the Kinetic InRide, which uses an optical sensor to determine the speed of the roller on their trainer and figures out power output then sends that info via Bluetooth to the computer (UPDATE: As of Jan 29, 2015, they’re reporting compatibility issues with InRide and Yosemite OS on Macs). They also can integrate with the Computrainer via USB, assuming you can daisy chain the necessary wires together to get a USB output.
Support.TrainerRoad.com has tutorials on set up for all the different trainers and other things that might stump you. Videos are coming soon, too.
