At the launch, the Eagle AXS electronic wireless shifting parts were still officially unofficial pre-production samples, so the weights weren’t accurate enough to share. Now that we have our own sets of both the Eagle AXS XX1 and X01 groups in, we threw them on the scale before mounting everything for our first rides on home trails. Following are the actual weights, then installation notes for anyone upgrading on a DIY scheme…
What’s in the box?

Presentation is everything, so they say, and more so when you’re dropping up to $2,000 for a complete group, or $1,000 for the electronic bits. SRAM doesn’t disappoint, providing everything you need to install it (except a chain breaker) inside the box for a complete drivetrain. And it’s a nice box, with all the parts organized and kept safe. Plus, they continue to create great installation and service videos to walk you through the installation. Here’s what it looks like layer by layer:
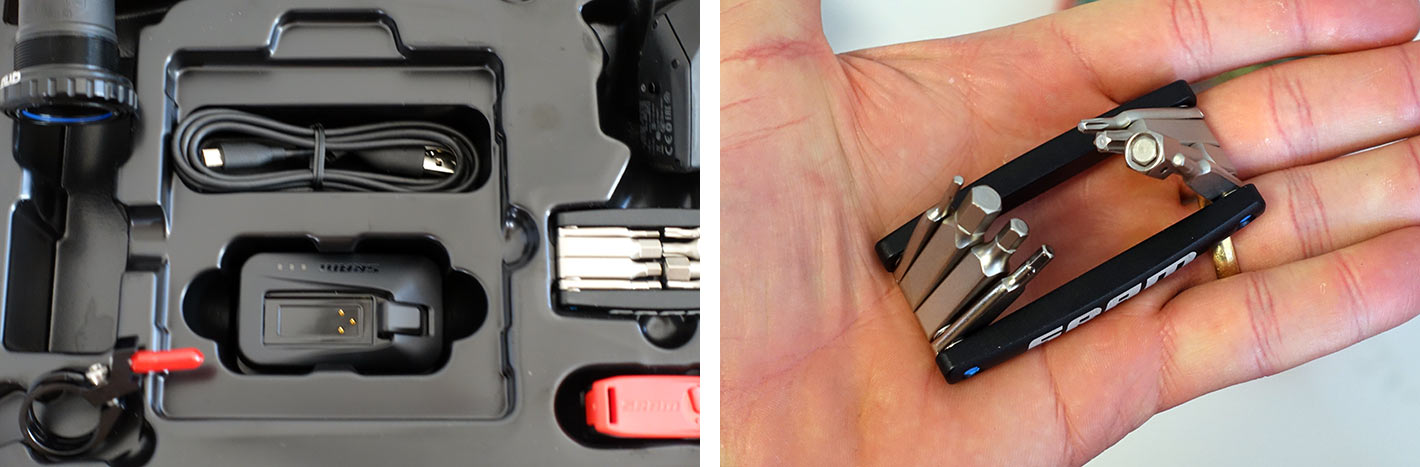
The charger and USB cable are hidden under the chain. The included mini tool is a great size, and it’s become my travel tool for it’s compact size while still including all the things I need for basic on-bike repairs.
SRAM Eagle AXS XX1 actual weights

Weights for the parts are:
- 175mm XX1 crankarms with chainring installation bolts: 363g
- Crankarm boots: 12g
- 34t Eagle direct mount chainring: 63g
- Combined total: 438g
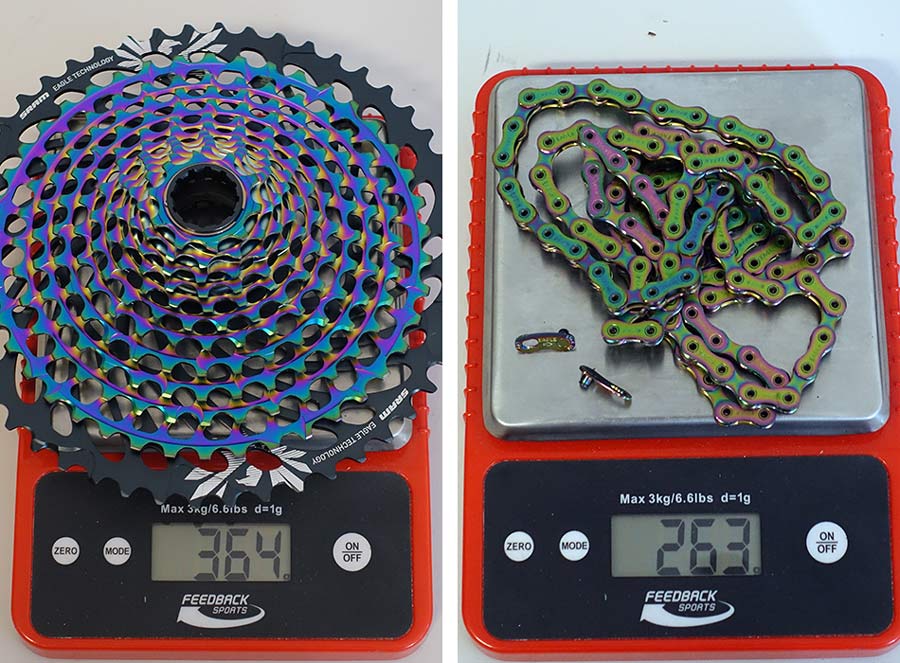
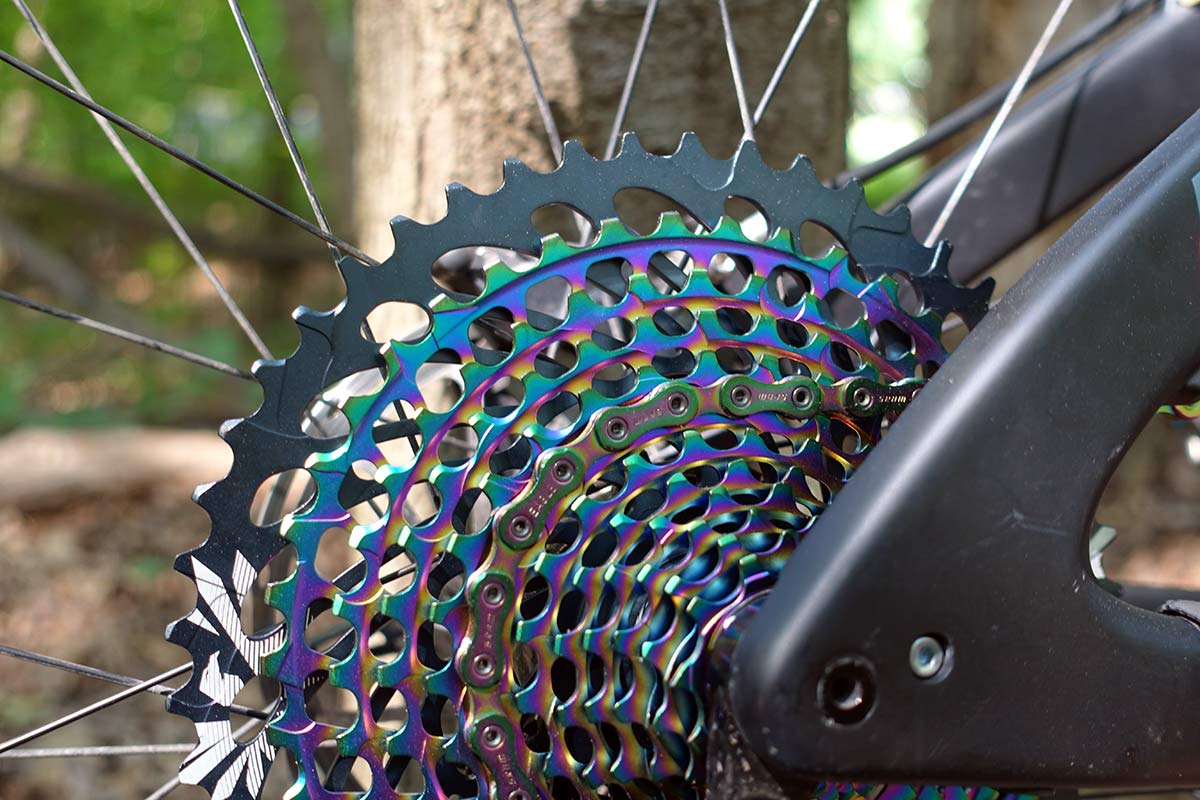
- Eagle 10-50 cassette: 364g
- Chain with quicklinks, full length: 263g
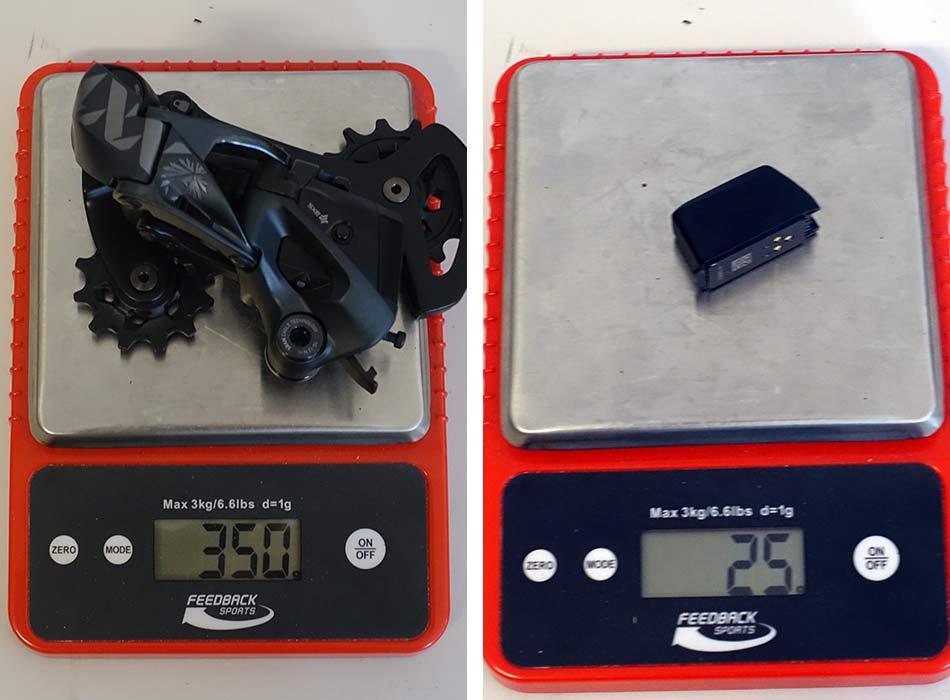
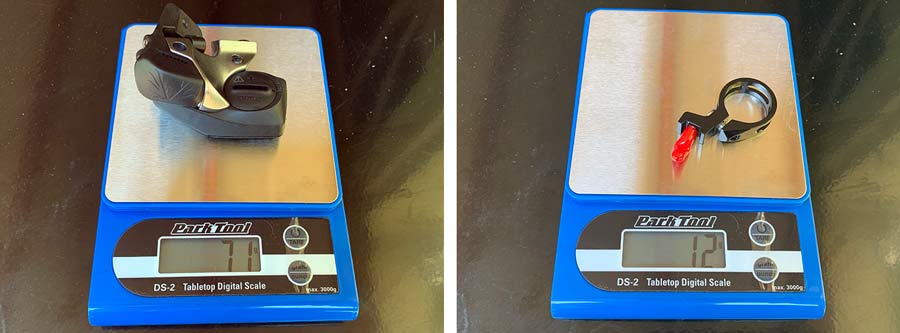
- Rear derailleur (w/o battery): 350g
- eTap/AXS battery: 25g
- Combined total: 375g (battery is the same across all SRAM AXS/eTap parts)
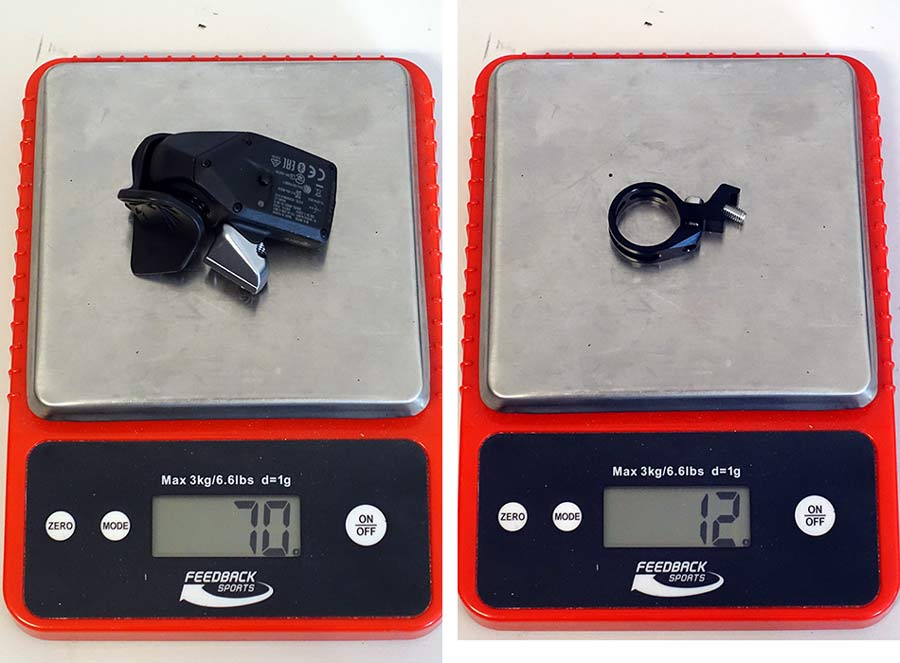
- Shifter pod with coin cell battery installed: 70g
- Standalone mount: 12g
NOTE: The kit comes with this shifter mount, but we used the Matchmaker mounts to combine with the G2 brakes, more on that in the install notes below. But if you’re pairing this shifter with another brand brakeset, you’ll need to use this or a third-party adapter mount to combine everything into a single mount.
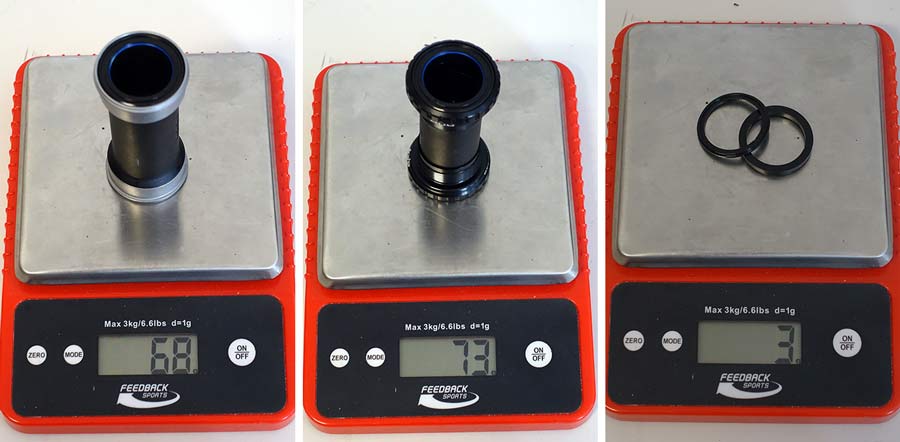
- Pressfit30 DUB bottom bracket: 68g
- BSA Threaded DUB bottom bracket: 73g
- Crankarm spindle spacers: 3g
NOTE: All SRAM mountain bike cranks now use their DUB bottom bracket spindle standard, so you’ll need a DUB bottom bracket to use them.
SRAM Eagle AXS X01 actual weights
We’re testing the X01 group long term, but a friend purchased the X01 group for their own bike and weighed all the parts for us. We’re showing off the items that are different.
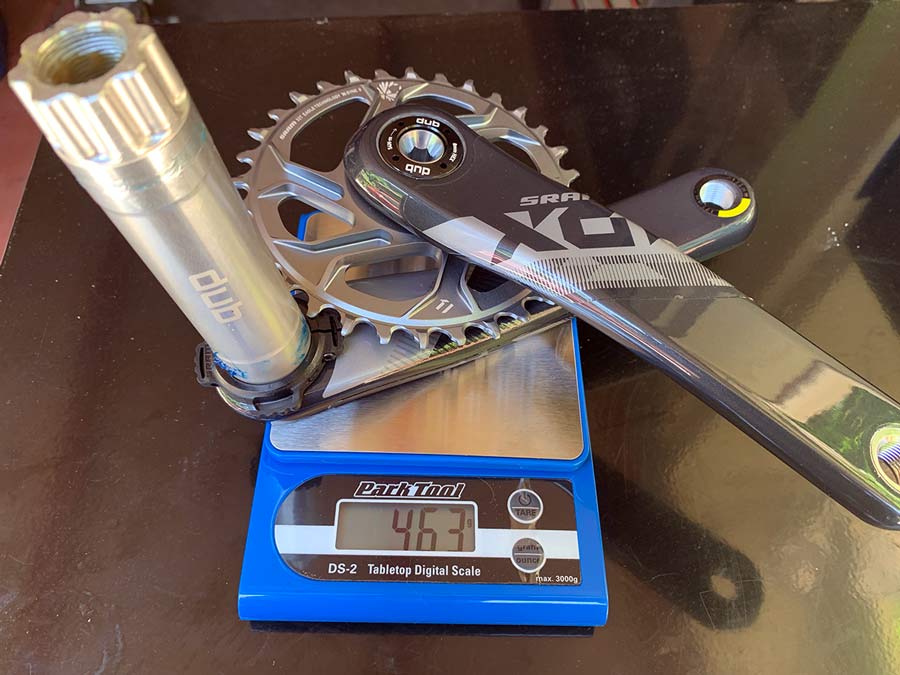
- 175mm crankarms with 32t chainring: 463g (+25g*)
NOTE: The key difference between the XX1 and X01 arms are that X01 has a hard foam inside to add more durability since they’re aimed at all users, and XX1 is hollow and lighter for XC racers. The other difference here is we’re weighing X01 with a smaller 32t chainring, so the actual weight difference between them would be slightly greater than 25g if they both had the same size chainring.
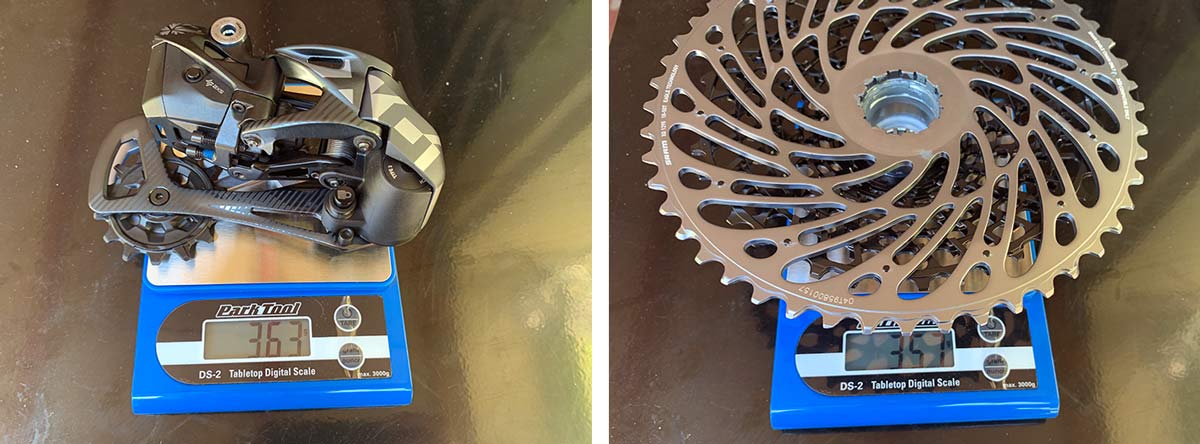
- Rear derailleur (w/o the 25g battery): 363g (+13g)
- 10-51 cassette: 357g (-7g)
NOTE: The cassette comes with some grease in it, which could account for some of the variance, as could that rainbow finish. Or just manufacturing tolerances maybe. But, the cassettes are effectively the same other than finish.
- Shifter pod with coin cell battery installed: 71g (+1g)
- Mounting clamp: 12g (–)
NOTE: The shifters are essentially the same, too, as is the included clamp, so any weight difference is from a difference in the scale or acceptable margins of error here.
Reverb AXS actual weights

Sold separately, SRAM is hoping you’ll want the full wireless experience and go for the Reverb AXS, too. Its presentation is also nice, and gets you a second charger if you have the drivetrain, too.
We had the chance to weigh two different sizes, but are only testing one. Both are weighed without the battery, so we added that number in parentheses.
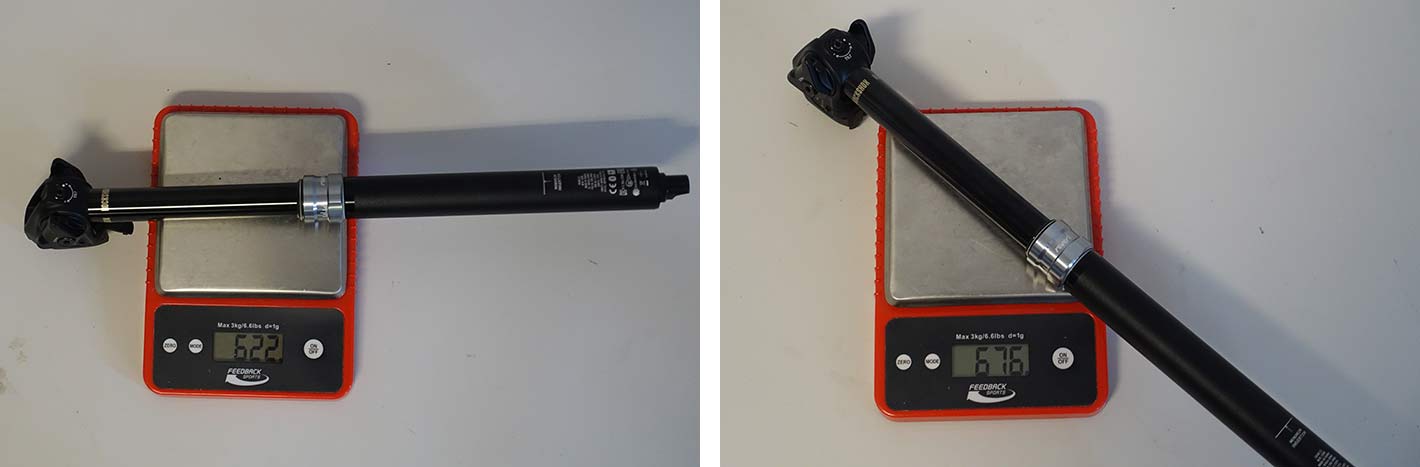
- 30.9 with 150mm travel: 622g (647g w/ battery)
- 31.6 with 170mm travel: 676g (701g w/ battery)
They recently upgraded their non-wireless Reverb with the same user-serviceable Vent Valve tech and improved shaft size and friction-reducing oil and seals. Check out that story here, and our hands-on video and actual weights here.
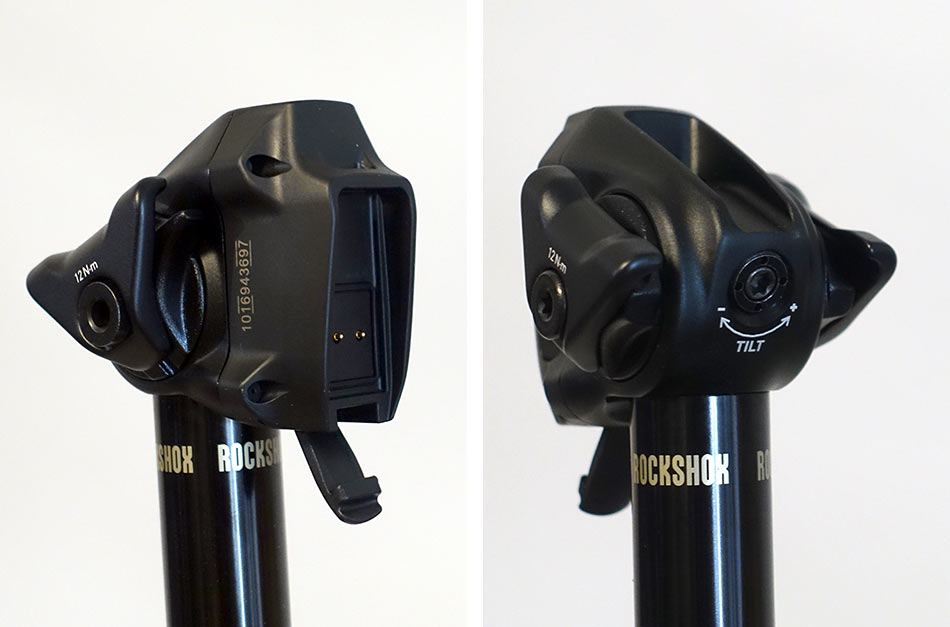
Couple more quick notes on Reverb AXS: The new clamp head’s two-step adjustment makes saddle position super easy to set. Clamp it about 70% tight in the fore/aft position you want on the rails, then set the angle with the front bolt, then tighten the side bolts completely to lock it all in. Easy, and it keeps one adjustment from changing the other. So far, it’s been rock solid.
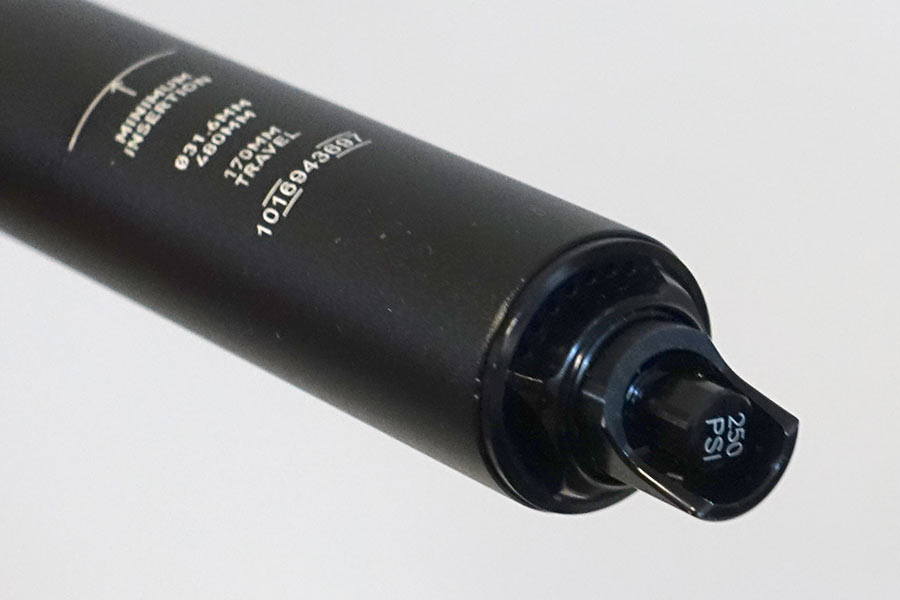
The air pressure adjustment, which you really shouldn’t need to mess with, is at the bottom of the post. This is where you use the included Vent Valve tool to reset it if your post ever develops any squish. Check the launch coverage for the full tech explanation of this feature.
SRAM Eagle AXS installation notes
Having installed every Eagle group before (NX, GX, X01 and XX1…complete comparison here), there was nothing particularly tricky about this install, but I watched their video just to run through the entire experience and actually ended up with an interesting result.
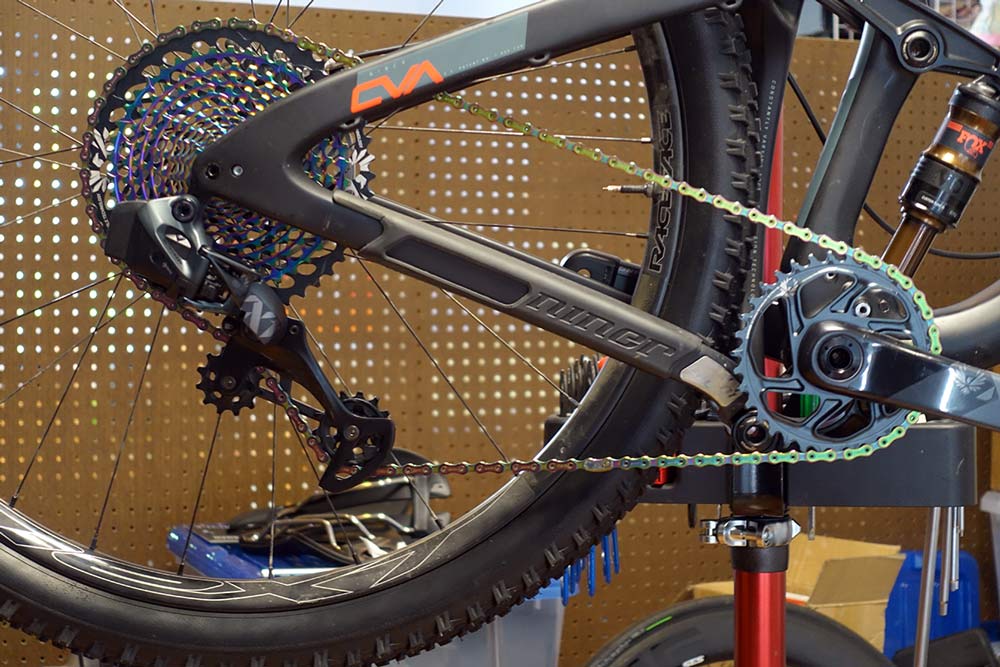
Normally, the Eagle chain length measurement is straight forward, just overlap two links when wrapped around the chainring and the 50t cog. Their video recommends compressing your suspension to the point where chain growth would be longest, which is something I’ve never actually done. Until this install, and this is what I ended up with. More accurately, what I ended up with was having to take another couple links and a second quick link and add those to get enough length.
My recommendation would be to start with four links overlapping, install it, then check at both extremes of the cassette and see if that works. You want a little bit of tension left in the system when you’re in the 10t cog, and you want to be able to easily get into the 50t without stretching the whole thing out like in the photo above.
If you’re swapping out an existing crankset, check where any BB spacers are and replicate that. Depending on your bike, sometimes those spacers might be between the BB and the frame, but most bikes nowadays are putting them on the spindle between the BB and crank arm. Whatever your setup, match that.
If you’re starting fresh, get the BB installed, then place the cranks in them, tighten them down, and see if there’s play. And see if you have an approximately equal gap between the arms and chainstays on each side. If you’re working with multiple small spacers, you can dial in the chainline later, the goal now is to eliminate any play.
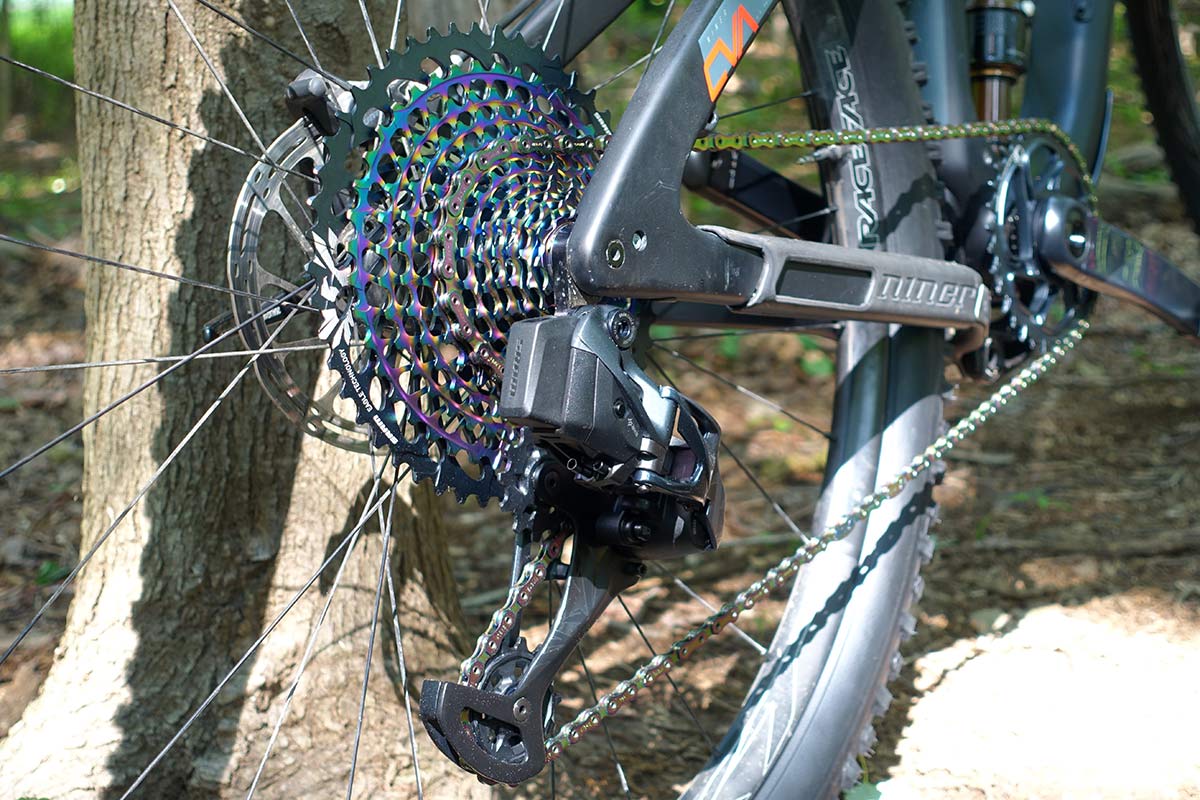
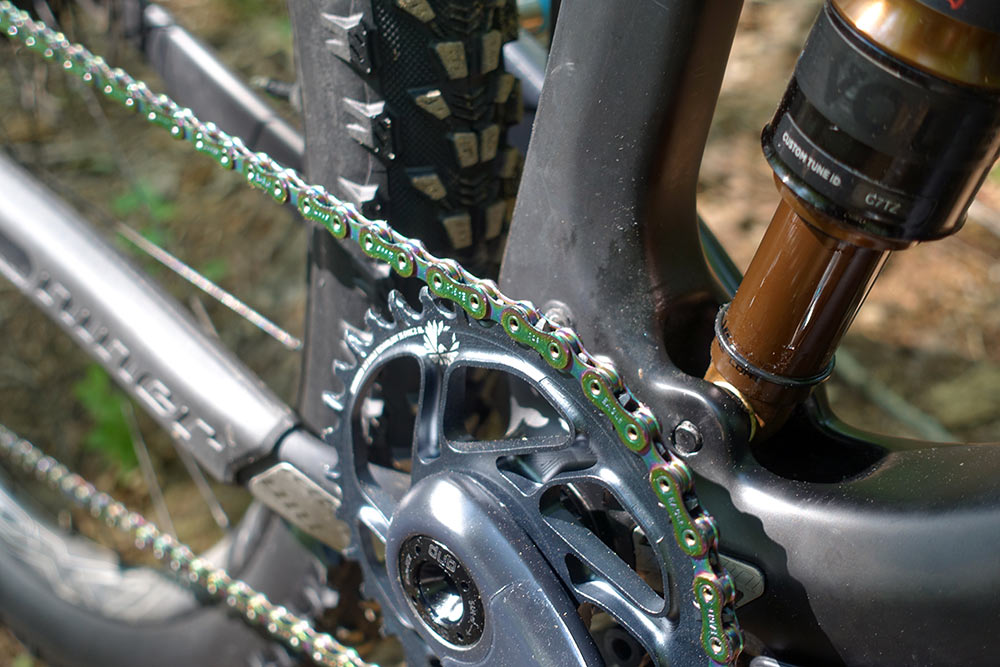
Speaking of chainline, here’s what it looks like on a Niner JET9 RDO (2017). Visually, it appears to line up further outboard than center-of-cassette. Generally, many riders spend more time in the top (bigger part) of the the cassette and you want the chain closer to that, but I haven’t had any problems…once the rear derailleur was set into position correctly.
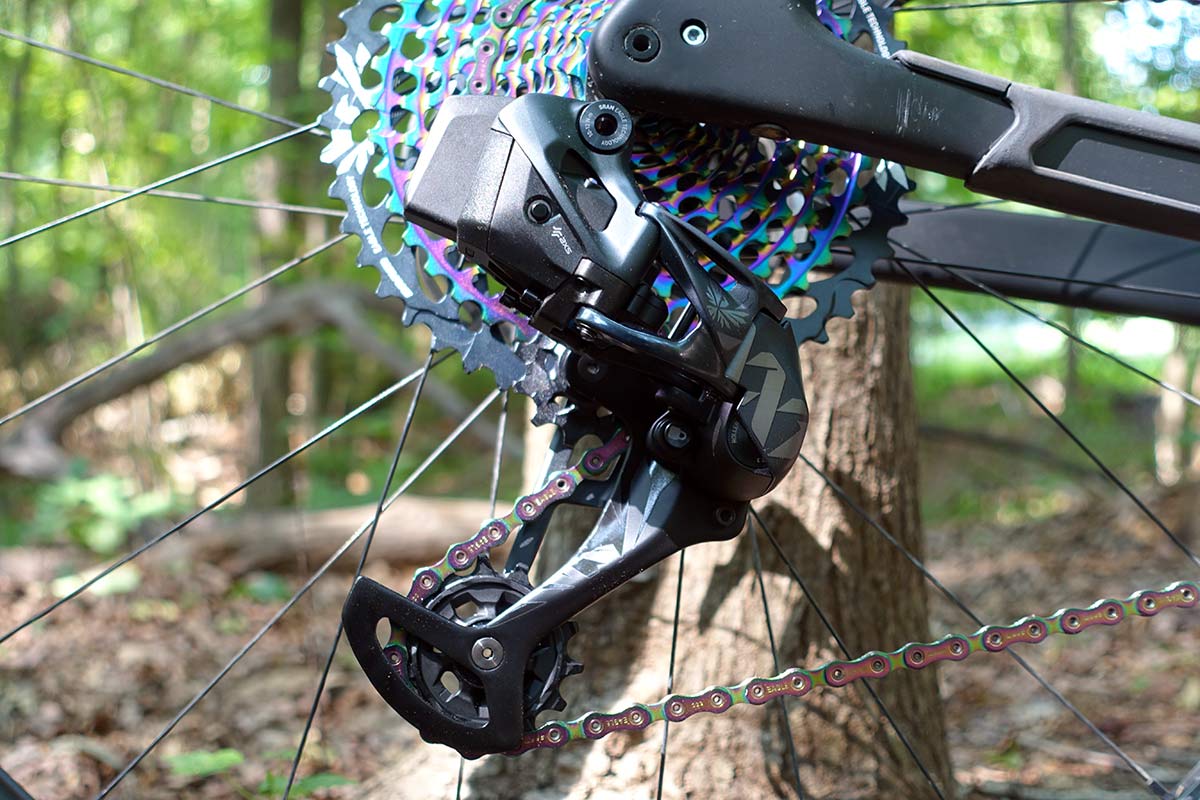
SRAM’s set up video suggests shifting the derailleur to the smallest and largest cog, then turning the limit screws in just shy of making contact. Which is correct, but there’s a) room for a little bit of judgement call, and b) if you change wheels, those limits can change. Which seems obvious, but there’s a third step, and that’s shifting into an intermediate gear and using the adjustment button on the shifter to fine tune the position. The derailleur then uses those three parameters (end limits on either end, plus your fine-tune setting) to claims its position in space. Once it knows where it is on one of them, it sets everything else based on that.
So, if you change wheels and only fine tune the position in the middle of the cassette, then as soon as you shift to one end (particularly the 10t cog end), if the limit screw is farther out than it needs to be, the derailleur resets to that position, and thus gets offline for the rest of the gears. Which is what happened to me, and it was really frustrating. Because the lower (10t) limit screw wasn’t so far out that the chain could drop, but it was far enough out to reset the position, which resulted in mediocre shifting and constant chain rub when in the 11th cog, rubbing on the 12th (50t) cog. So, get those limit screws tight, as that seemed to solve all of the problems and get the shifting back to the crisp, quiet performance I’ve come to expect from Eagle.
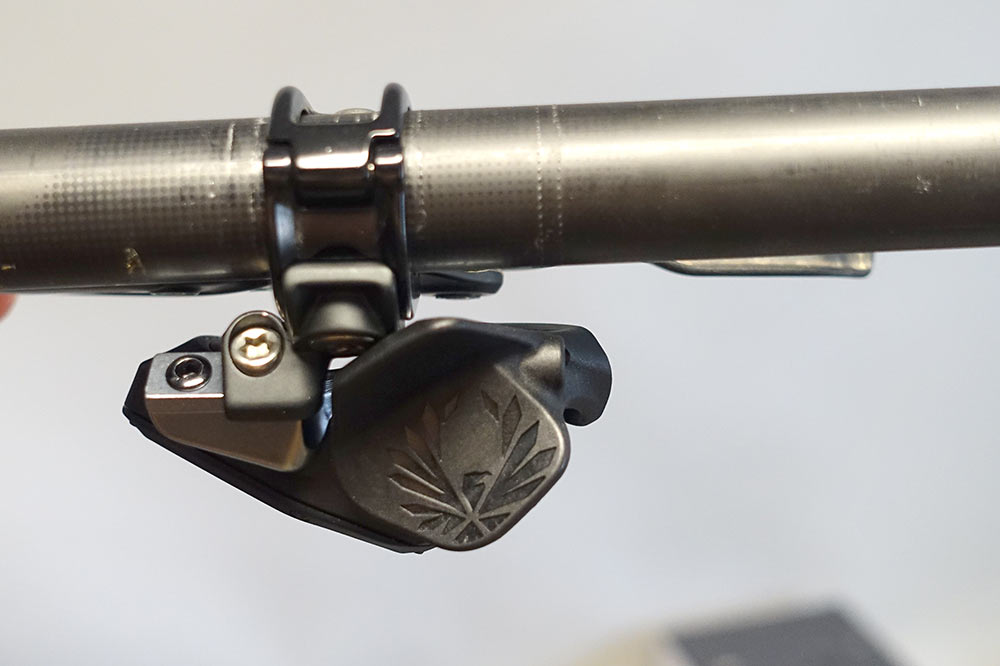
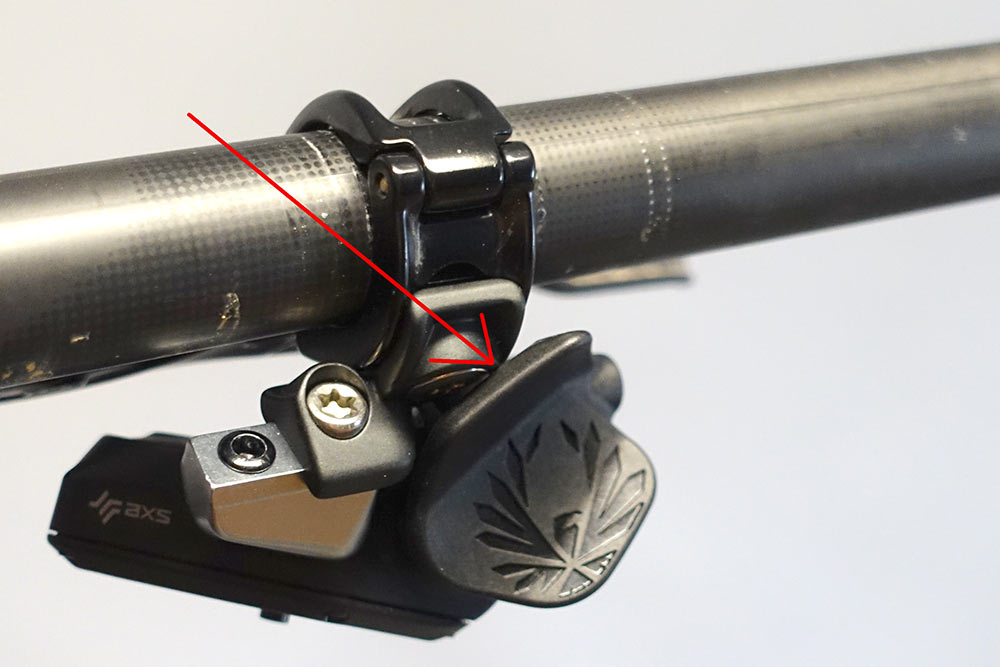
These two pics show the shift lever pod mounted on their Matchmaker mount, paired with the new G2 brakes. The pods get the same two bolt holes as their mechanical shifters, and if you have any old front derailleur (AKA “left side”) Matchmaker mounts laying around, you’ll have the option of using the left- or right-sided inserts to get your desired shifter position…with one exception. The combo shown above puts the main paddle in contact with the mounting bolt in the inward-most position. So, if you really, really need your shifter far inboard, you’ll want to use the included standalone mount.
Here’s where I ended up, which keeps the shifter paddles from intersecting with my thumb space, helping keep the kids from fighting in the backseat.

Both the standalone mount and Matchmaker mounts allow some independent rotational adjustment between the shifter and the brake lever, but you’ll get more range with the standalone mount. I’m still tweaking the rotational position to find the best spot for me.

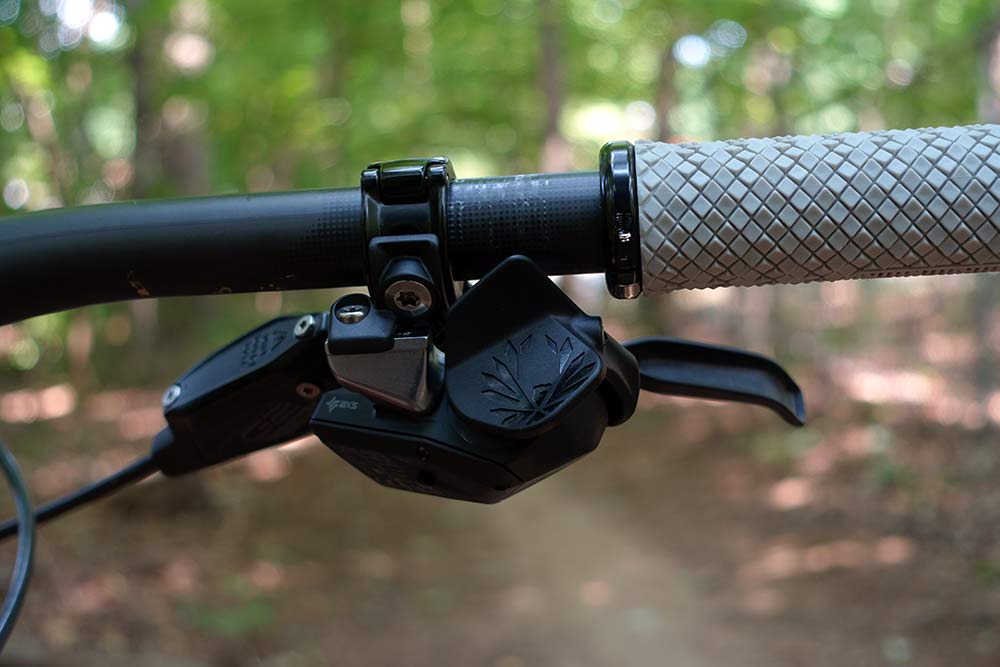
Of course, if you use the Matchmaker mount, this is what you end up with…an ultra clean install!
For the full tech story on all of these components, read our launch coverage and check the links at the bottom of that post for more info.
How to set up the Eagle AXS app
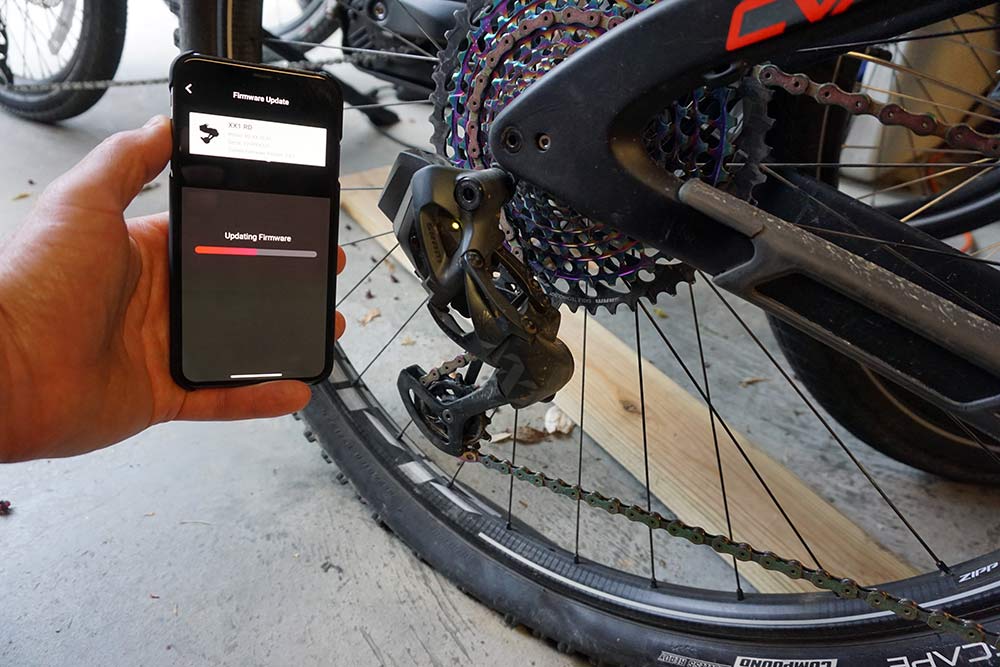
Part of the story is the AXS app, too, but the most important thing to know is this: You don’t need the app to use the group. You can unbox the parts, install them, and set everything up directly on the bike. The AXS app is like icing on the cake that lets you customize a few features. We outlined exactly how it works and what it can do, with video, in this post.
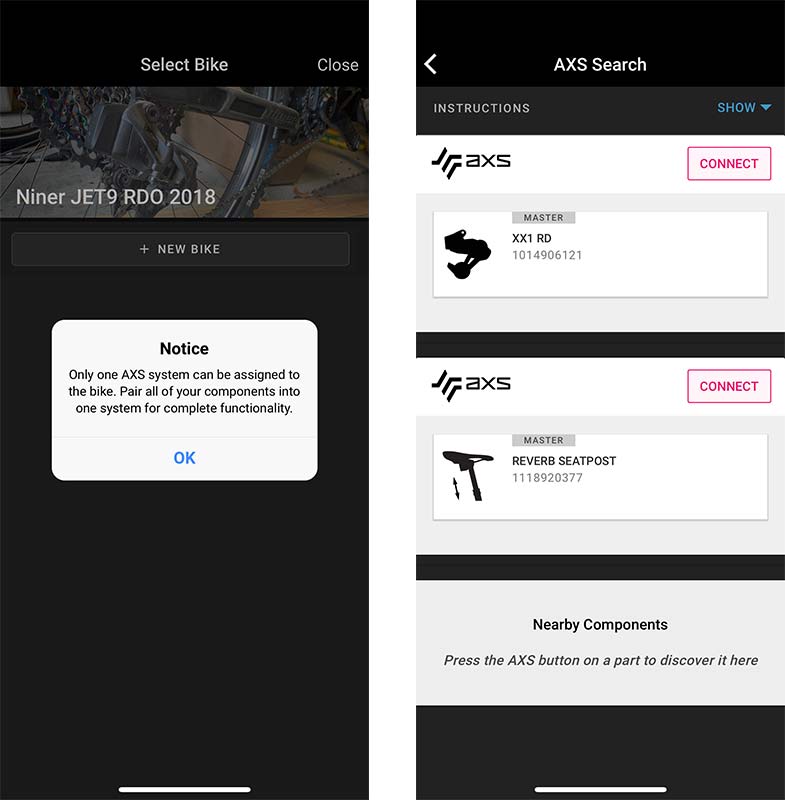
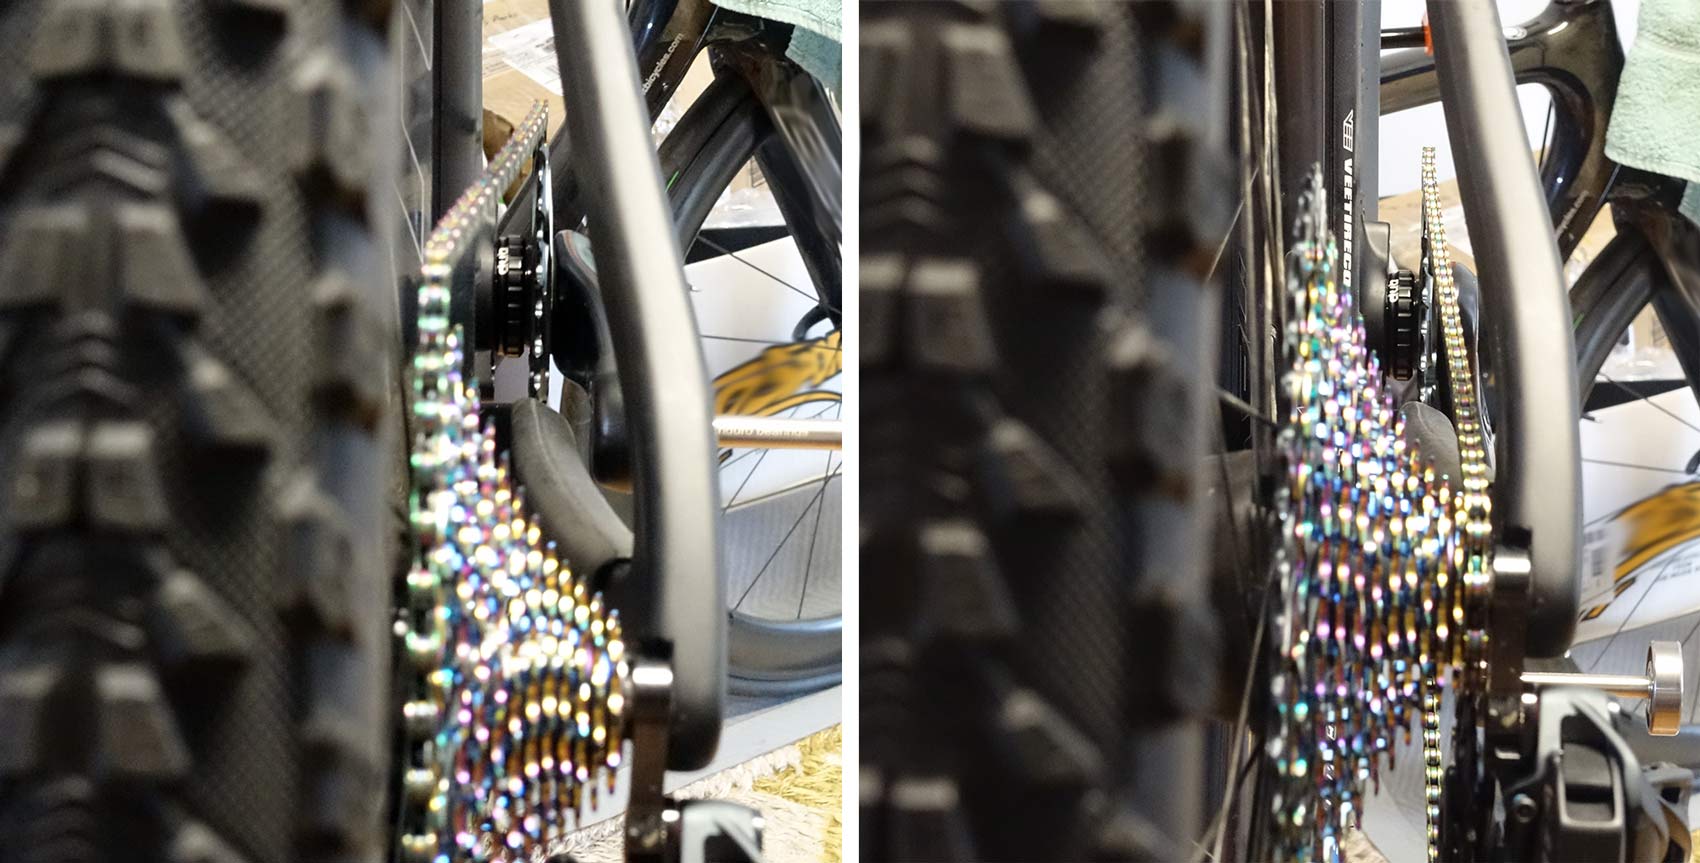
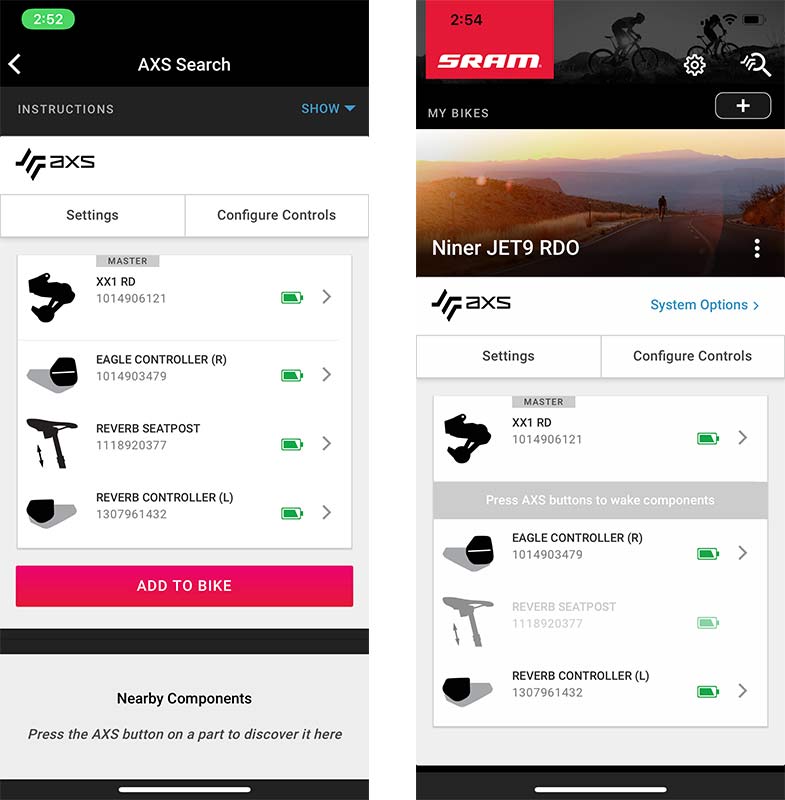
(This section UPDATED July 23, 2019) At the launch event, SRAM helped us pair everything to a beta version of the app. Once we received our long term test group, I paired it in stages. The drivetrain came in first, so I paired that, then the Reverb, and then I paired that as its own device…keep reading, there’s a difference, and it’s important. Pairing each component and its shifter as a distinct part will create problems (photo above, left) with matching all of them to one bike inside the app. If each is paired to the app on its own, each will show as a “Master” component (photo above, right). And you can only have one “Master” per bike. But getting everything grouped under one “Master” component isn’t immediately obvious, so here’s how you do it:
Whether you’re setting your components up for the first time, or adding a second AXS component to an existing AXS-equipped bike, this method is how you pair multiple components under one “Master” so they’ll all show up under a single bike:
- First, hold down the AXS button on whichever component you want to be the “Master”. For my bike, I chose the rear derailleur.
- Once that component’s light is blinking slowly, press and hold the AXS button on its shifter until the light on the derailleur blinks quickly, then release.
- Do NOT press the AXS button on the rear derailleur yet, it needs to stay “open” to communicating with other components. You have about 30 seconds before it times out and closes this pairing session.
- Press and hold the AXS button on the Reverb until the the light on the derailleur blinks quickly, then release.
- Press and hold the AXS button on the Reverb’s remote until the the light on the derailleur blinks quickly, then release.
- Now you have all four components paired under the “Master” rear derailleur.
- Press the rear derailleur’s AXS button to “close” the pairing session.
- Open the AXS app and turn Bluetooth on and you should see all of the components grouped together with your rear derailleur shown as the “Master” (photo above, left).
- Click “Add To Bike” and create a new bike or select one you’ve already created. All of those components will now be paired to this bike.
Setting it up properly with only one “Master” is the only way to get multiple AXS components together on a single bike. And, it’s how you open up all of the customization options for button function and layout. SRAM says they’re updating the firmware a few times per month, so it’s worth occasionally popping open the app and checking for updates.